How to Add Appointment Booking In WordPress Website (3 Easy Steps)
Do you want to add an appointment booking to the WordPress website?
Many businesses need appointment booking form that allows their users to easily book an appointment online. You can do that with a contact form, but why not use an appointment form that comes with an automated setup system and saves your precious time?
Here, in this tutorial, we will show you an easy way using which you can add an appointment booking in WordPress. We have used the “Easy Appointment” plugin and have also listed the top 3 WordPress appointment booking plugins.
Key Takeaways:
- Steps to add an appointment booking to WordPress:
- Install and activate the ‘‘Easy Appointments” plugin.
- Configure the form using various tabs.
- Use a shortcode to embed the form in your WordPress website or webpage.
- Three different WordPress appointment booking plugins:
- Easy Appointments: easy to use and clutter-free interface with various customization options.
- Sugar Calendar: Integration with WPForms and Ninja Forms to create more appealing appointment forms.
- Booking Calendar: A plugin that is easy to use and powerful but doesn’t have much customization.
Steps to Add an Appointment Booking to WordPress
Step 1: Install and Activate the Plugin
To add appointment booking in WordPress, here, in this tutorial, we use the “Easy Appointments” plugin. There are two different methods to install and activate the plugin:
Method 1: From WordPress.org
Go to the official WordPress website and then navigate to the “Plugins” option. In the search field, search for the “Easy Appointments” plugin and hit the “Download” button to download it.
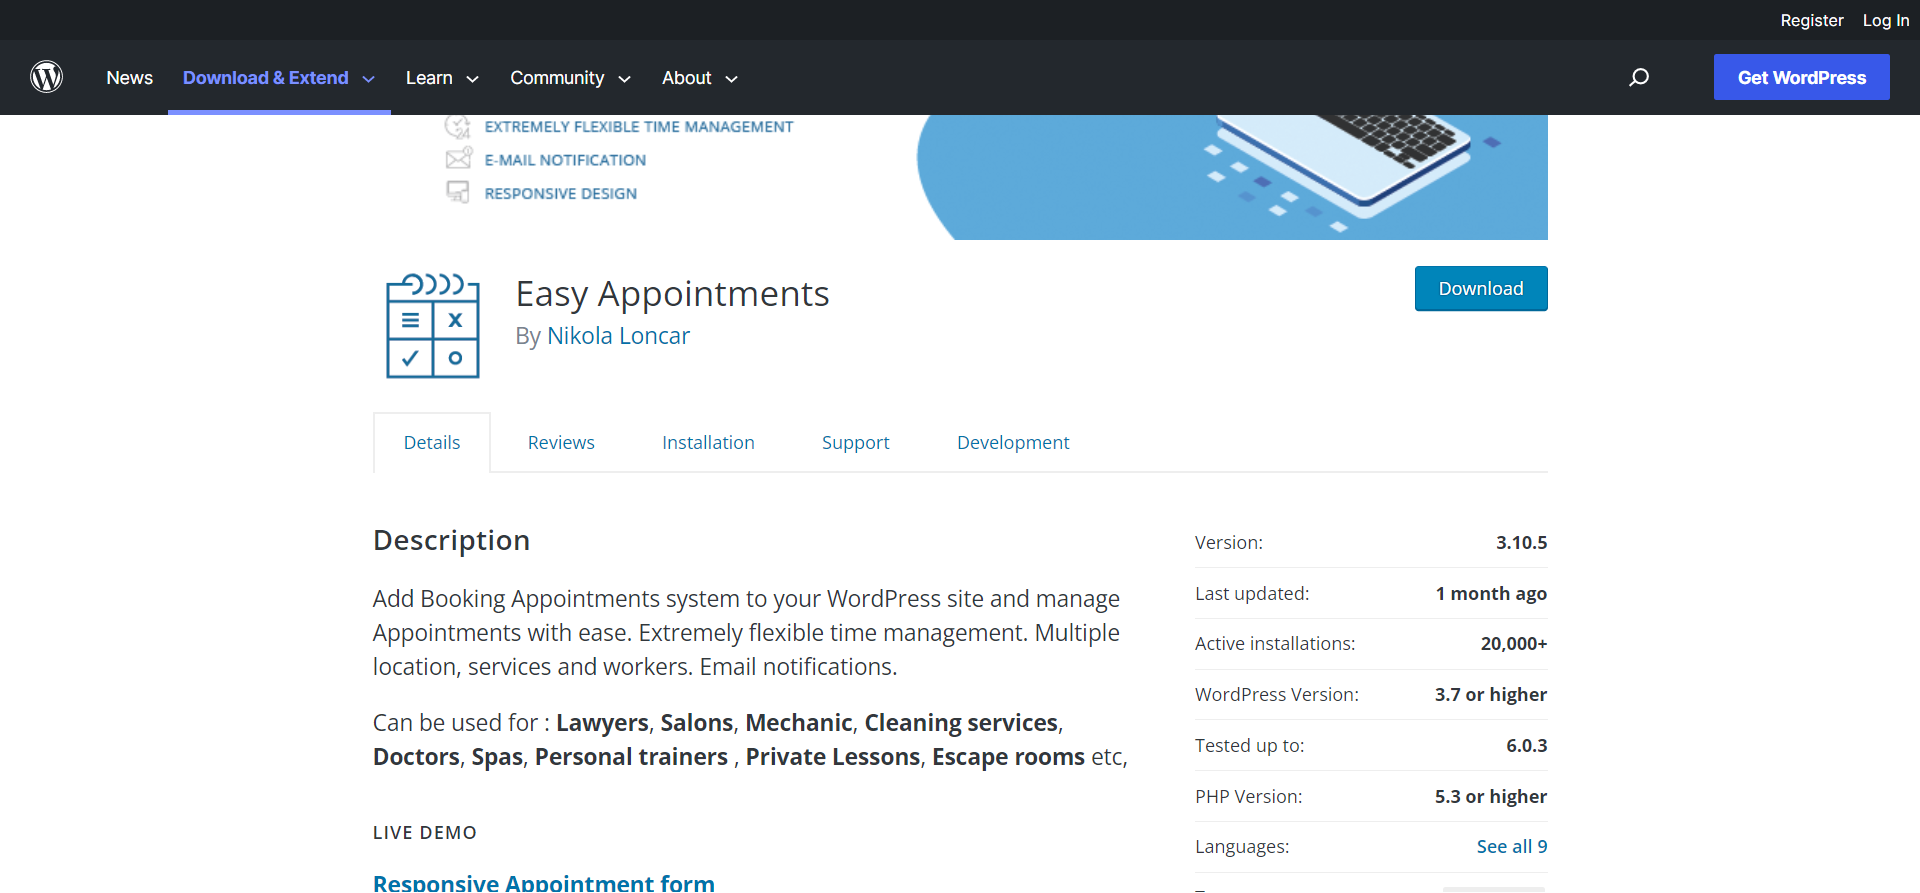
The plugin will be downloaded in .zip format. Go to the WordPress admin dashboard and upload the file in the “Plugins” option.
Method 2: From WordPress plugins
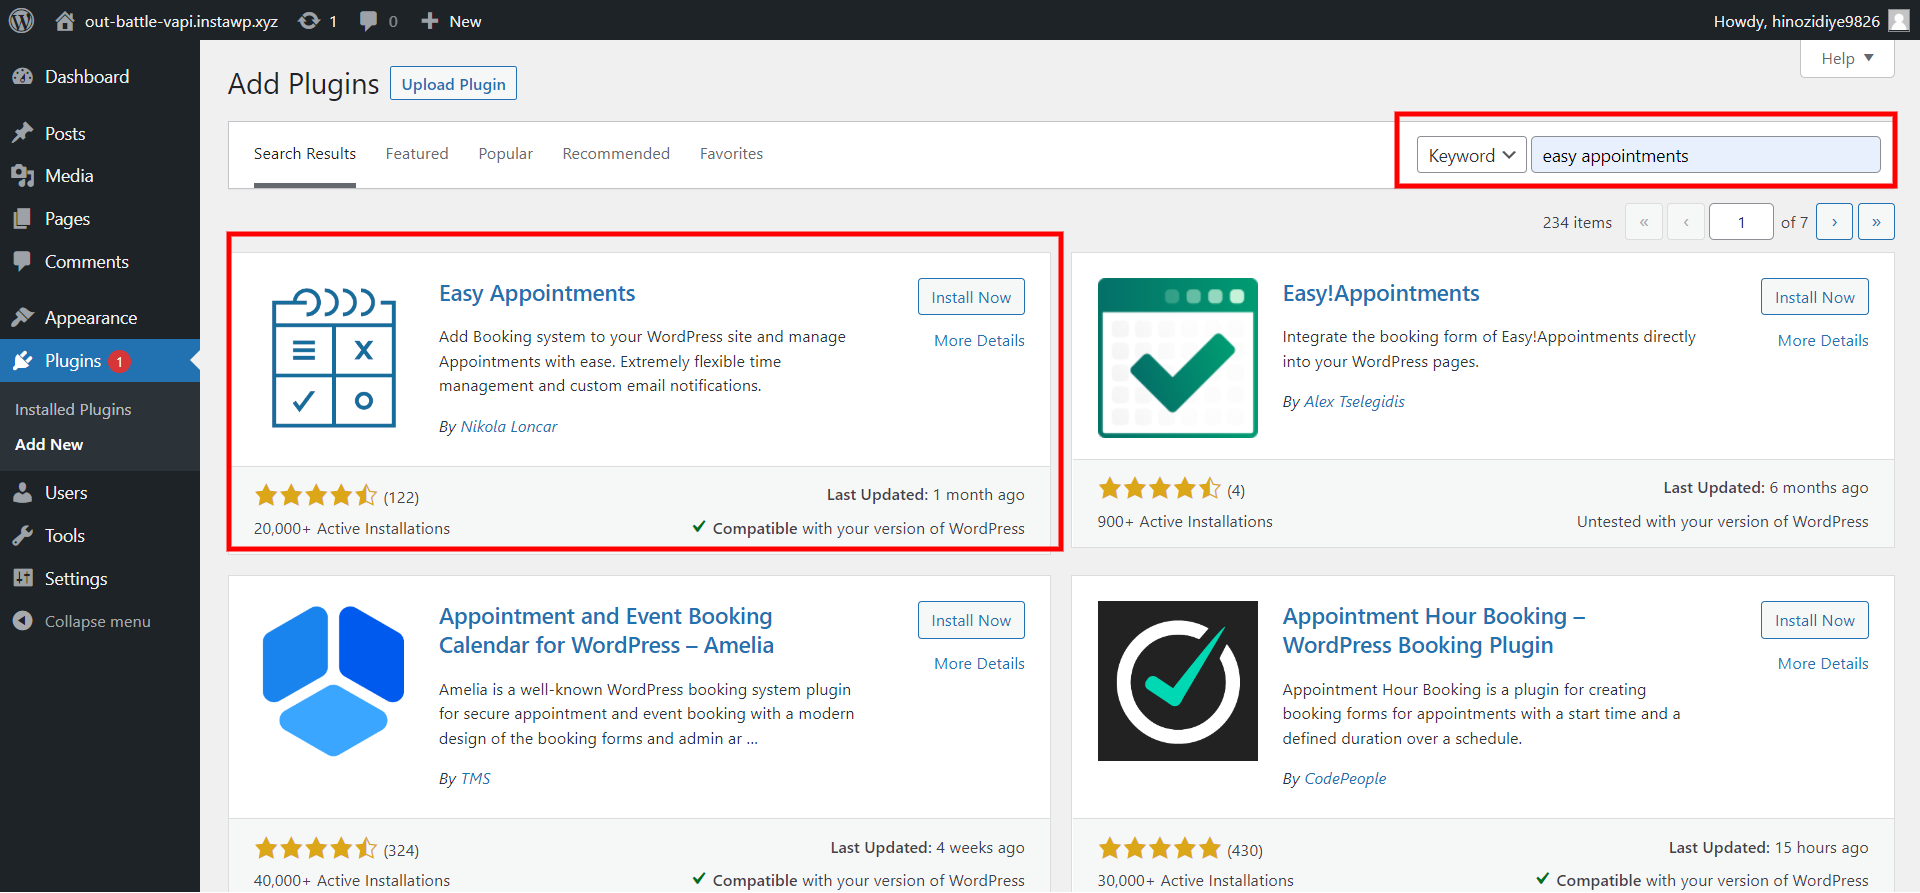
On the WordPress sidebar, navigate to “Plugins” and hit the “Add New” option. Now, in the search field, search for the “Easy Appointment” plugin and click on the “Install” button to install it. Don’t forget to activate the plugin. Once done with installation and activation, you will see the “Easy Appointments” option in the sidebar.
Step 2: Configure the plugin
Once done with the installation and activation of “Easy Appointments”, it’s time to configure the plugin. You will have to go to each option individually and configure them. In total, there are six options:
- Locations:
Hit the “Locations” option and you will be brought to a new window. Here, you will have to add your name, address, and location in the respective field. But if you are creating an appointment booking in WordPress for digital meetings, then you don’t have to necessarily add your business address and location.
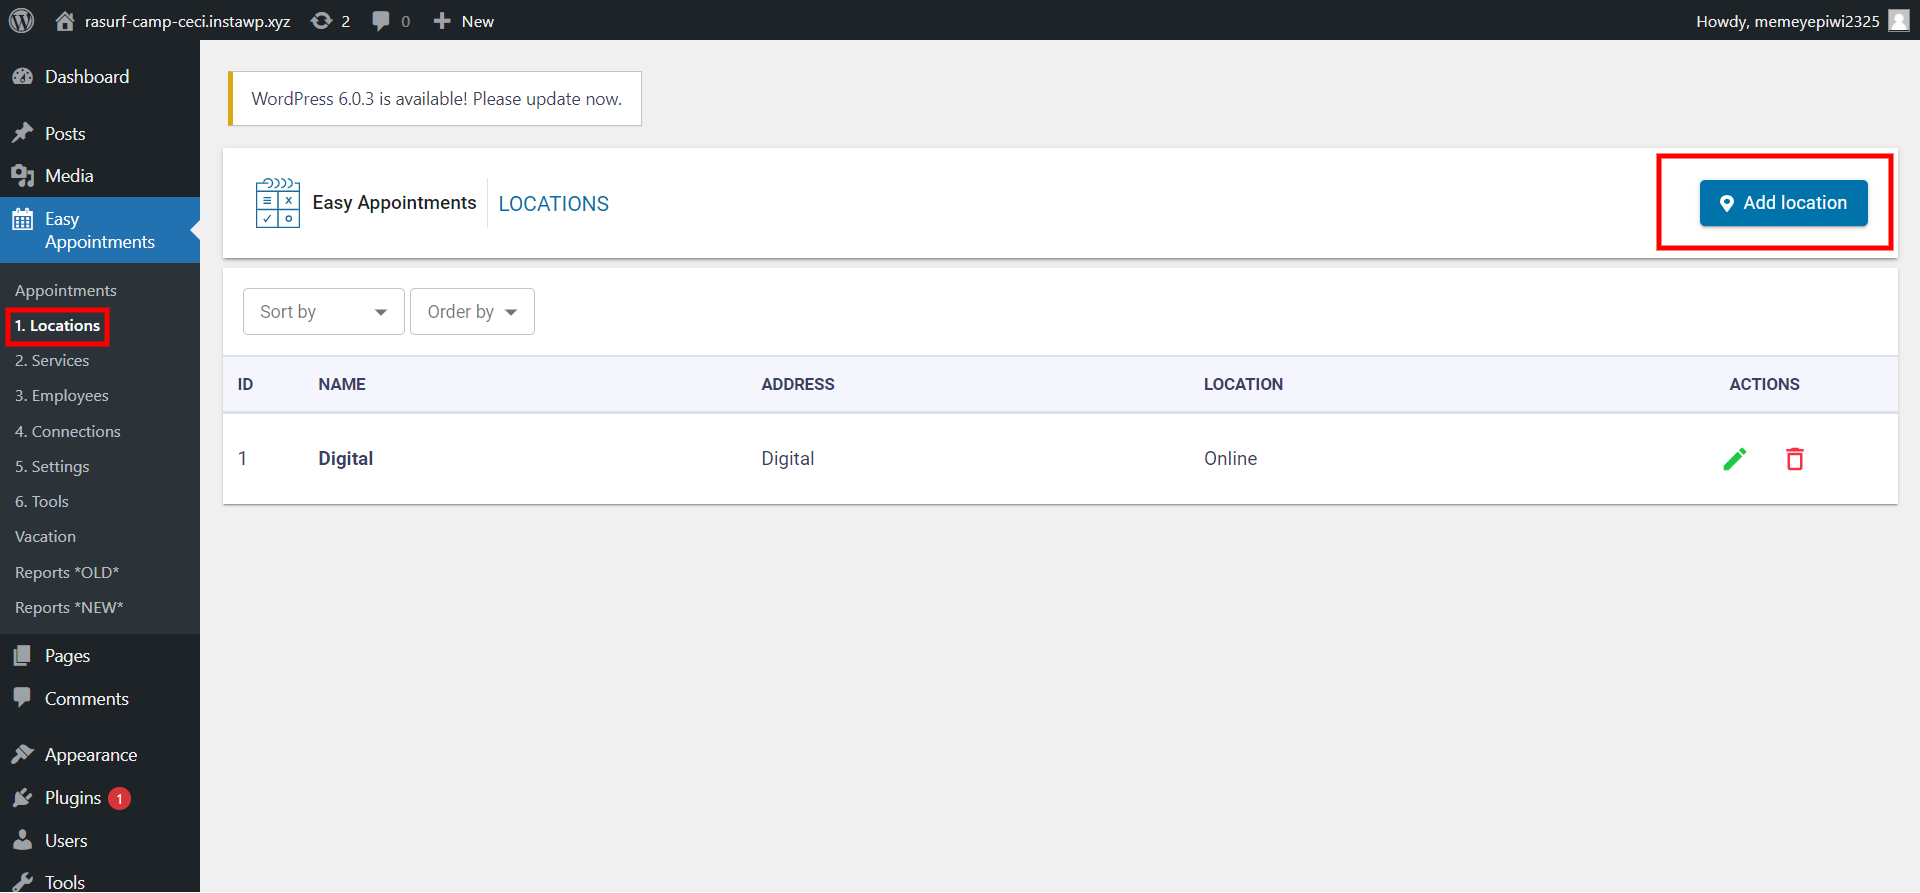
You can even add multiple locations if needed. For example, you are a SIM card company and have various service centers at different locations. You can add each location separately.
- Services:
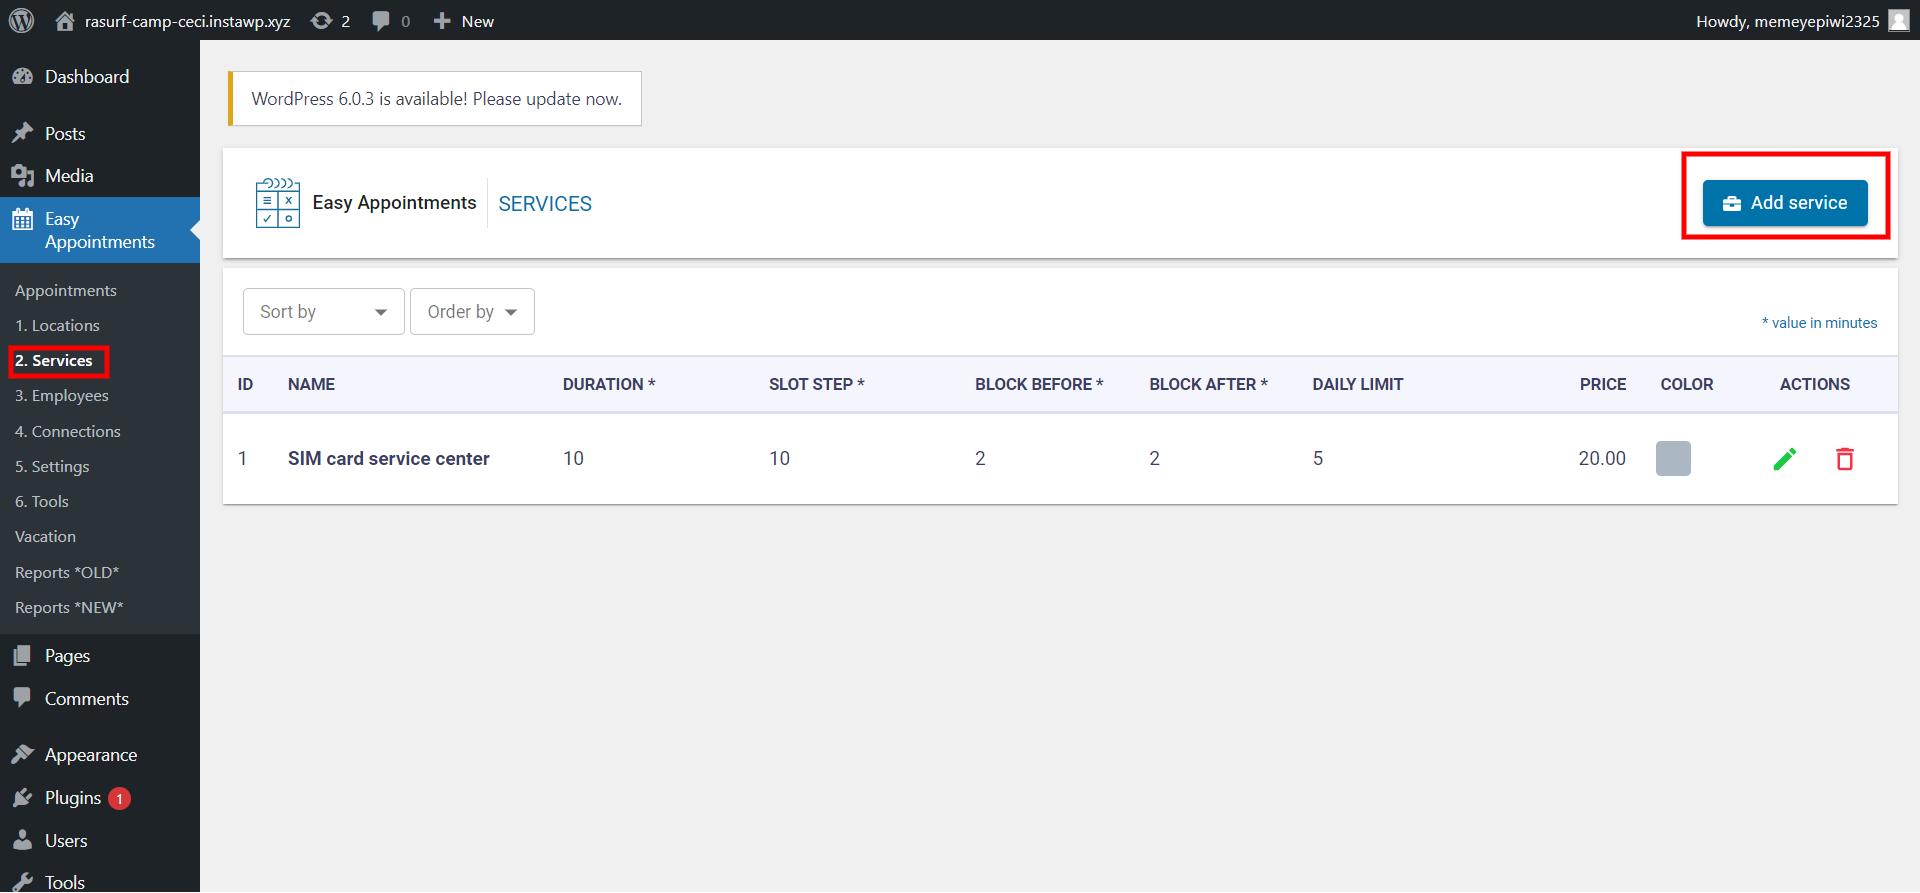
From the “Services” tab, add the service for which you want to book an appointment. It has fields like name, duration, time before you wish to block the spot, and same for the after-slot, price, and more. All fields are not necessary to fill. Fill in the required fields and hit the “Save” button.
- Employees:
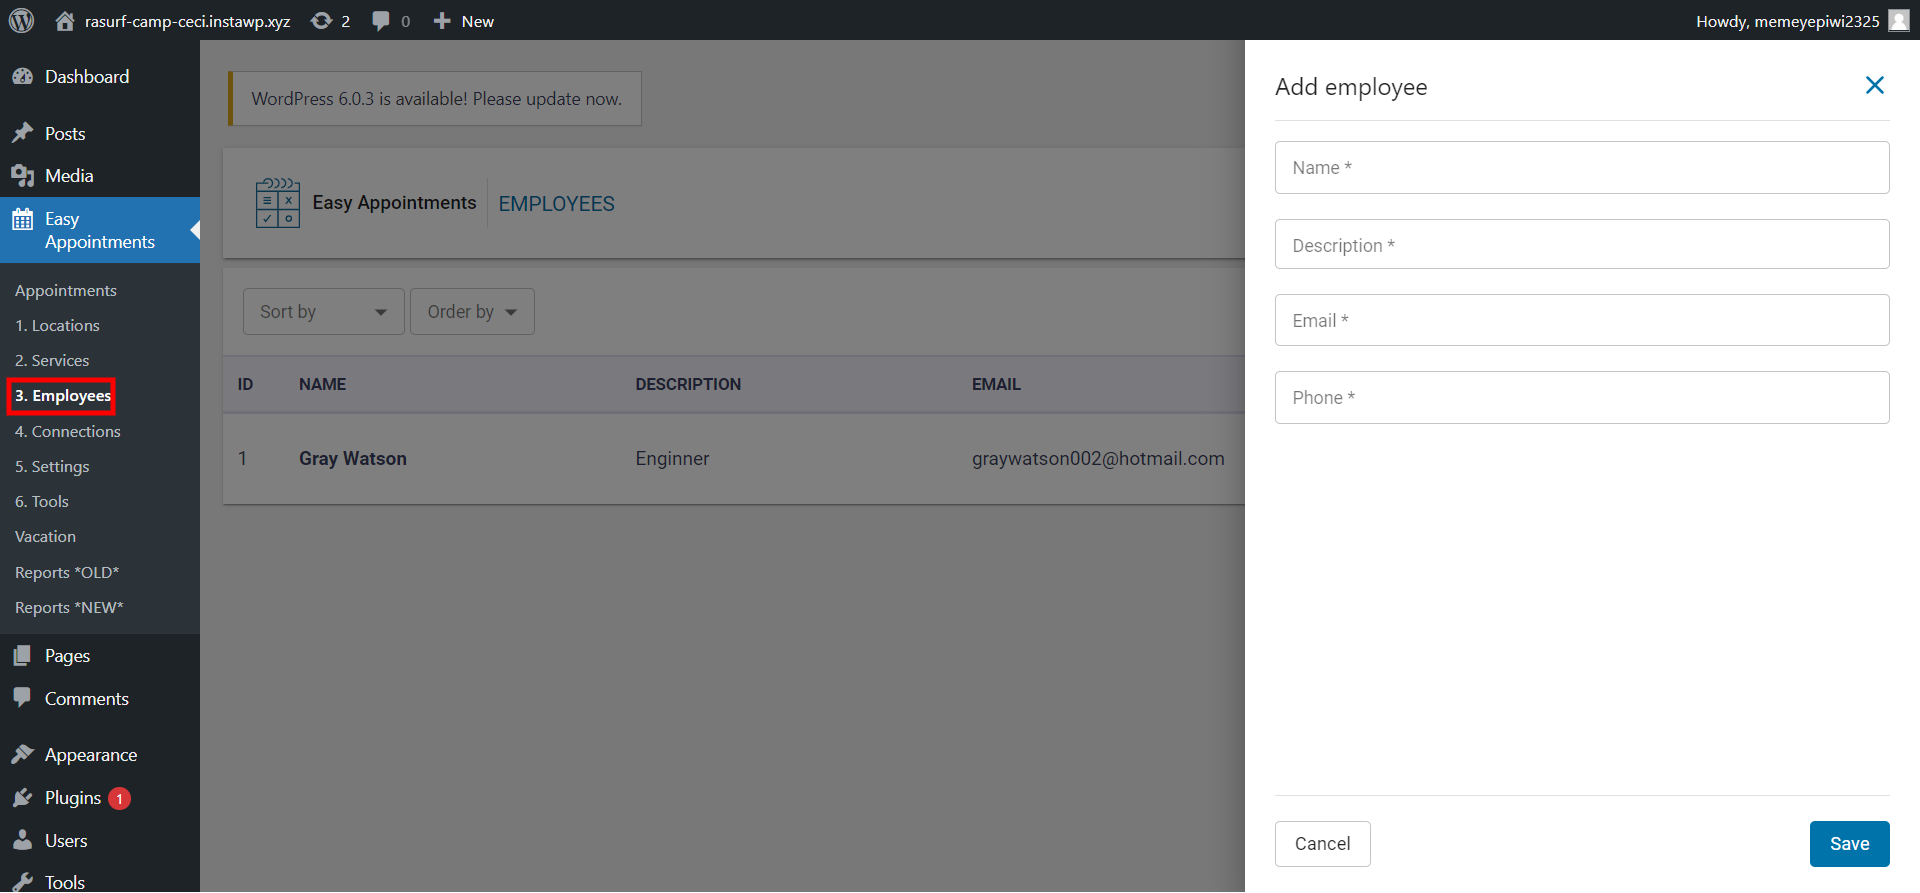
The next step in adding appointment booking in WordPress is to add employees who you want to allow visitors to book. Enter their necessary details like name, description, email, and phone number. If you are the only one on your team, then simply enter your necessary details.
- Connections:
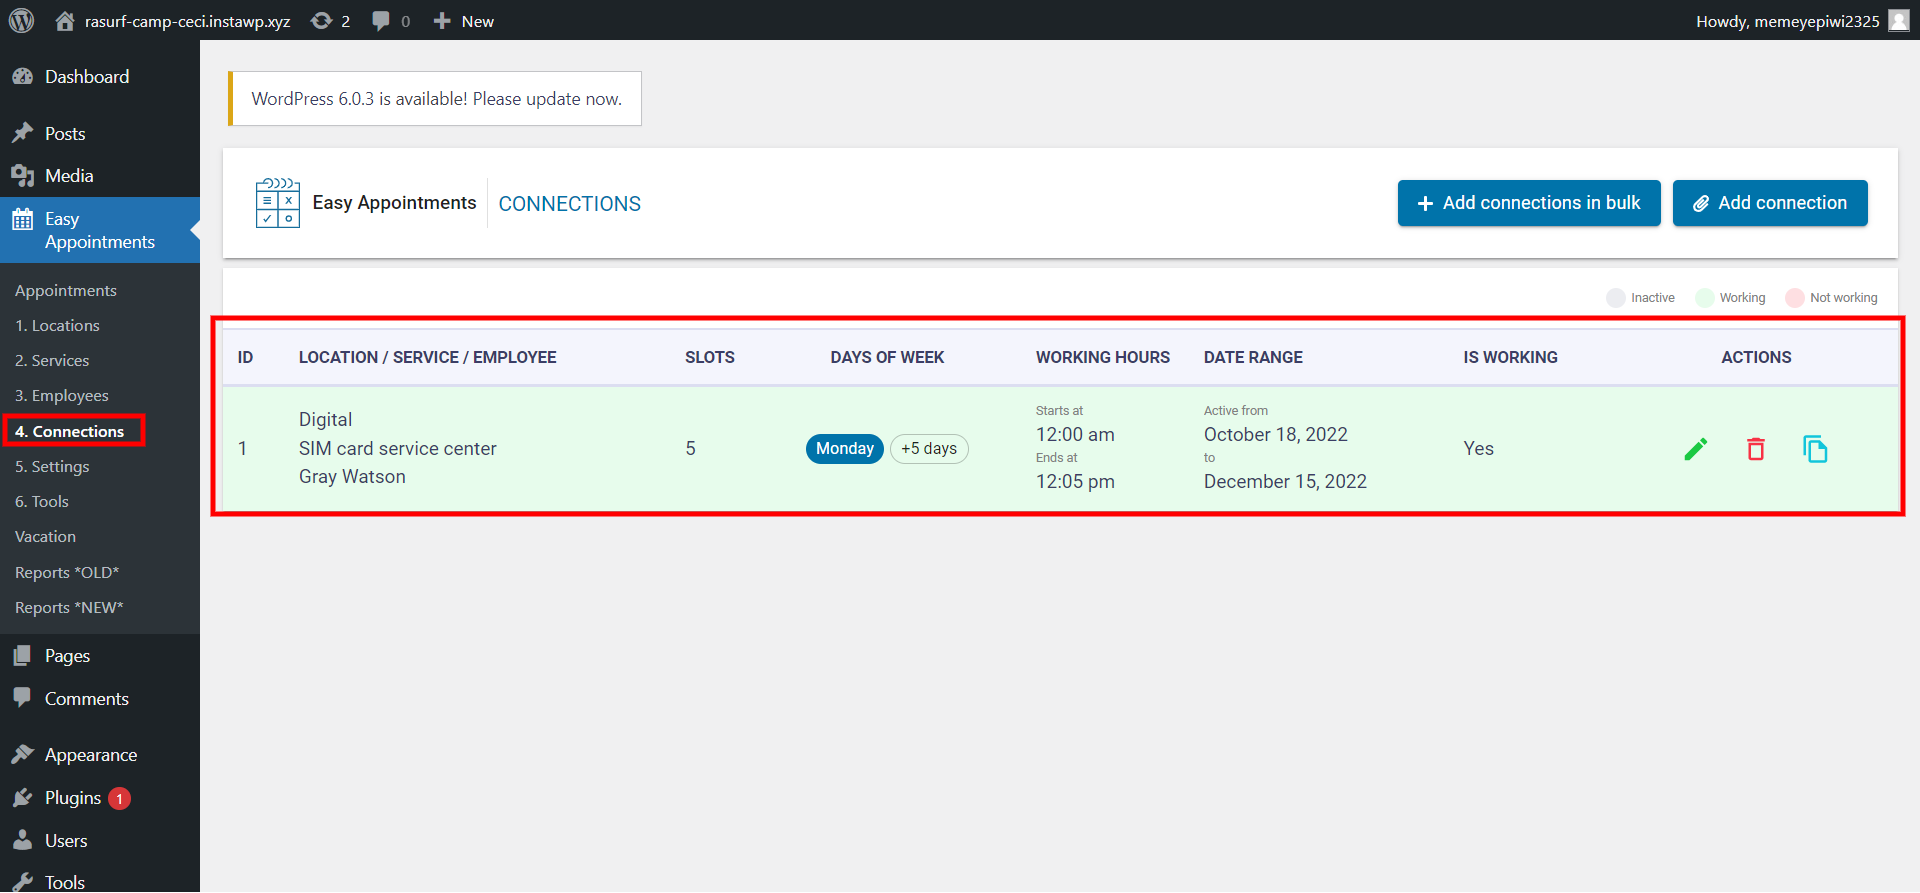
Here, you will have to link your locations, services, and workers. For instance, at location A, worker B provides service C on D days of the week. If you are the only person on the team, then it won’t be very difficult to set this part up, but if you have multiple people providing different services at different locations, then you will have to be careful while configuring this.
- Settings:
From here, you get to customize emails and forms used for the booking system. With this tab, you can handle a maximum number of reservations, auto reservations, mail notifications, date and time, and more. It also allows you to set up Google reCAPTCHA.
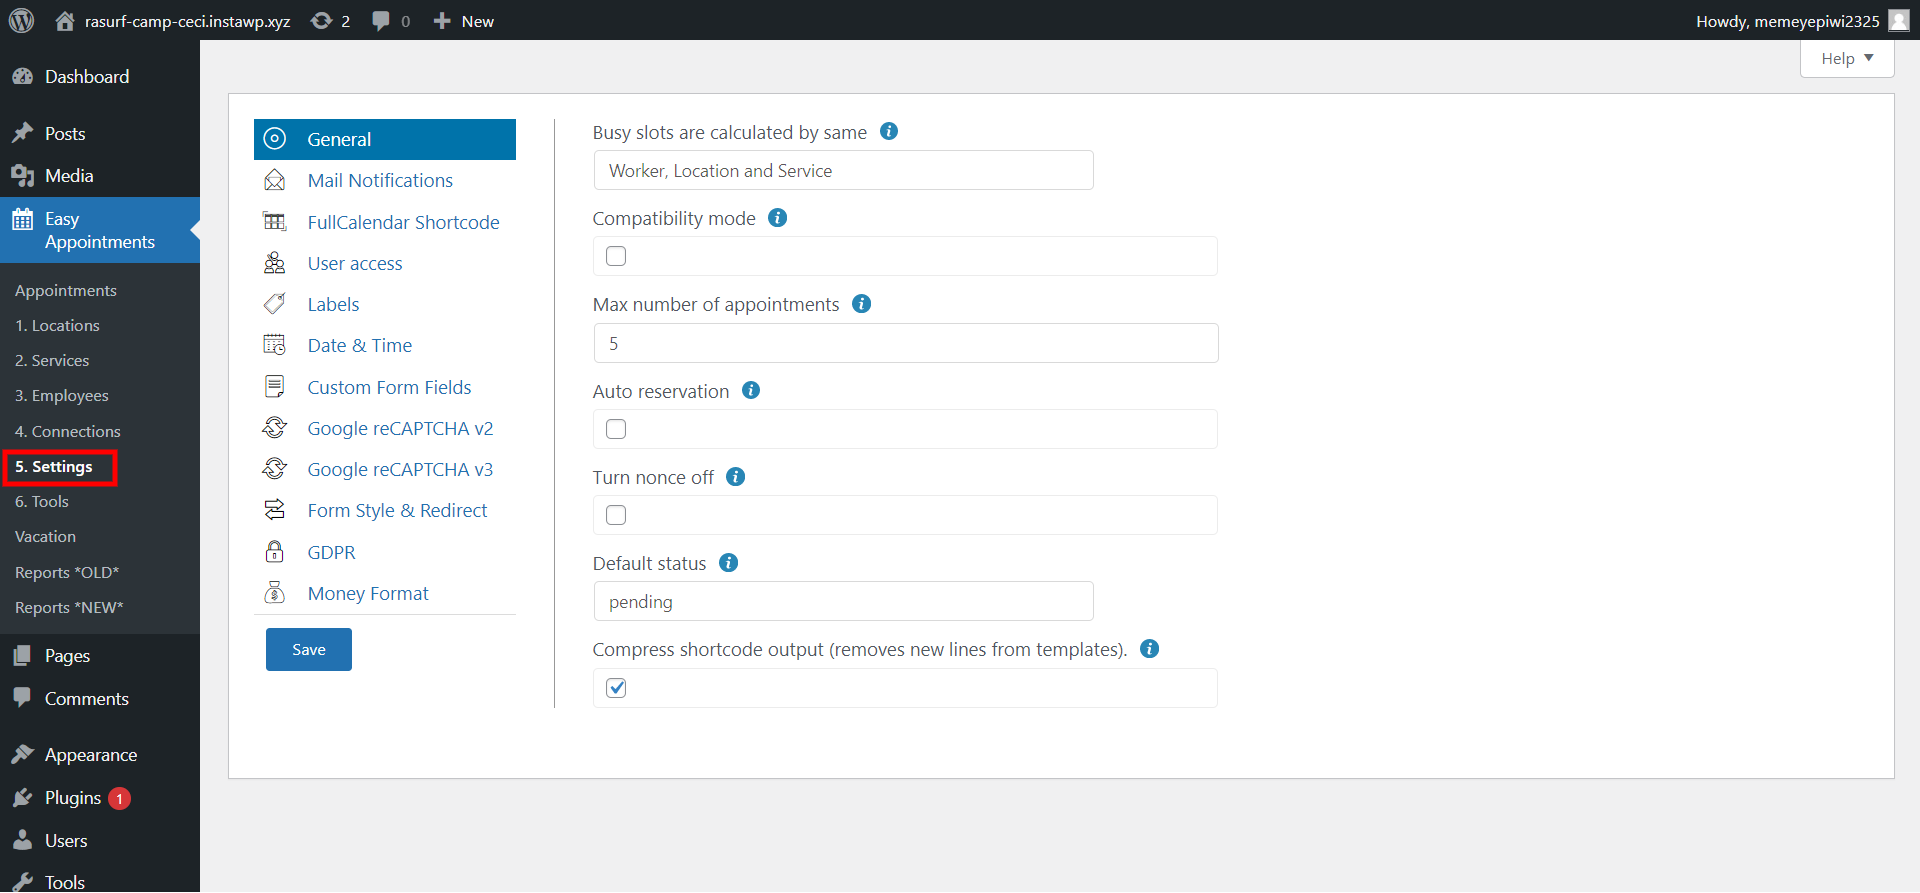
You can customize emails as per the appointment status. Use variable tags to personalize your emails. For example, when you add the #location_name# tag, the tag will automatically be replaced by the selected location when mail is sent to the user. Don’t forget to hit the “Save” button to save all the customized settings.
- Tools:
After all the configuration, when your appointment booking in WordPress is created, it’s time to generate a test email. This will test if the mail service is working just fine on this WordPress website by generating a test email.
Step 3: Displaying appointment booking on the WordPress website
Once done with all the configuration, it’s time to add your appointment booking to the WordPress website. To add the form you just created, you will need simple shortcodes. Here, we have mentioned two simple shortcodes that you can use to embed your appointment booking in a WordPress page or post.
- For one-column form:
[ea_bootstrap]
- For two-column form:
[ea_bootstrap width=”800px” scroll_off=”true” layout_cols=”2”]
Preview it once and check if the form is according to your requirements. Next, hit the “Publish” button to finally publish the appointment booking on the WordPress website.
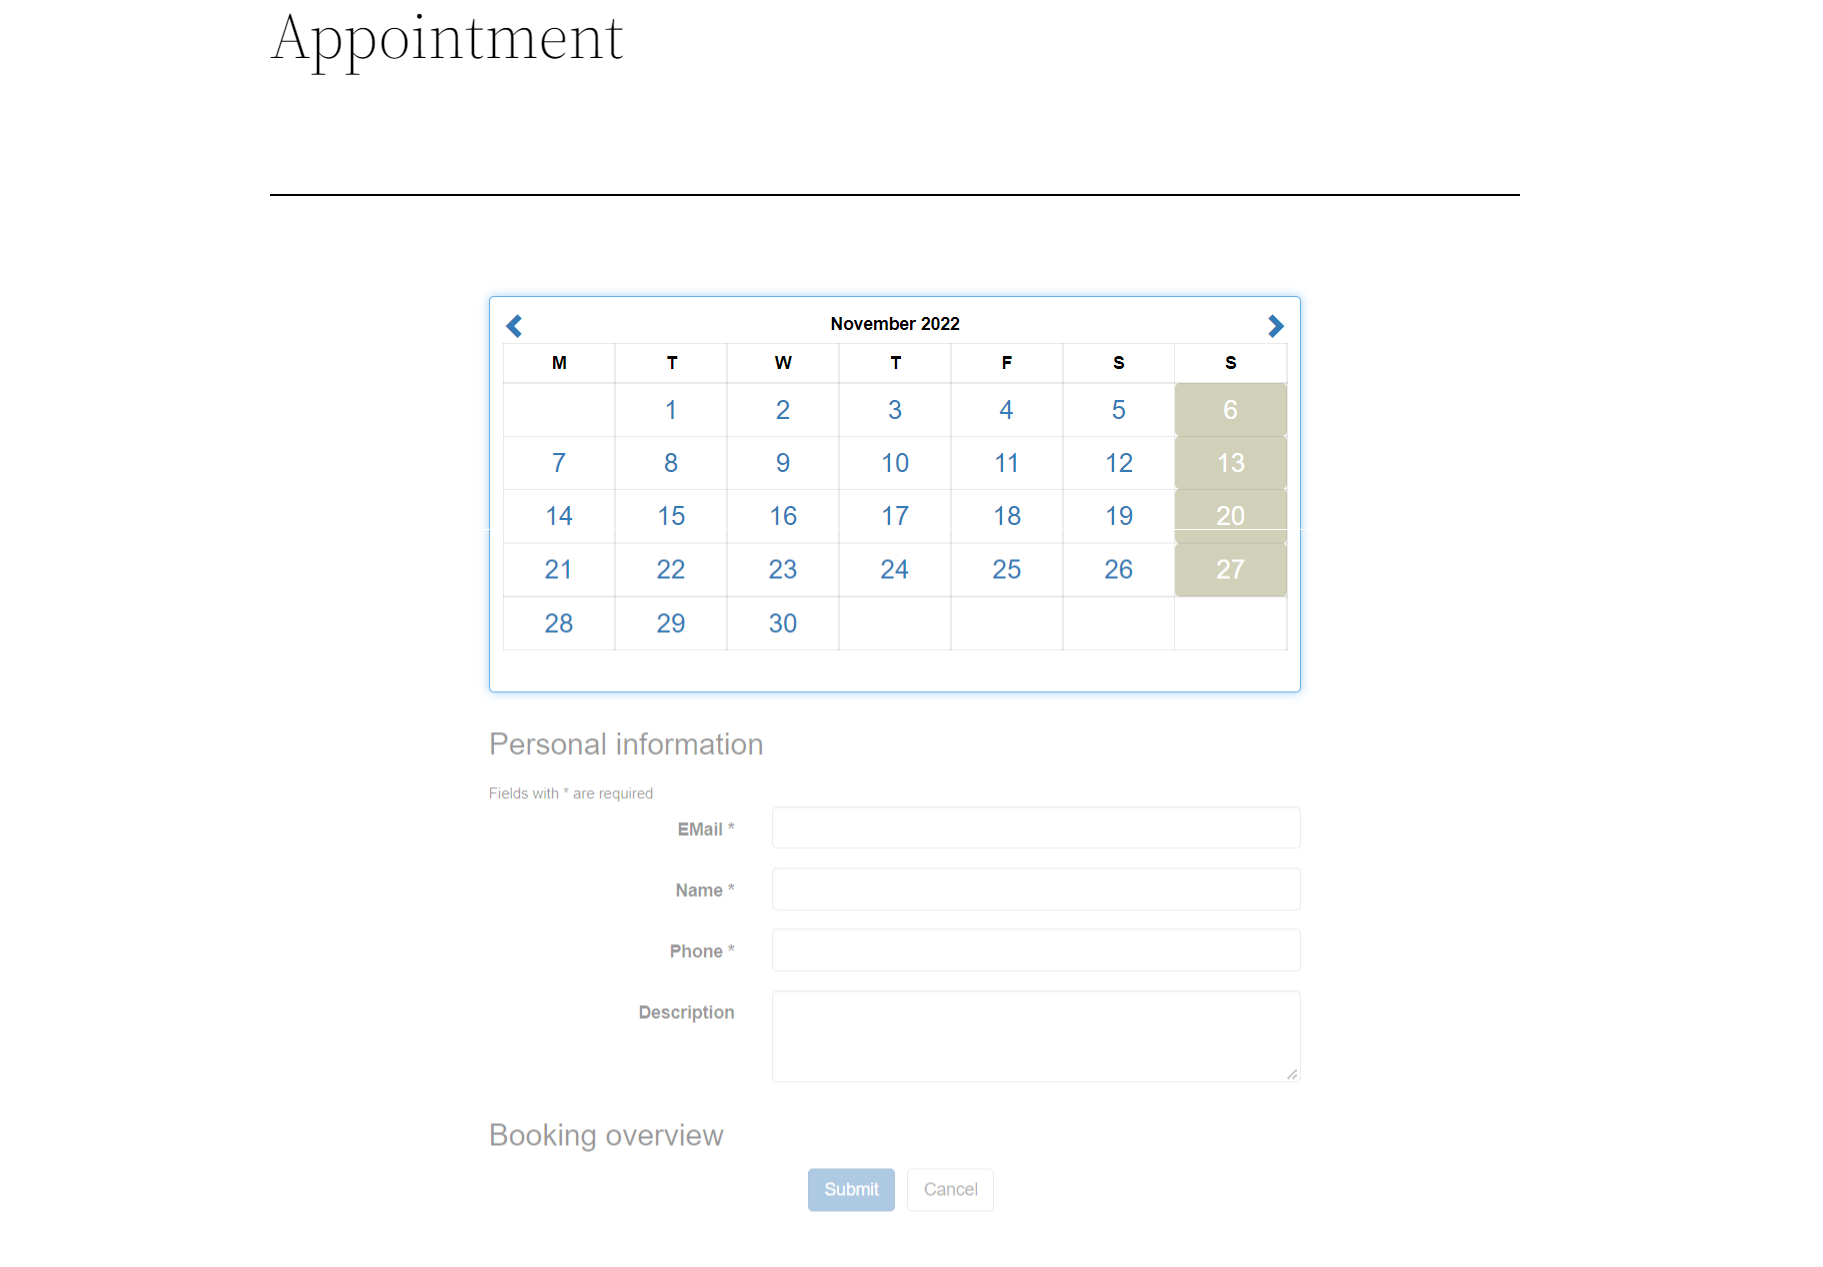
And there, you can have your appointment booking form on your WordPress website.
Top WordPress Appointment Booking Plugins 2022
1. Easy Appointments:
Here, in the above tutorial, we have used the same plugin and you can see how simple it is to configure it. It is a very flexible and free WordPress appointment booking plugin. With this, you can add multiple locations, services, and various times. This plugin allows you to customize fields by using custom tags.
With a few shortcodes, you can easily add appointment booking to the WordPress website. It has numerous features to customize the emails that you want to send to the clients, workers, and admins.
2. Sugar Calendar:
One of the most powerful WordPress appointment booking plugins is Sugar Calendar. It lets you create events, schedule them, manage them, collect payments, and much more. One of the most important features is that they easily sync with Google Calendar. So if you are someone who uses Google Calendar to manage your workflow, then this plugin can work well for you.
Another great feature is this plugin can easily integrate with WPForms and Ninja Forms which gives you the ability for more customization of appointment booking forms.
3. Booking Calendar
Last but not least plugin in the list is the Booking Calendar plugin. It helps you create easy-to-use and simple appointments for your WordPress website. If you are someone who doesn’t want much customization and just wants a basic appointment booking calendar form, then this plugin is something you should go for.
It helps you with calendar views for both you and your users, it is a simple yet very powerful plugin that includes a range of features.
FAQs
1. How do I make an appointment booking in WordPress?
To create an appointment booking form in WordPress:
1. Create an appointment form.
2. Configure your appointment booking form settings.
3. Customize the notification.
4. Embed the appointment booking form in your WordPress webpage or web post.
2. What is the best booking plugin for WordPress?
Following is the list of best appointment booking plugins in WordPress:
1. Easy Appointments
2. Sugar Calendar
3. Booking Calendar
4. WP Simple Booking Calendar
5. BirchPress.
Wrapping things up
And that’s it for this blog. We hope this blog has helped you set up an appointment in WordPress. With an appointment form, it becomes very easy for your visitors to book slots with your business and even for you to manage all the bookings. Go ahead, and try to create your appointment booking form.
This was a detailed guide, but if you still get stuck somewhere, you can hire WordPress engineers from JustHyre.
If you like reading this blog, also read How to Display Recent Posts in WordPress by Category Name? (3 Easy Methods) and How to Add TikTok Pixel in WordPress? (3 Easy Steps).
Stuck Somewhere?
Connect With JustHyre
Hire WordPress Engineers for custom jobs like Website Customization, SEO Optimization, Clearing a Hacked Website, Installation & Configuration & more.
Connnect with JustHyre


0 Comments