How to Easily Setup a WordPress Sandbox for Agencies to Deliver Client Sites?
Are you an agency looking to deliver exceptional websites for your clients? One crucial aspect of the website development process is testing and experimenting with different plugins, themes, and configurations to ensure a flawless final product. That’s where a WordPress sandbox comes in.
In this guide, we’ll show you how to set up a WordPress sandbox through Instawp—an intuitive tool designed specifically for agencies, developers, students, and everyone who is a user of WordPress.
By utilizing this user-friendly sandbox environment, you can test-drive plugins, themes, and more, ensuring that your client sites are delivered with the utmost quality and precision. Let’s dive in and discover how setting up a WordPress sandbox through Instawp can streamline your development process and help you deliver exceptional websites to your clients.
Analyzing the WordPress Sandbox Environment: A Brief Overview
Based on the Cambridge Dictionary definition – the sandbox is defined as;
“Sandbox is a separate part of a computer system where software can be tested without any risk of it harming the whole system.”
In the field of cybersecurity, a sandbox environment refers to a safe and separate virtual space where possibly risky software code or any new applications can be run by developers without causing harm to the network or local programs.
Apart from cybersecurity, developers also use sandbox testing environments to run code before omnipresent deployment.
A WordPress sandbox environment is an isolated and secure space to scrutinize WordPress plugins, themes, code snippets, and other changes to see how they are working out before committing to changing your live site or pushing it to live.
While building a new website requires a multi-step process, that varies from writing code to using page builder, testing, and so forth. But, when it comes to editing the already existing website, it’s vital to not directly jump off the boat and push changes to the live site or do everything on it now.
These are often at risk by nature and so that might change or corrupt the site. Not only will you lose traffic because of not working site but that will lead to giving away your hard-earned money. But your team will have to clamber out of this situation as quickly as possible.

Understanding the Benefits of a WordPress Sandbox for Agencies
As an agency working on client websites, you know how important it is to ensure smooth and error-free delivery. That’s where a WordPress sandbox comes in handy! Especially when WordPress has been part of many marketing companies and is the most used content management platform in the world.
A WordPress sandbox is like a virtual playground where you can test and experiment with website changes without affecting the live site. It provides a safe and controlled environment for agencies to try out different themes, plugins, and customizations.
WordPress sandbox environment comes with various benefits;
- Streamline the process – The Sandbox environment benefits from the effortless process of creating and deploying, even at scale. Thus, easily and quickly you can test plugins, software versions, codes, etc.
- Collaborate and Iterate: A sandbox environment enables your team to collaborate seamlessly. Multiple team members can work on different aspects of the website simultaneously, making the development process faster and more efficient. You can experiment, gather feedback, and iterate until you achieve the desired results.
- Prevent Disruptions: Making changes directly on a live site can be risky. A sandbox acts as a protective layer, allowing you to test any changes without compromising security and worrying about breaking anything.
- Enhance Quality Assurance: With a WordPress sandbox, you can thoroughly test your website’s functionality, responsiveness, and compatibility across different devices and browsers. This helps you catch and fix any issues or bugs before they reach your clients.
- Cost-efficient – Constructing and maintaining a website already requires a lot of cost and time affair. On top of that, if there are any occurrences happening it can cost a fortune to the clients. Instead, you can use a sandbox environment as a solution to eliminate issues as much as possible when creating a website.
III. Step-by-Step Guide to Setting Up a WordPress Sandbox through Instawp
One of the easiest ways to set up and use WordPress sandbox is through a tool that can in an instant provide you with a staging site. For that, we have the perfect and simplest solution – InstaWP.
If you’re not aware of it, then InstaWP is a popular tool that as its namesake lets any WordPress users set up WordPress sandbox or staging sites instantly. It is an ideal tool for everyone whether you’re a designer, developer, agency, or enterprise.
Generating a staging site from InstaWP will work like any other self-hosted WordPress website, you will have entire control over your site. One of the standout features of InstaWP is its simplicity. The tool is designed to be easy to use, even for those who may not have extensive technical knowledge. InstaWP also offers flexibility and customization options.
With InstaWP, agencies can confidently test, iterate, and refine their work, resulting in high-quality websites that meet their clients’ needs.
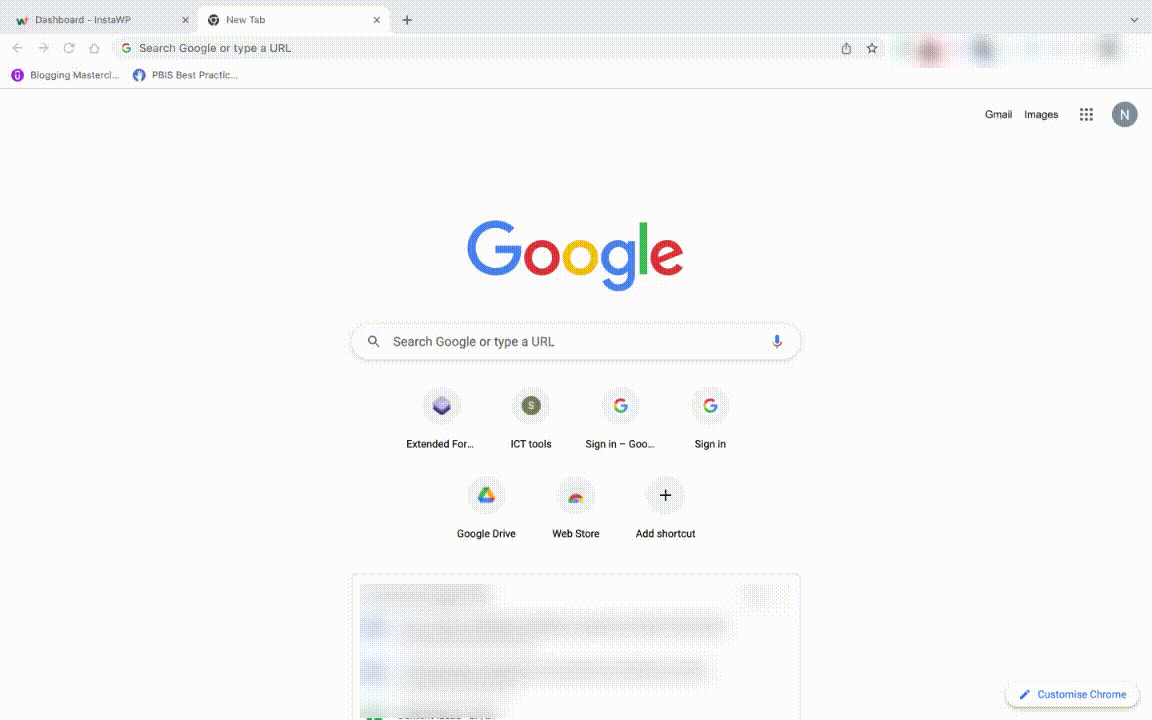
Step 1: Creating an account on Instawp
In order to use the features of the InstaWP tool and access its dashboard, it is necessary to create an account. Whether you choose the free or paid option, you can create an account by visiting https://app.instawp.io/onboard or simply by searching for InstaWP and visiting their main website.
If you are manually visiting the main InstaWP website then, click on the “Try for Free” button and you will be taken up to set up your new site. You have to create a free account to set up the site and access the dashboard and further work on it.
You don’t have to fret over purchasing a domain name, hosting service, and SSL certificate. All are well-equipped and handled by InstaWP, you’ll get all that when you create your account and set up the site.
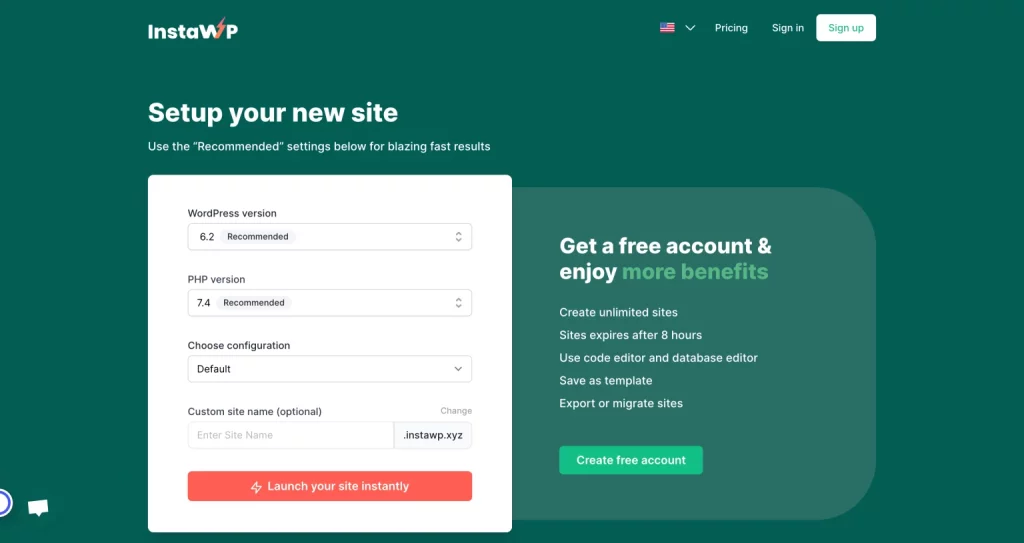
Setup 2: Setup the site
If you want to not configure your WP version and choose configuration but go with the default setup for your first time, then click on the “Launch your site instantly” button from the setup page. It will automatically generate with most appropriate configurations and you’ll be provided with login credentials.
Note* – You can create up to 3 sites without an account through – the ‘launch your site instantly’ button.
Or else, set up your account and log in to the dashboard. Once you are in the InstaWP dashboard, the next step is to launch your staging site with custom WordPress installation. All you need to do is click on the “Add New+” button and a configuration box will appear. It has three options – From Scratch, From Templates, and Store (this is a new feature coming soon).
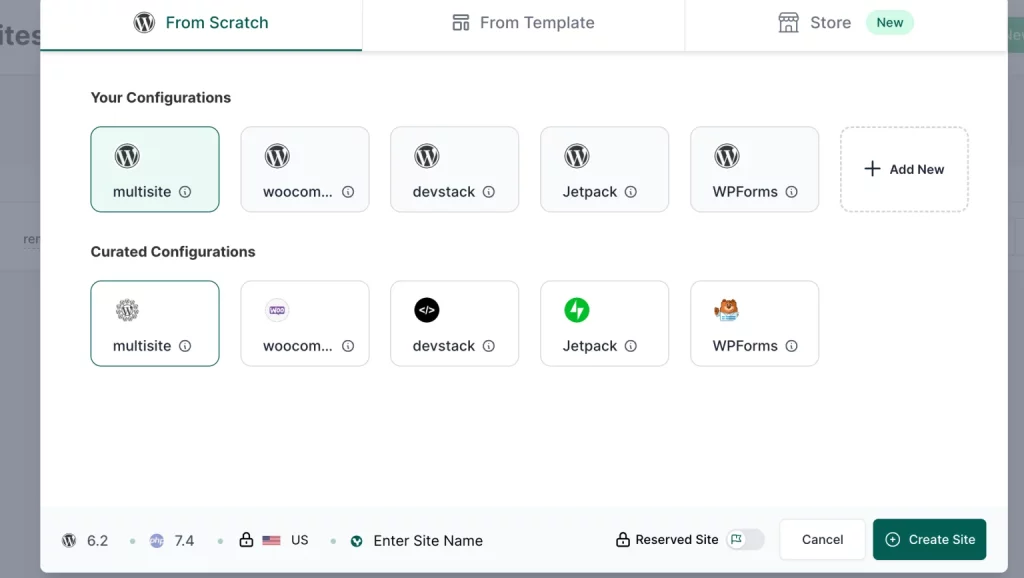
If you are a new user of InstaWP, using it for the first time we have then start from scratch. You get the following options to configure;
- Your Configurations – you can choose default or random, or even add a new one by yourself (we will discuss this feature later on)
- Curated configurations – In this, you’ll see all the curated configurations with some of the integrations InstaWP has.
* You can choose from either your or curated configurations.
- At the bottom, you’ll see a few options lined up like the WP version, and PHP version, just select from the dropdown options.
- You can also enter the site name of the staging. It also has two pro features that will be available in pro plans – to add “server location” and “reserved site.”
After entering the specifications, you’ll be amazed to see your site appear on the dashboard within seconds! The dashboard will display all the login credentials you need, and there’s even a convenient “Magic Login” option that will automatically take you to the WordPress dashboard.
Just a friendly tip: For a speedy launch, it’s recommended to stick with the default settings for your new site, including the WP and PHP versions. Get ready for a blazing-fast start!
Step 3: Accessing the Instawp dashboard
Now that you have the access to InstaWP dashboard and have created the site, you’ll see newly created WordPress test site credentials and the site panel.
To customize your site, whether it’s for updating plugins and themes, or addressing any other issues, InstaWP offers free access to the database and code editor. Plus, you can easily auto-login to the WordPress dashboard.
To auto-login either click on the “Magic Login” button you see in the “New WordPress website is ready” message box, and from there you can also access DB Editor, Code Editor, and Logs. Or you can click on the “Auto Login” option that you’ll find under “Actions” of the created site panel.
Apart from that, there are more features in the site panel;
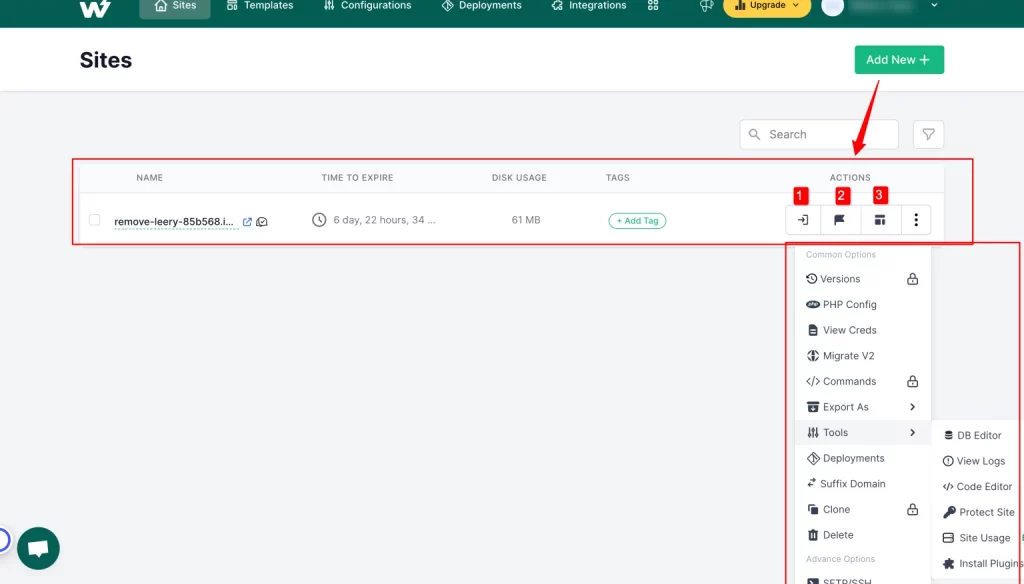
- The first option that you’ll find is the Auto-Login option
- Next, is the “Reserve” option that is available in upgraded plans. But this feature allows you to reserve your site that will never expire or be deleted.
- Then the “Save Template” option you can also access from the top panel beside Sites. A ‘save as template’ box will appear that asks to save the template by configuring the options like – Template Name, Description, and type.
It also has an “Instant Template” option that is available for pro plans, it consists of more advanced options, template branding, instant template, advanced deployments, and more.
- Click on ‘More Actions” and you’ll see more common and advanced options. Like Versions that is part of the upgraded plan. PHP Configuration that you can access under the Configurations section.
- In View Creds, you can see the username, and password and can also log in from there.
- With Migrate V2 option, you can transfer the staging site to the existing live site or create a new site.
- If you want to add and run new commands for the client site, you can do so under the Commands option which is also part of upgraded plans.
- InstaWP also allows you to Export as localWP. Under Tools, you’ll find DB Editor, Code Editor, & Logs that you saw when your site was created.
- But apart from that, you get the option to protect the site with a username & password, check site usage, and install plugins option.
- Then there’s the suffix domain, which lets you choose the domain between the two options available. Clone that allows you to duplicate the existing test site.
- There are some advanced options that are available when upgraded to the pro version like Access SFTP/SSH, & Map Domain.
Step 4: Installing and configuring themes and plugins
If you have created the test site to install & configure the themes and plugins and check how they are working on WordPress, then you can swiftly do so in InstaWP.
There are some ways through which you can install the themes and plugins, then try them out on your test site and work further.
One of the ways you can do this is inside the InstaWP dashboard itself;
- In the side panel, under the More Actions > Tools > Install Plugins. It will open the install plugin/theme page, it provides easy 1-click installation of plugins & themes to the website.
- Just add the plugin slugs to install the plugin and in a similar way theme slugs to install a theme.
- You can also zip the URL to install a theme/plugin. It is part of the paid plan.
Apparently, there are other two ways to test themes & plugins in a sandbox. It includes installing InstaWP plugins for Chrome & WordPress. (To know that, check below the InstaWP tricks in which we have covered both ways)
Step 5: Exploring additional features & settings
Apart from all the above, there are two important feature settings of InstaWP – Configurations and deployments.
To start with, from the top navigation bar, go to the Configurations section, you’ll establish all the test site general, PHP, & WordPress configurations. You can change under the General tab – WordPress, PHP version, server location, and add a logo.

In PHP settings, configure further like – max execution time, memory limit, max input time, output buffering, etc. Moreover, under the WordPress tab, you get to configure options like site language, multi-site installation, pre-install plugins, themes, etc.
Then there is a Faker option to configure, which includes Core Faker and WC Generator.
Next, let’s talk about the Deployments feature. You can find it in the site panel settings or directly go to the ‘Deployments’ section. To add a new deployment, simply click on the “Add New” button. A dialogue box called ‘Add Git Repository’ will appear.
Choose the Repo Type either Public or Private. If select ‘Public,’ then In the ‘Repo URL’ field, you need to copy the ‘HTTPS’ link from your GitHub repository. Then, in the ‘Branch’ field, specify the branch you want to deploy your site to. Additionally, provide the destination folder of your plugin. Also, add Post-Deployment Commands!
Every time you create a new instance of a template, your GitHub repository will be pulled, and the contents of that folder will be replaced with the live GitHub code. Once you’ve filled in the required details, click on ‘Add’ and your deployment will be added to the deployments tab.
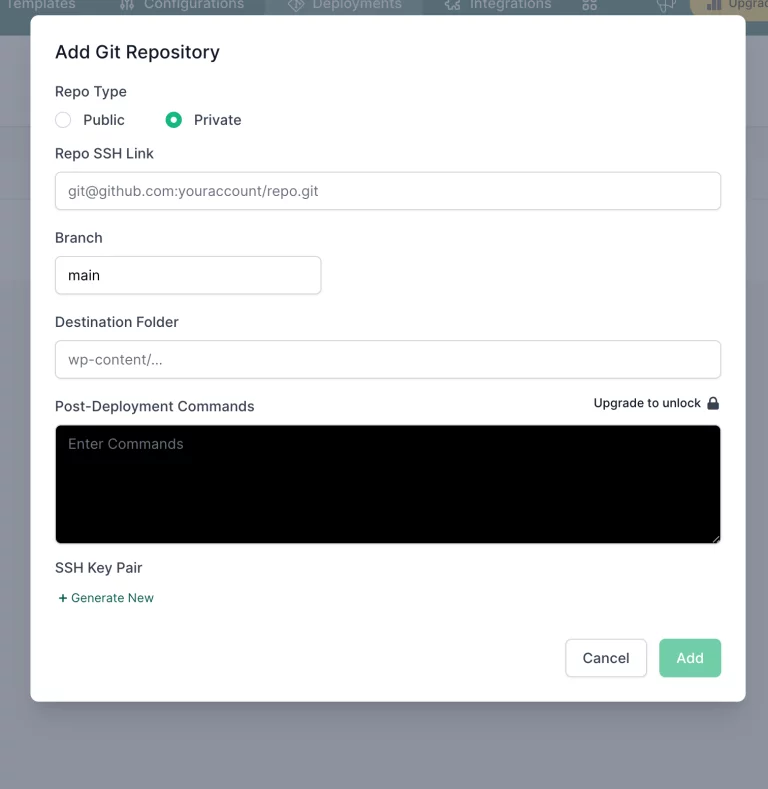
If you go with the Private repo, then instead of the repo URL you’ve to add the Repo SSH Link, and you’ve to generate the SSH Key pair that you can copy to your repository.
There is another feature of Integrations, it allows users to integrate with some great applications. Currently, InstaWP allows to integrate with MailChimp newsletter, Atrium tool, Mailtrap, & Active Campaign newsletter.
Elevate Your InstaWP Game: Expert Tricks/Tips
In here we are going to give some cool tricks of InstaWP that can be a game changer for you all. These are not some massive tips but they are still of the essence if you are going to be using InstaWP. Basically, they are here to make your life (I mean process) simple!
Let’s go through them;
- Shortcut way to create a WordPress site– You know by now how to create a WordPress test site though that step is not difficult as such. But what if, I tell you that we have the shortest way to create a WordPress site without going through all the setting up process?
Yes, we have the trick for that! You just need to type wp.new on the web browser and hit enter. It will automatically create a new site and will log in you to the created WordPress site admin panel. And you don’t have to worry about login credentials, if you log in to your InstaWP dashboard you’ll see the newly created site panel.
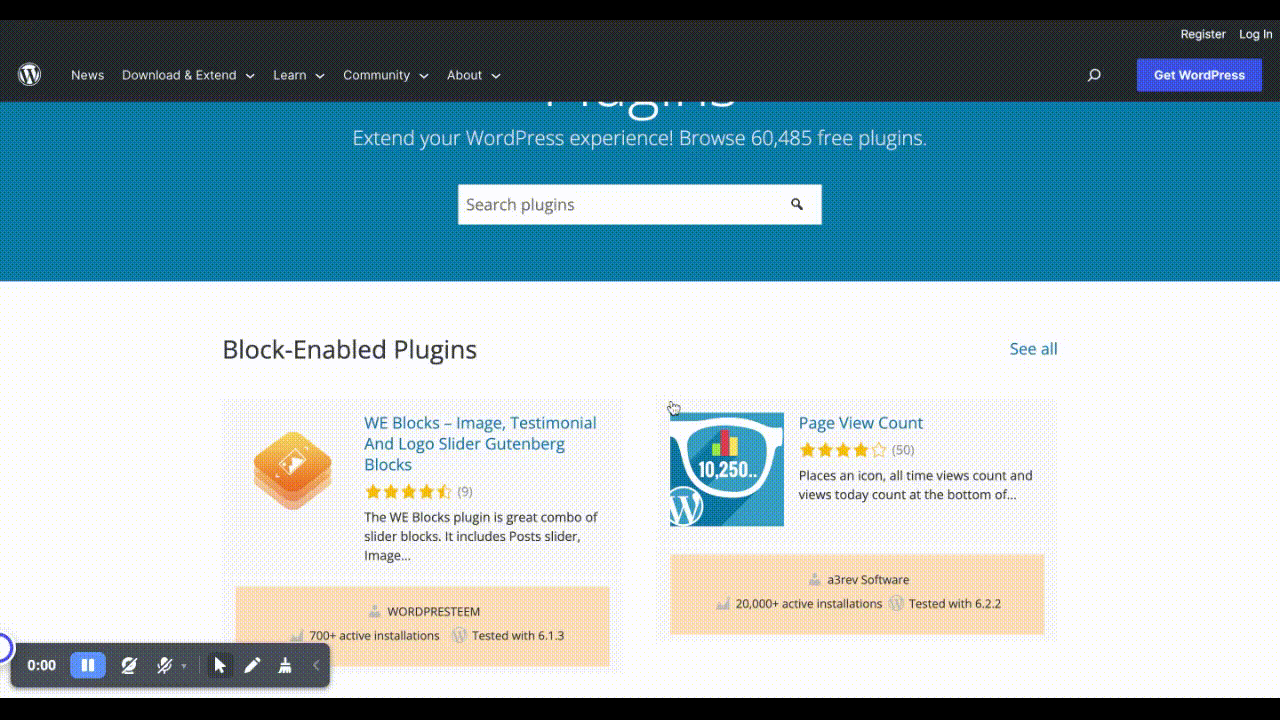
- InstaWP Launcher Extension for Chrome – The Next InstaWP tip is to install themes and plugins to your WP site through the InstaWP launcher plugin. Go to the Chrome extension web store search InstaWP and install InstaWP Launcher.
Then go to WordPress.org, there are various themes and plugins to search from. Open the one that you want to install, you’ll get the InstaWP Launch button beside the Download option. Click on it and the plugin/theme will get installed in your WP.
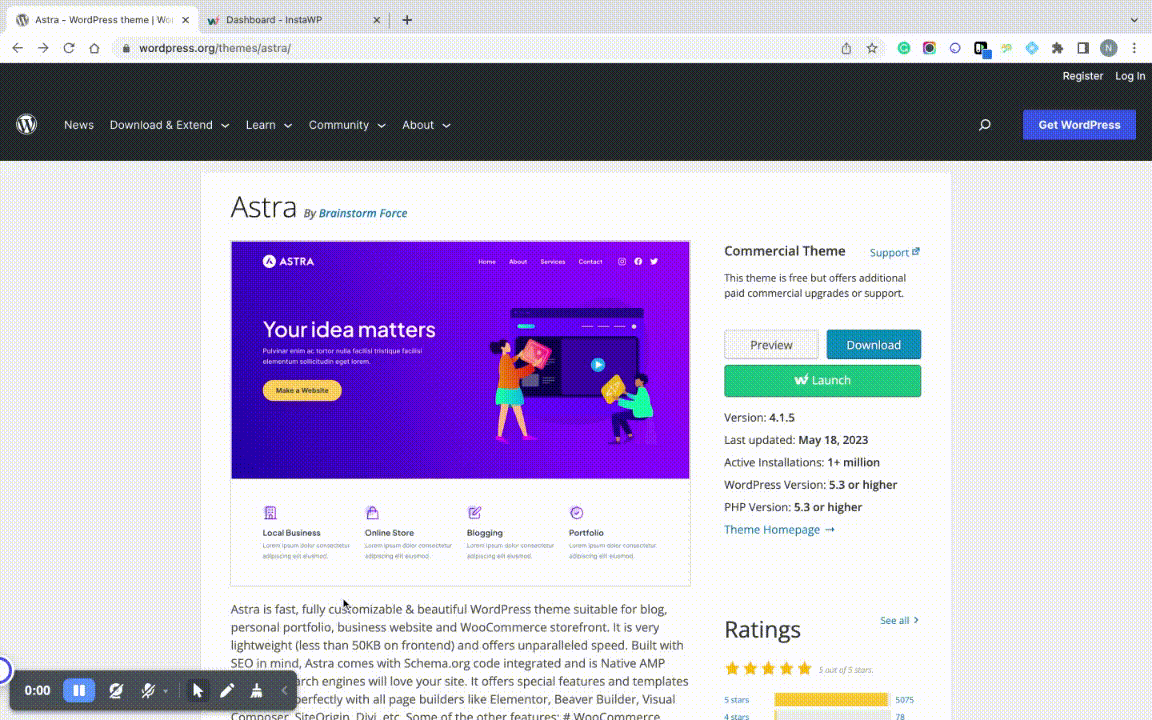
- Install Plugins/Themes through Custom URLs – You can install themes/plugins by tweaking the URL a bit. To do so, you’ll have to go to WordPress.org plugins and themes, choose the specific theme/plugin, and open it.
Then go to your URL on the browser, just change the “wordpress.org” to “instawp.io” Apart from that keep everything as it is. For instance, “https://wordpress.org/plugins/yoast-seo/” converts to “https://instawp.io/plugins/yoast-seo”
Hit enter and it will set up a new WordPress site and install the plugin/theme in it.
- InstaWP Connect Plugin for WordPress – The last tip to create an effortless site is through the InstaWP Connect plugin. With this plugin in your WordPress, any developer or admin can easily spin a WordPress sandbox environment.
You’ve to install the plugin, and click on Create site – Once you go to the dashboard, you’ll see steps to staging. You first need to select the “staging type”
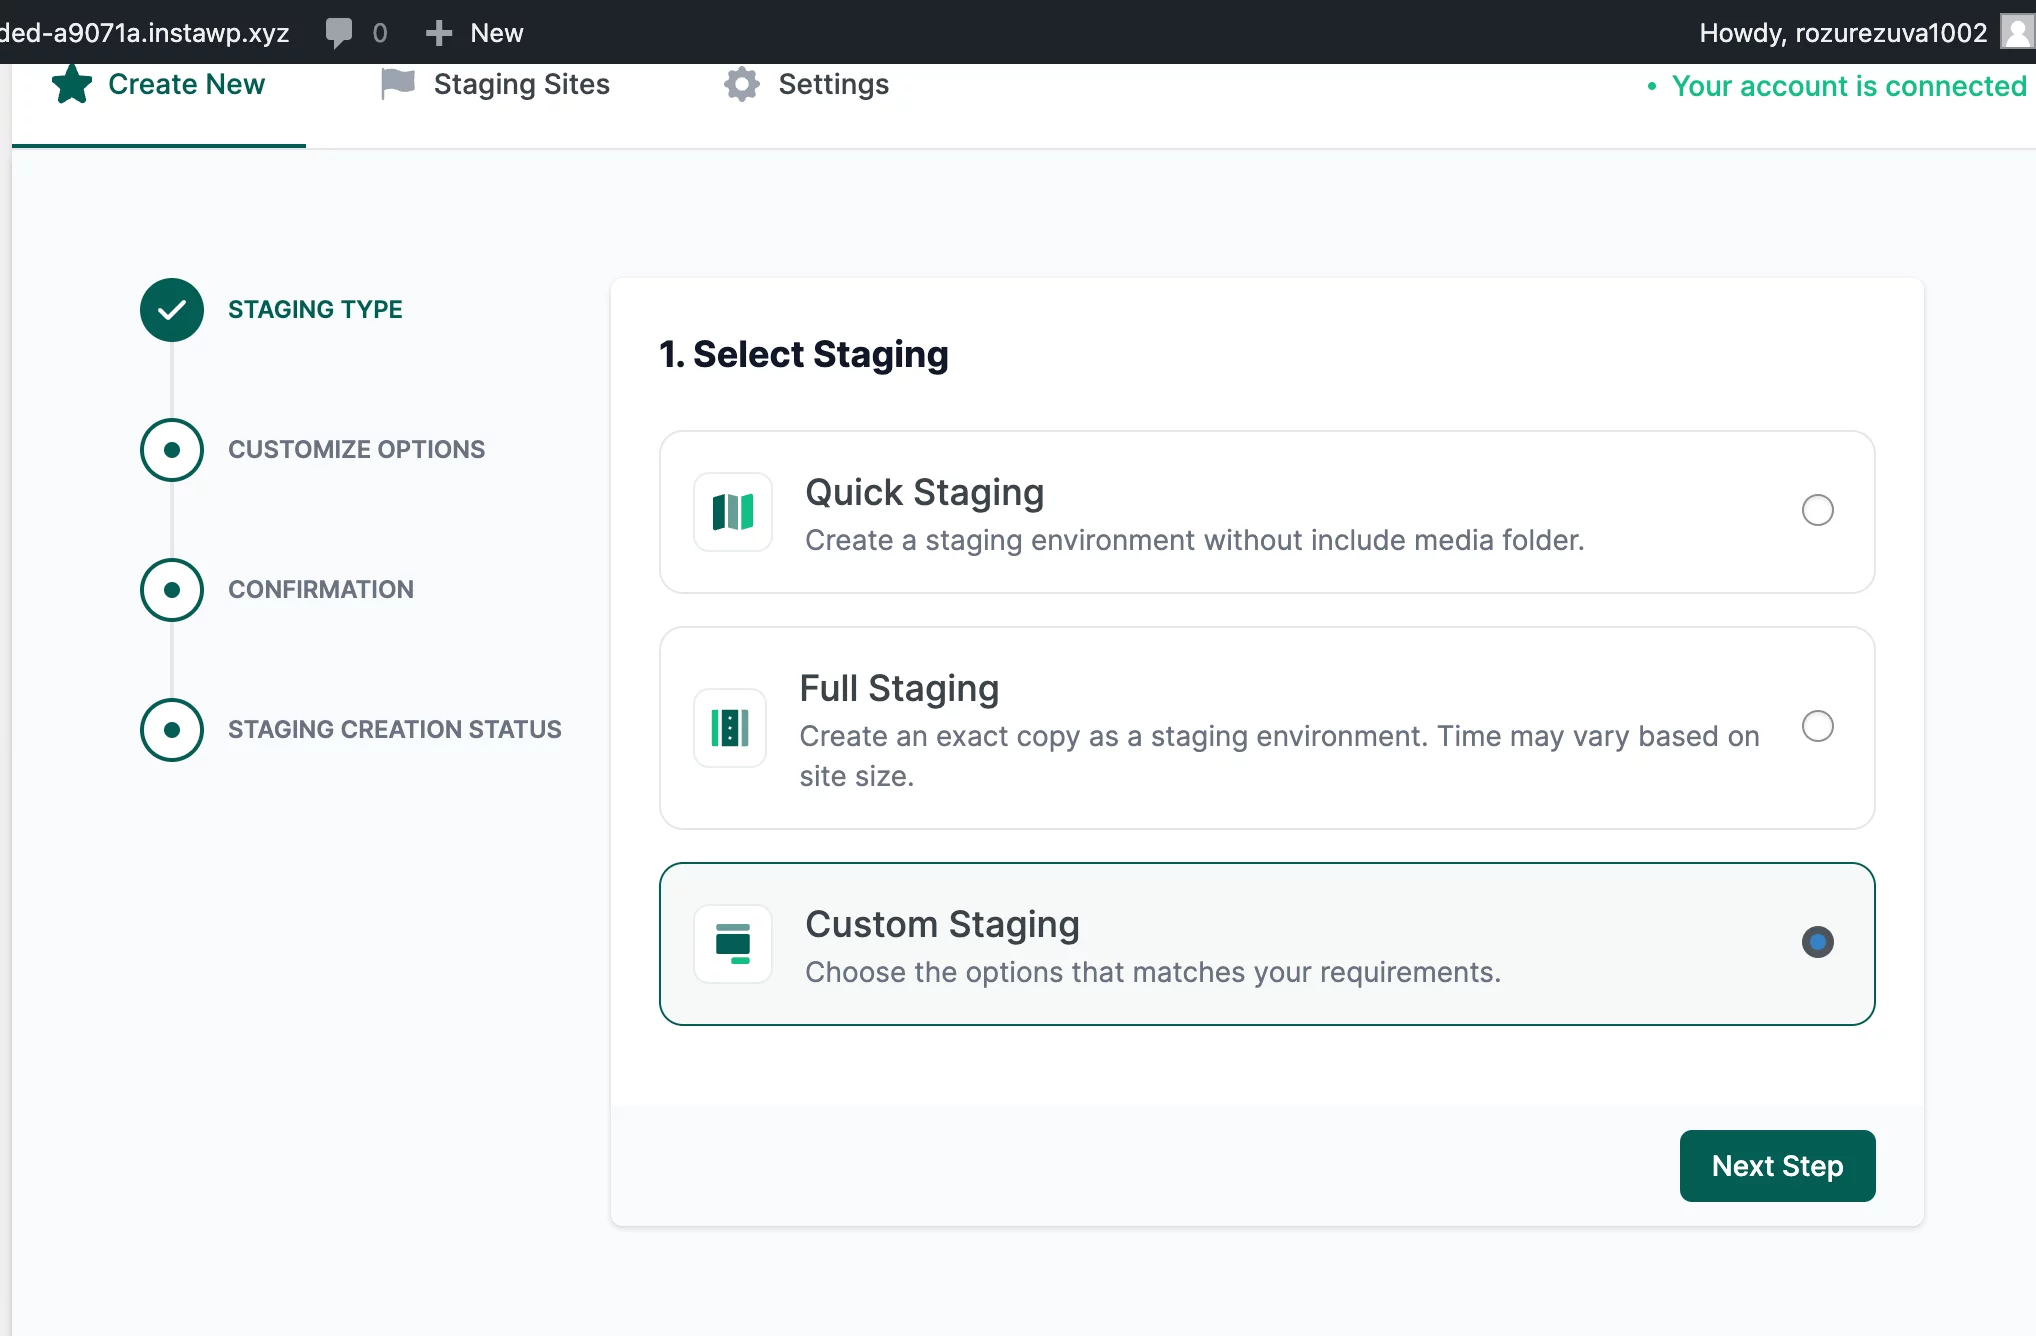
- Quick Staging – Create a staging environment without including a media folder.
- Full Staging – Create an exact copy as a staging environment. Time may vary based on site size.
- Custom Staging – Choose the options that match your requirements.
Once you are done with selecting the staging type, go to the next step and customize the option. Then the plugin will automatically prepare the sandbox environment.
Conclusion
All-in-all the WordPress sandbox environment is a crucial stage in the website development process. You can find various ways to create testing sites and it can be a problem if you don’t know what works best for you. Thus, we took it into our hands and here we have explained the easiest way to set up a WordPress Sandbox for agencies to deliver to clients.
InstaWP is a great WordPress sandbox provider for every WordPress learner and enthusiast. Further, the pro plan would be best to choose if you are seriously interested in creating a WordPress sandbox. But if you want to try it out first, you can start with the free account!


Stuck Somewhere?
Connect With JustHyre
Hire WordPress Engineers for custom jobs like Website Customization, SEO Optimization, Clearing a Hacked Website, Installation & Configuration & more.
Connnect with JustHyre
0 Comments