How to Create a Counter in Elementor? (5 Easy Steps)
Are you struggling with counters on your website? Don’t worry! We have brought this article about how you can easily create a counter in Elementor.
Many websites on the internet sell the same product or service as your website. In the efforts to make your website distinguishable, a counter section adds a cheery as it directly tells your new customers about the satisfactory service experienced by your past customers. A tally counter displayed shows the hits on your website or a page receives.
Elementor, a visual WordPress website builder, is the best option for you to create an amazing WordPress increment counter for your webpage. Making a counter in Elementor gives you access to the advanced styling, layout, and design elements for your WordPress content.
Read this blog to know how you can easily create a counter section in Elementor. But before that, let’s see what a counter is and why we use them.
What Is a Counter on a Website?
A counter on the website helps to keep track of your audience. It helps you keep track of how many visitors have visited your website and the clicks. A counter is usually at the end of the website page that your new users about the credibility of your business. When a user sees a counter, it helps in the decision-making of whether to use your product or service or not.
Different Types of Counter
1. Hit Counter
A hit counter, usually on the home page, shows the number of time a user have visited the page. Every time a visitor’s browser requests your page to see or visit, you get a hit. It can be public or non-public. Hit counters are the most basic counter type which is easy to install and graphically altered to fit in features.
2. Web Counter
A web counter measures the number of visitors a website has received. It offers the statistics of both the number of hits and the number of pages viewed. Sometimes, it also provides an overview of which page has received the most number of visitors.
3. Page Counter
A page counter is almost the same as a hit counter. A page counter is more advanced than a hit counter. A page countermeasures page views on multiple pages of a website whereas hit countermeasures the hit on a single page.
Looking for an easy way to add a testimonial block using Elementor? Check out, How to Create an Attractive Testimonial Block In Elementor? ( 2 Easy Methods)

Why Do We Need a Counter Section?
1. It Tracks Website Traffic
A website page counter’s main purpose is to track website traffic. Installing some plugins lets you see the number of views and hits your website is getting. The data collected gives you information on the areas where you should improve.
2. Easy Access to Compare Data
When you track your website’s traffic, you get to know your target audience and your target product. You can know what time of day, you have the most users and visitors. You can use that data to create your marketing strategies. For example, you can schedule your promo, discounts, pop-ups, giveaways, and likewise.
3. Give Ideas to Your Customers About Your Website and Its Analytics
Displaying a counter section on your website shows the experience of visiting and interacting with your website. Since customers do care about what other customers think, a counter will help you to improve your credibility.
4. Helps in Transparency
A counter section works as social proof for your website and it gives your customers a peek into your website’s traffic. It gives tangible proof to your customers that you have no intention to lie about your product and service.
Want to add a PDF download button using Elementor? Read, How To Add PDF Download Button Using Elementor? (6 Easy Steps)
How to Create a Counter in Elementor?
Step 1: Install and Activate Elementor
To create a counter in Elementor, you need to download it. It can be done in two ways.
Firstly, you can hover over the “Plugins” section and click on the “Add new” button. Search for Elementor in the search box. You will find the result. Install it and activate it. Or you can just click on the link below to directly access the page.
Once you download and activate the plugin, you can find the Elementor in the menubar of your WordPress interface.
Step 2: Select Layout
After installing Elementor, add a new page and give it the title. Next, you will find an option to edit the post with Elementor. Click on that and you will land on the Elementor interface.
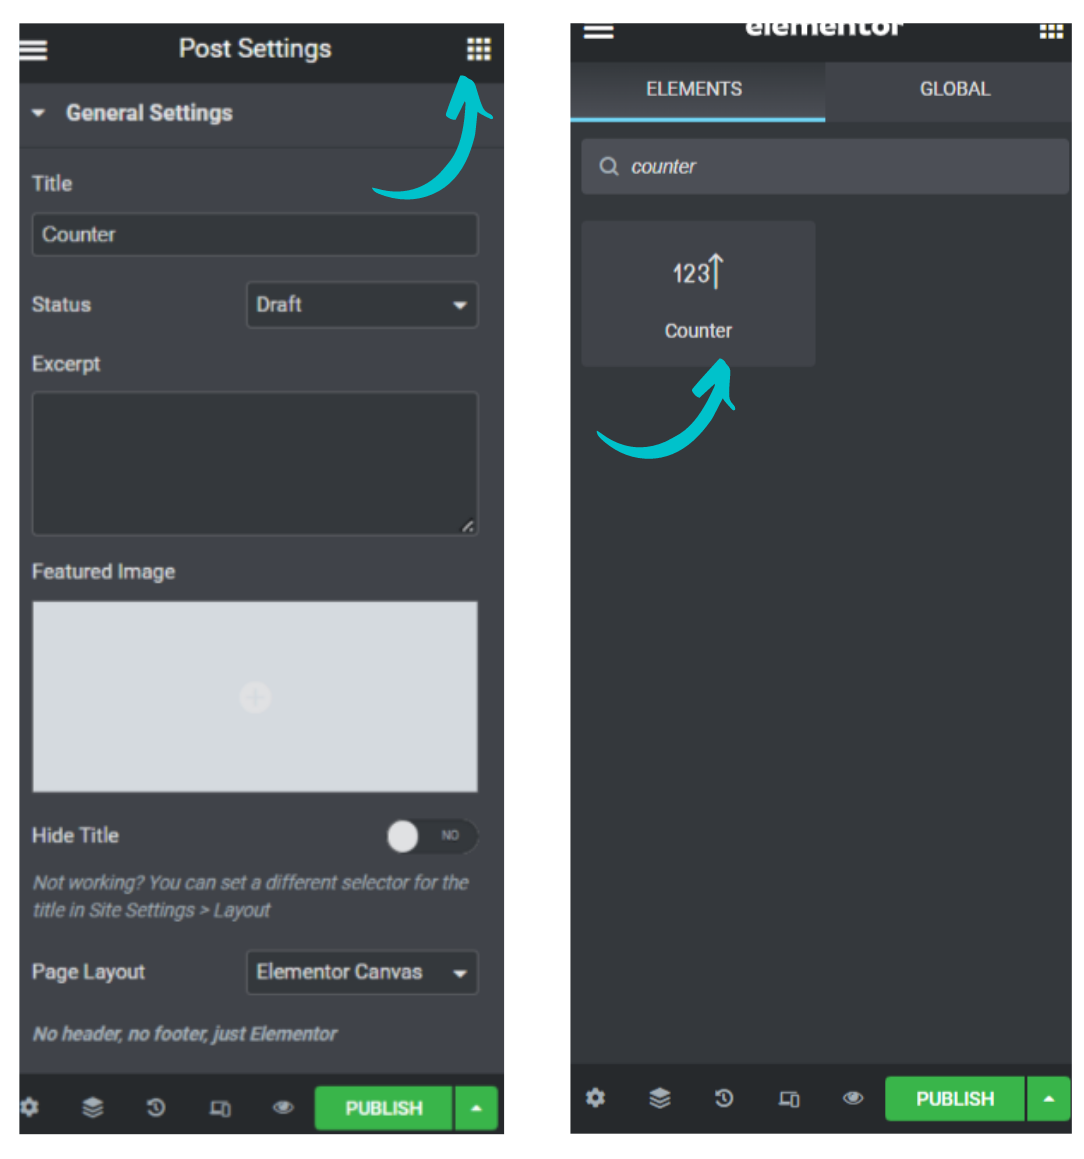
To change the workspace, click on the settings icon in the bottom left of the Elementor interface. Navigate to “Page Layout” and select “Elementor Canvas”.
Click on the icon to add a new section and select the layout that inclines with your requirements for the counter section.
Step 3: Insert Counter Widget
Go to the Widgets panel and search “Counter” in the search field. Making a counter in Elementor is so easy because of its amazing features. One of those amazing features is Drag-and-drop. Drag and drop the Elementor counter widget to the structure.
Step 4: Edit Widget
To edit the counter in Elementor, click on the edit icon. From that, you can change the starting number and ending number. You can also add the number suffix and number prefix. Set the animation duration as well. Select the separator and change the title of your counter in the “Title” field.
Next, to style the number and title of the counter in Elementor, go the the “Style” option. Change the text color, typography, and text shadow of both the number and text. Set it according to your theme for the webpage.
When you make a counter in Elementor, you also get access to advanced editing. From the advanced option, you can set the margin, motion effects, background, and more.
Step 4: Add Icon
To make your counter look good appearance-wise, add an icon to it. For that, search “Icon” in the search field of the widgets panel. Drag and drop the icon widget to the same section where you have added the counter widget.
Select the icon that goes with your counter section. For that, click on the icon, and search. You will have various options for your webpage. But if you are not satisfied with that, you can upload one by clicking on the “Upload” button. After selecting the icon, click on “Insert”.
In the edit section of the icon, you can go to the “Style” tab, to edit the icon. From the style tab, you can change the primary color, size, and rotation.
Wondering how to add shape dividers in Elementor? Read this, How to Add Shape Dividers in Elementor? (5 Easy Steps)
Step 5: Duplicate the Section
Once you make the counter in Elementor, you can duplicate it. Click on the icon for the edit section and select duplicate. Change the icon, title, and number according to the counter.
For example, if you have 10000 active users, edit the counting number and change the title to “Active User”. If you want to make a counter for the number of countries, then you can change the icon to some building or globe ion and can change the title to “Countries Reached”. If you want to showcase the average number of clicks per hour, then you can change the icon to mouse ion and the title to “Clicks per hour”.

Wrapping Up
And there you have it. Elementor is one of the most advanced and easy-to-use virtual website builders. With the above-mentioned process, making a counter in Elementor is as simple as making a pie. A properly designed and well-crafted counter in Elementor can help you gain more traffic. Since the counter shows the stats, figures, and specificity of your website or business, it can help mold the customer’s point of view towards your products.
Even if you are new to WordPress, you can easily create a counter in Elementor. One of the significant features of Elementor, apart from the drag-and-drop editor, is its responsive design. Since you can’t decide whether your user is reviewing your webpage on a phone or desktop, it is always better to play on the safe side and create responsive designs that change according to the screen of users.
[wbcr_html_snippet id=”4204″]
FAQs
1. How do you make a counter in Elementor?
To create a counter in Elementor, drag and drop the Counter widget onto your page, then customize it with your desired settings and content.
2. How do I add a counter widget?
Add a counter widget in Elementor by dragging the Counter widget from the Elementor panel onto your desired section of the page, then configure it with your preferred options.
3. How do I add a visitor counter in Elementor WordPress?
Elementor does not have a built-in visitor counter widget. However, you can integrate third-party visitor counter plugins with Elementor to add this functionality to your WordPress site.


Stuck Somewhere?
Connect With JustHyre
Hire WordPress Engineers for custom jobs like Website Customization, SEO Optimization, Clearing a Hacked Website, Installation & Configuration & more.
Connnect with JustHyre
0 Comments