How to Setup WordPress Multisite Domain Mapping? (4 Easy Steps)
Want to set up WordPress Multisite Domain Mapping?
You will be amazed to know how easy WordPress Multisite Domain Mapping makes it to manage a network of websites. WordPress has an over-powered feature to have multiple sites under one parent WordPress Multisite setup. With WordPress Multisite Domain Mapping, you can manage everything including the number of sites, features, themes, and user roles.
Here, in this blog, we have shown you an easy way by which you can set up WordPress Multisite Domain Mapping. But before that let’s have a look at what is WordPress Multisite Domain Mapping and why to use it.
What Is WordPress Multisite Domain Mapping and Why Do You Need It?
WordPress Multisite is one of the most popular features of WordPress that enables you to manage multiple websites using the same WordPress installation. If you have multiple websites, you can manage them all using a single WordPress installation.
It is an advanced feature that lets you manage WordPress in multiple different domains. If you don’t have WordPress Multisite, then you will have to individually update the plugins, themes, and backups of each website. But with WordPress Multisite you can update all your websites with a single click. You can also have separate hosting for each domain.
A WordPress Multisite can install new themes and plugins and make them available to the websites on the network. You can also customize the themes for all the websites.
How to Set Up WordPress Multisite Domain Mapping?
To set up WordPress Multisite domain mapping, you will need a WordPress hosting company that supports WordPress multisite subdomain and WordPress multisite, and a domain name for your WordPress Multisite Domain Mapping.
Here, in this tutorial, we have used SiteGround.
Step :1 Installing WordPress Multisite
The first step to creating a WordPress Multisite Domain Mapping, you will need WordPress. Once you install WordPress, you will have to select the hosting company. Most WordPress hosting companies come with a one-click WordPress installer. Once done with the installation, you will have to enable the WordPress Multisite feature.
WordPress Multisite Domain mapping is the built-in feature of WordPress. To enable it, you will need to edit the wp-config.php file. The wp-config.php file is the WordPress file that has all the important configurations for a WordPress installation. You can find the wp-config.php file under the root folder of your website.
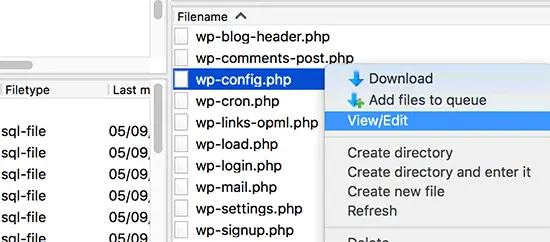
Once you find the wp-config.php file, you will find an option to edit it. Add the following lines.
define ( ‘WP_ALLOW_MULTISITE’, true );Add the lines mentioned above, save your changes, and upload the file back to your website.
Once you upload your file, you need to go back to the WordPress admin dashboard and reload the admin dashboard. Next, you will need to configure your WordPress Multisite Network. For that go to “Tools” and search for “Network Setup”.
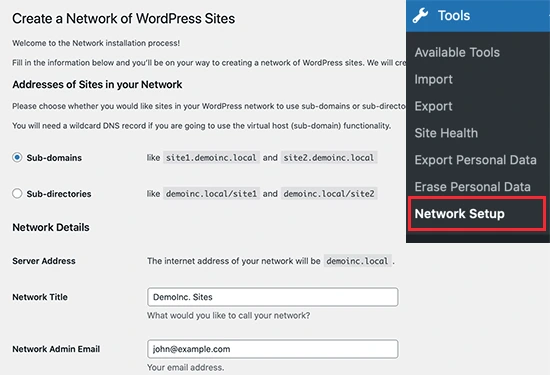
Under the ‘Address of Sites in your Network’, you will need to choose subdomains for your multisite network and network admin email address. Click on the “Install” button and you will have a window that will show two pieces of code.
The first code will be needed to add to the wp-config.php file. In addition to that, you will need to add the following lines,
define( ‘COKKIE_DOMAIN’, $_SERVER[ ‘HTTP_HOST’] );You will have to add the second code to your .htaccess file and replace the default WordPress .htaccess rules. Once done with adding both codes to their respective file, you will have to log in to your WordPress admin dashboard.
Now, you will see a new menu item in the admin bar of your WordPress admin dashboard. “My Sites” is your way to manage WordPress Multisite Domain Mapping for your websites.
Step 2: Creating new sites
Go to “My Sites > Dashboard”. No, to create your first site using a different domain name, navigate to Sites > Add New.

Enter all the necessary details in the respective fields like site address, title, site language, and admin email. In this step of WordPress Multisite Domain Mapping, you can add any site address as you can change it in your custom domain.
Next, click on the ‘Add Site’ button to add a new site.
To edit the site you have just created, you will have to go to Sites > All Sites. Search for the site you have just created and click on the “Edit” link below the site’s name. You can add a custom domain name that you wish to use for your website from the Site Address (URL). WordPress has built-in domain mapping which will automatically map your custom domains to your Site Address.
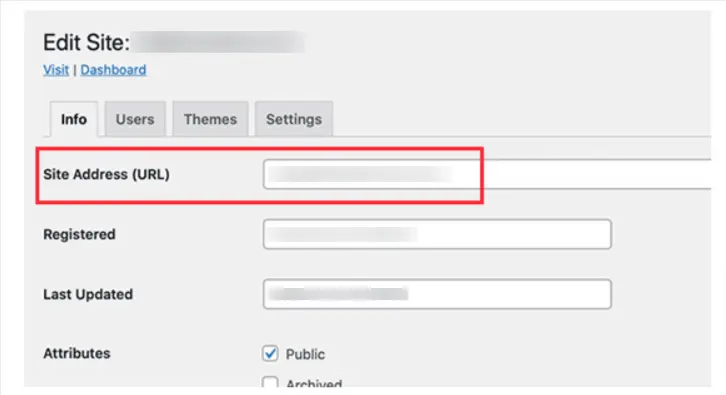
Hit the “Save Changes” button to save all your custom edits.
You can add as many sites as you want using the same process. But, one thing you will notice is that none of your custom websites is accessible as your custom domains don’t have any WordPress hosting company.
Step 3: Adding custom domains to the hosting account
Now, you will have to add custom domains to your hosting account. As mentioned above, here in this tutorial, we have used SiteGround, an amazing hosting provider.
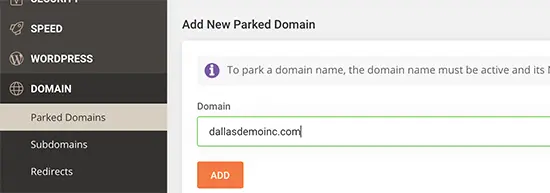
To edit the domains, click on “Site Tools”. Then navigate Domains > Parked Domains and add your custom domain here. To add more custom domains, repeat the same steps.
Step 4: Managing and Login to WordPress Multisite
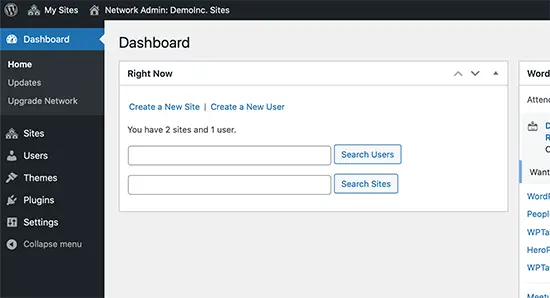
With WordPress Multisite Custom Domain Mapping, you can easily perform most administrative tasks like installing plugins, themes, and updates from your root site’s dashboard. But if you wish to work with an individual site, then navigate My Sites > Sites > All Sites and then click on the “Dashboard” below the site you want to edit.
From here, you might need to log in again, and then you can create pages, and edit and manage the individual site.
Wrapping Things Up
And that’s it for this blog. We hope this blog has helped you in setting up your WordPress Multisite Domain Mapping. WordPress Multisite Domain Mapping is best used when you are creating a network of sites sharing similar functionality. With just a single installation of WordPress, you can manage your network of websites.
If you like this blog, also read our detailed guide and our expert’s pick on How to Fix the “File Type Is Not Permitted” WordPress Error with Easy Methods and How to Add a Calculator in WordPress? (5 Easy Steps).
Stuck Somewhere?
Connect With JustHyre
Hire WordPress Engineers for custom jobs like Website Customization, SEO Optimization, Clearing a Hacked Website, Installation & Configuration & more.
Connnect with JustHyre


0 Comments