How to Add Mailchimp to WordPress – 2 Simple Ways to Boost Your Email Marketing
Email can be a powerful tool to connect with your audience. Email marketing is one of the best strategies for small businesses and start-ups to gain traffic and an audience. However, it may be challenging for small businesses to purchase premium plans for email marketing. Therefore, in this article, we’ll learn how to add the powerful tool Mailchimp to a WordPress website.
First, let us understand why email marketing is important for your business. Email Marketing helps you connect with the audience and it helps generate traffic for your website.
Now let us understand why we have chosen Mailchimp for our WordPress website. Mailchimp is a unique platform that allows you to connect with your audience using forms and various other tools. Mailchimp offers paid and free plans. In the initial stages of your business, it’s advised to subscribe to a free plan as it has a limit of 2000 subscribers. Later you can purchase premium plans if you feel it’s needed. In this article, we’ll learn 2 ways in which you can connect your Mailchimp to your WordPress website. Now, without further adieu, let’s start our tutorial on how to add Mailchimp to your WordPress website.
1. How to add a Pop-Up form using Mailchimp to your WordPress website.
Step 1: Create or Sign-up for a Mailchimp account.
In the first step, you need to sign up or create a Mailchimp account. Once you’ve entered your information correctly, Mailchimp will verify your account using your email ID.
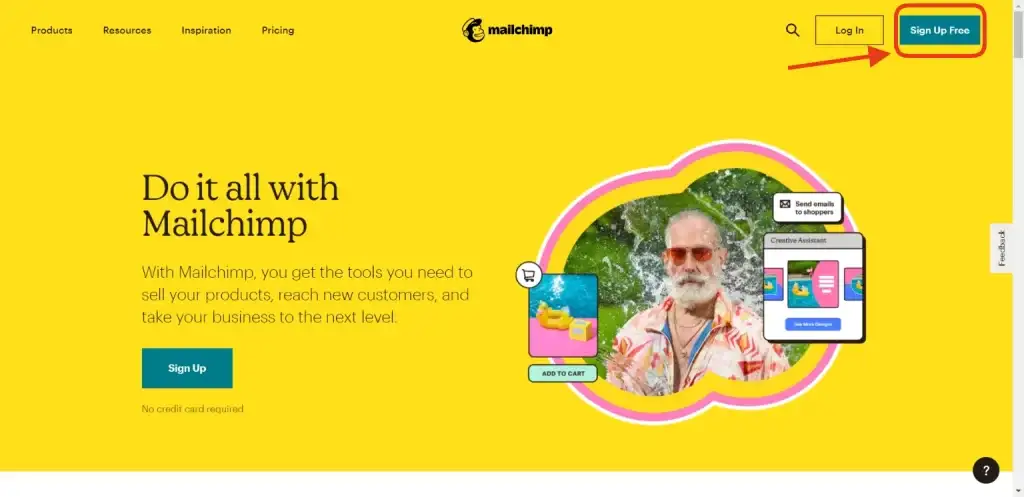
After activating your Mailchimp account, the next step is to choose your plan. There are several plans available, paid, and even free. In the initial stages, it’s advised to opt for a free plan. Later you can upgrade your plans if it’s needed.
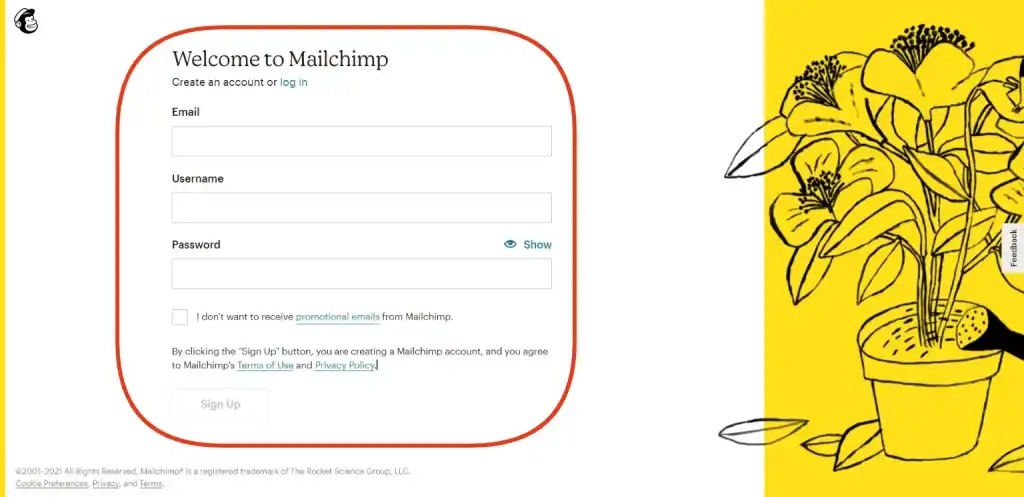
Step 2: How to Make a Pop-up form using Mailchimp for your WordPress.
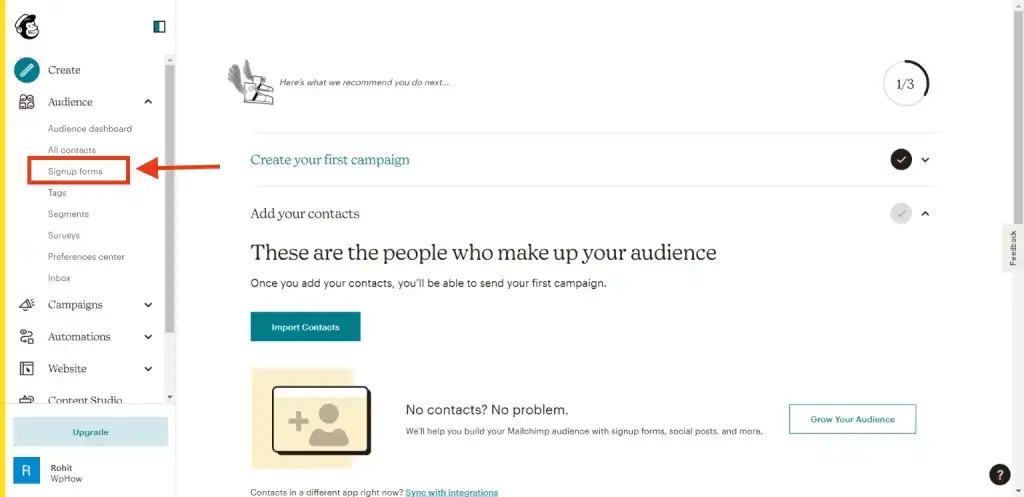
- Go to the Audience section from your Mailchimp Dashboard and select Sign-up forms.
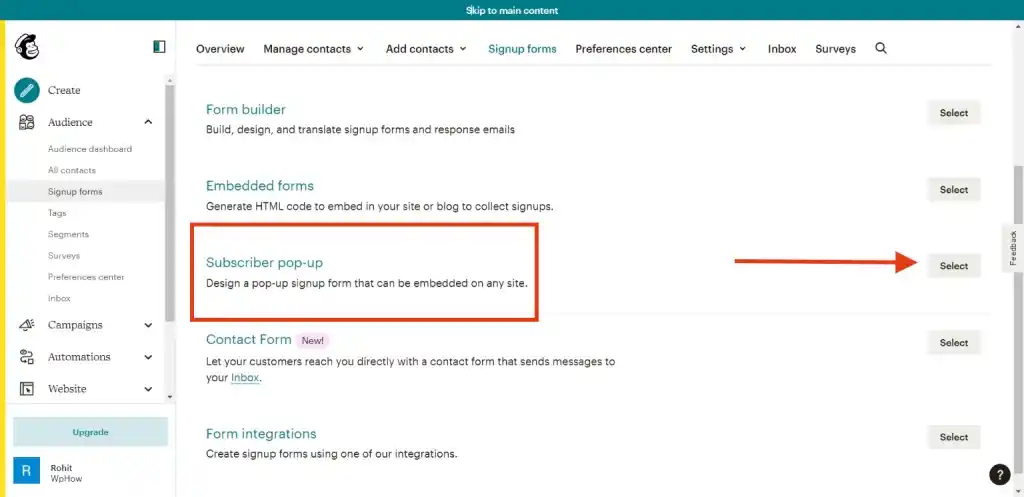
2. In the forms section, select Subscriber Pop-Up Form as shown in the image.
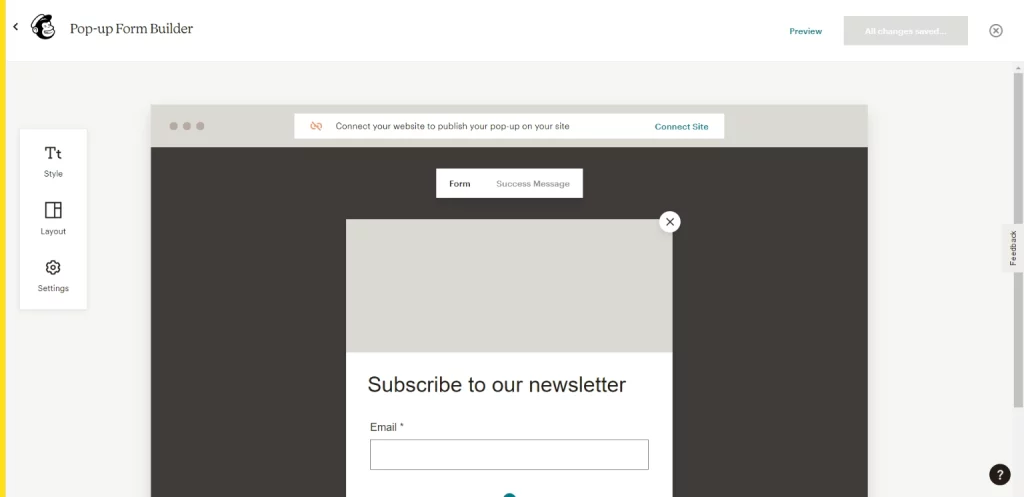
3. After clicking on the subscriber pop-up, you can select the layout for your pop-up form. You can also choose a style using the option given on the left-hand side.
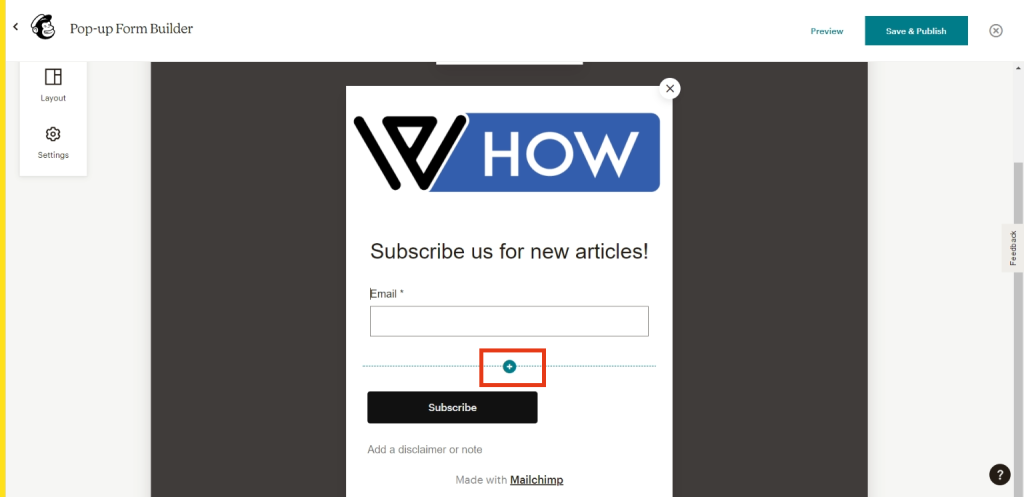
4. When you’re done with all the editing on your pop-up form, you can also add other sections in your pop-up form, e.g. First name using the + icon as shown in the image.
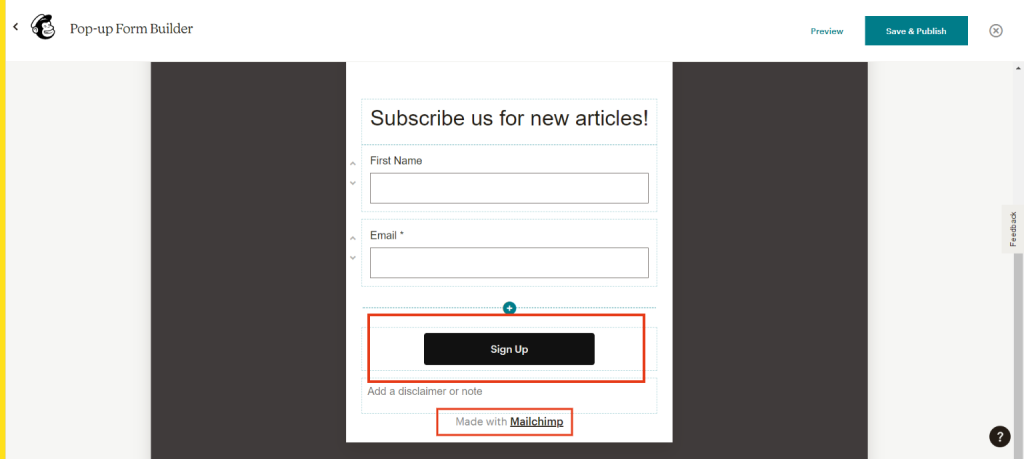
5. You can also add a disclaimer or note in your form, one important note, you can’t edit Made with Mailchimp from your form if you’re using a free plan.
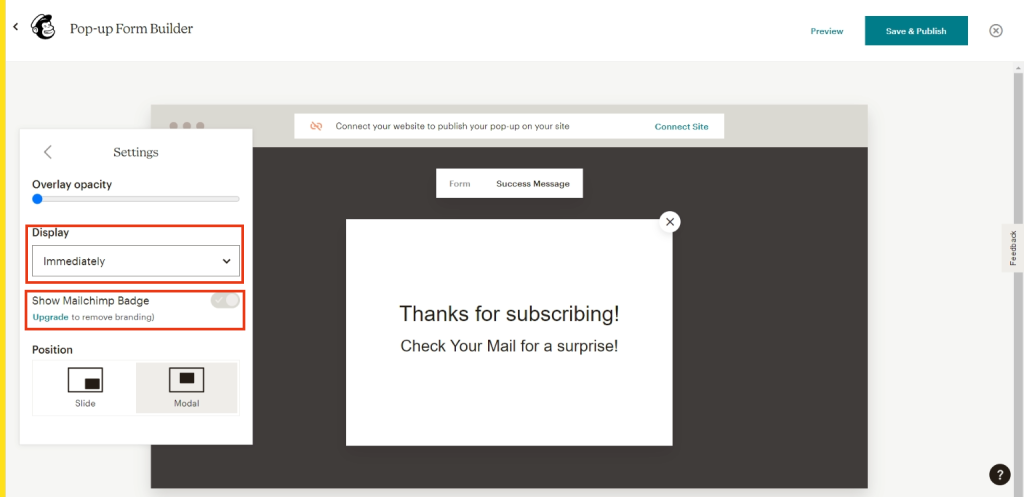
7. Inside the settings option you can choose when you want to display your pop-up, e.g. if you select immediately, the form will appear instantly to the user who’s visiting your website.
Step 3: How to integrate your pop-up form into your WordPress website.
- After you’re done editing your form, you need to integrate it into your WordPress website. For that first click on connect, which is at the top of your pop-up form.

2. Add your website URL and click on Get Started.
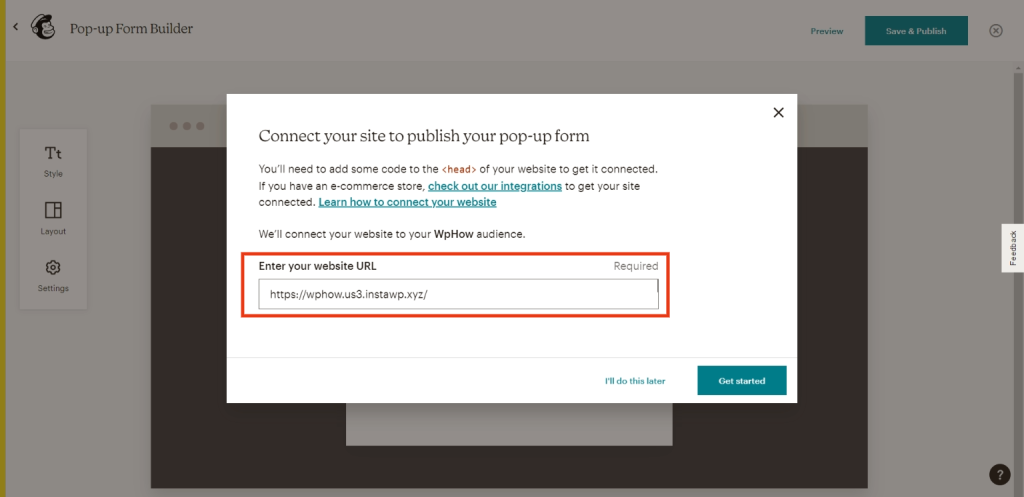
3. Copy the code that appears Infront of the screen.

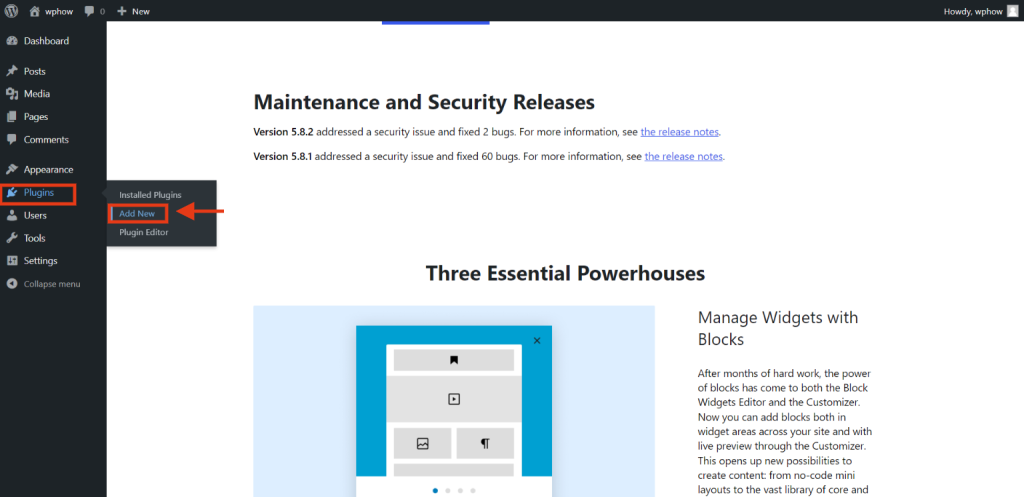
4. Go to your WordPress Dashboard, and click on Add new plugin.
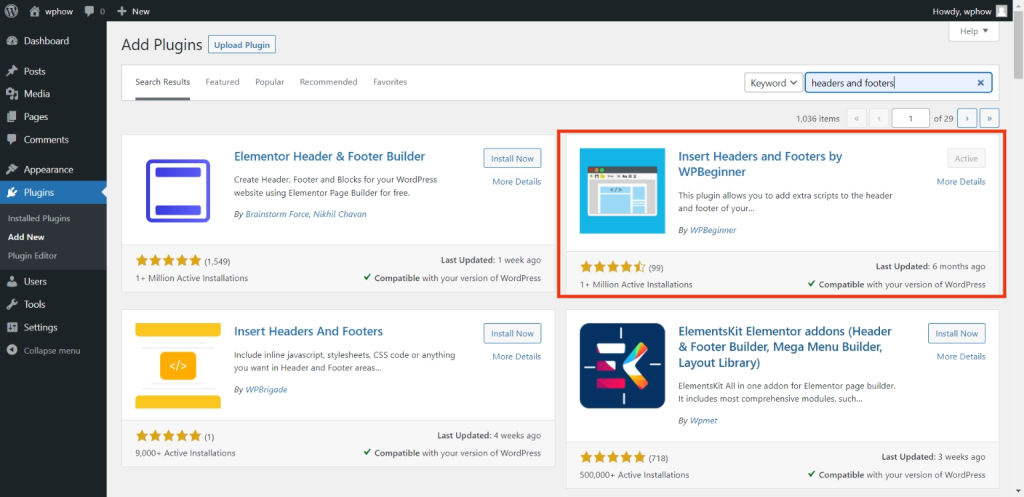
5. Search for Headers and footers and download the plugin which is shown in the image. This is very important as we need to copy the code from our Mailchimp to our WordPress.
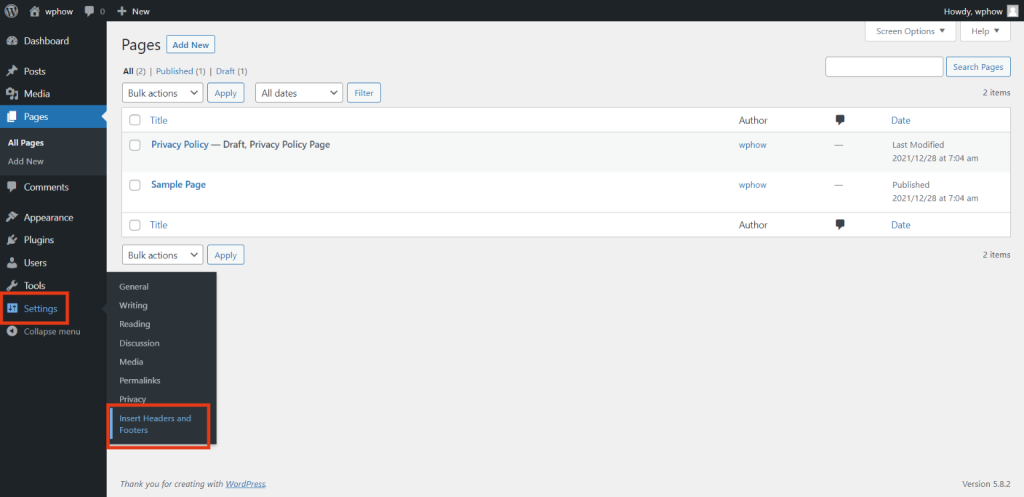
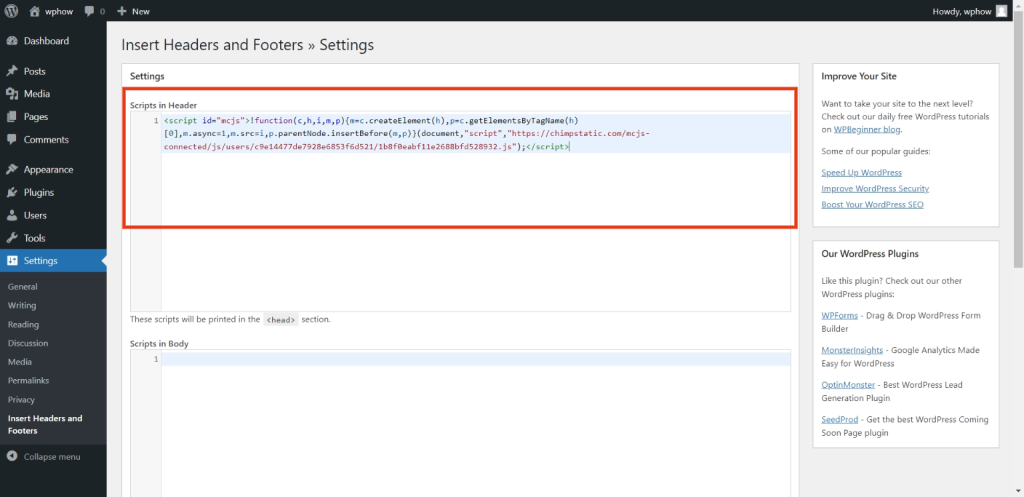
6. Once you’ve installed and activated the mentioned plugin, go to the Settings option in your WordPress dashboard and click on Insert Headers and Footers.
7. Paste the code that you’ve copied from Mailchimp in Scripts in the Header section. Scroll down and click on Save Changes to activate the code on your website.
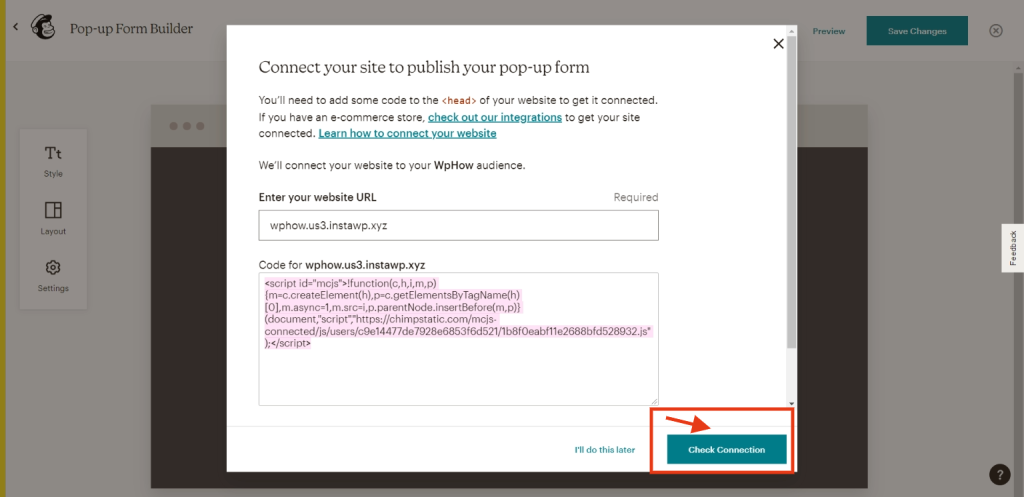
8. Once you’ve completed all the steps, go back to your Mailchimp Dashboard and click on check connection.
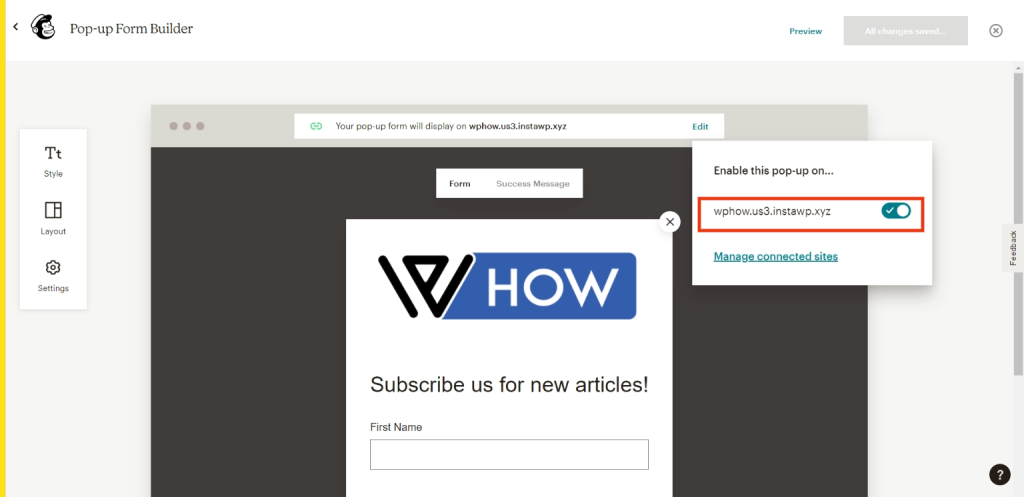
9. You need to just enable Mailchimp to integrate with your WordPress website. Make sure the option is enabled otherwise, the pop-up form won’t work on your WordPress website.
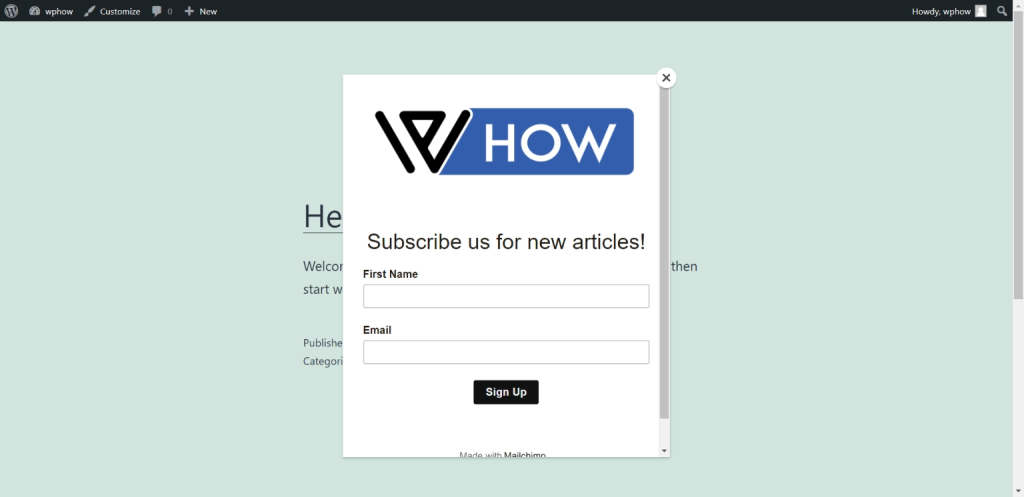
10. Once you’ve completed all the steps mentioned above, your pop-up form will instantly appear when anyone visits your website.
2. How to add a Normal sign-up form on your WordPress website.
Earlier we learned how to add a pop-up form on your WordPress, in the second part of the article, we’ll learn how to add a normal subscription form from Mailchimp on your website using a plugin.
Step 1: Download the Plugin, MC4WP
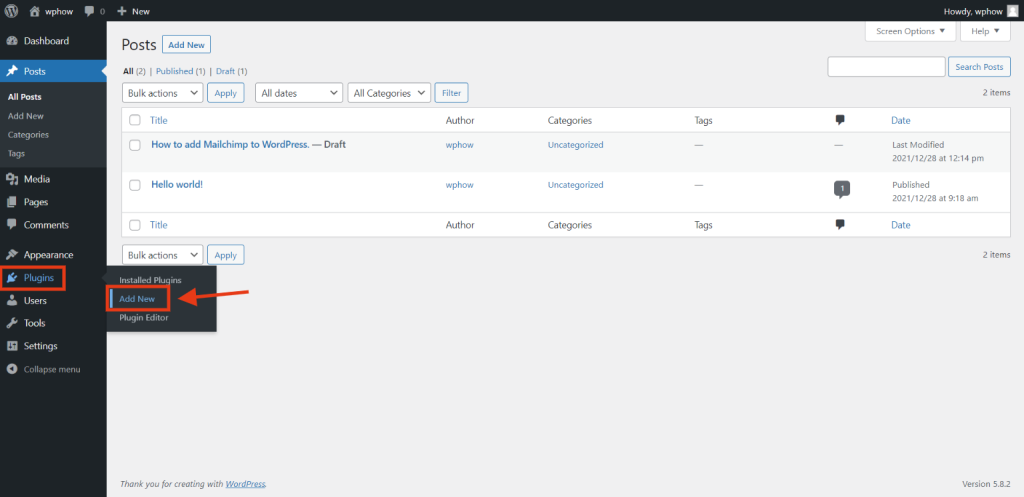
- First, we need to download a plugin named MC4WP from our WordPress dashboard. Go to Plugin and click on Add New.
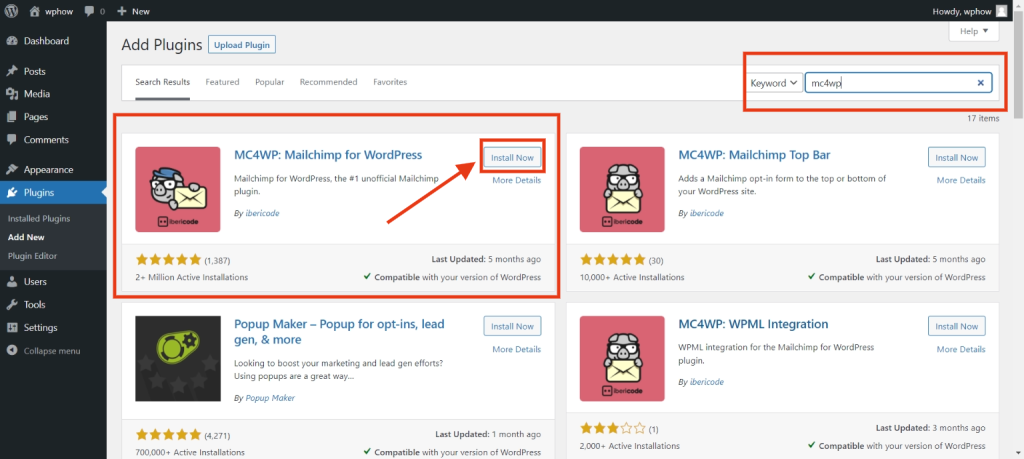
2. Search for the MC4WP plugin and install it. After downloading the plugin, make sure you activate the plugin.
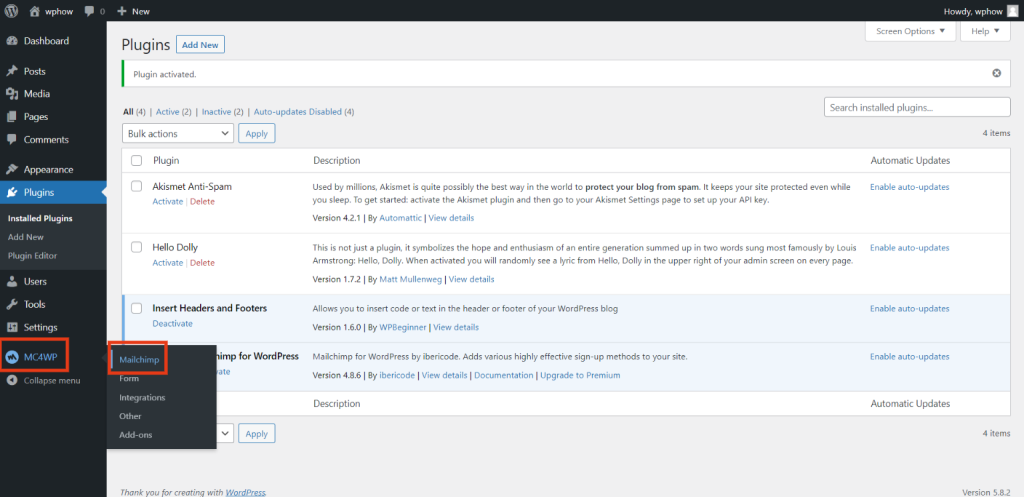
3. Once you’ve activated the plugin, click on MC4WP from the left-hand side of your WordPress Dashboard and select Mailchimp.
Step 3: Integrate your WordPress with Mailchimp using an API key.
In this part of the article, we’ll learn how to integrate our WordPress with Mailchimp.
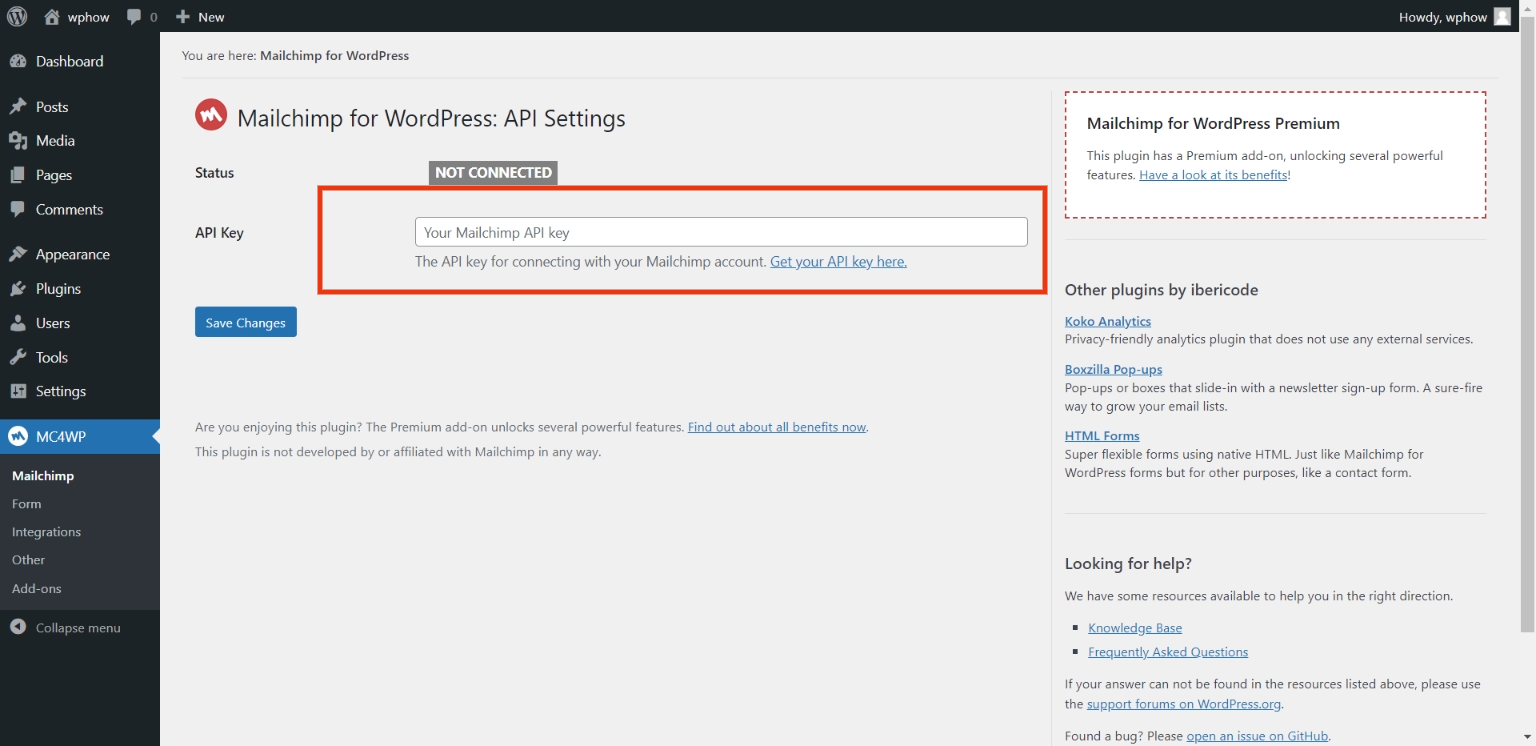
- For integrating our website with Mailchimp, we’ll use an API key, which is required to connect it.
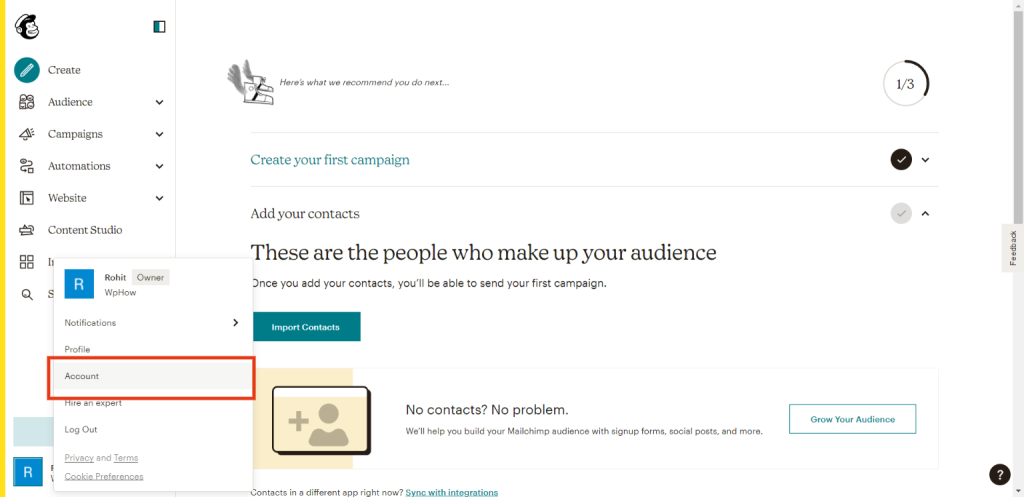
2. Go to your Mailchimp dashboard, and click on your profile which is at the bottom left of the page. Select Account in your Mailchimp Dashboard.
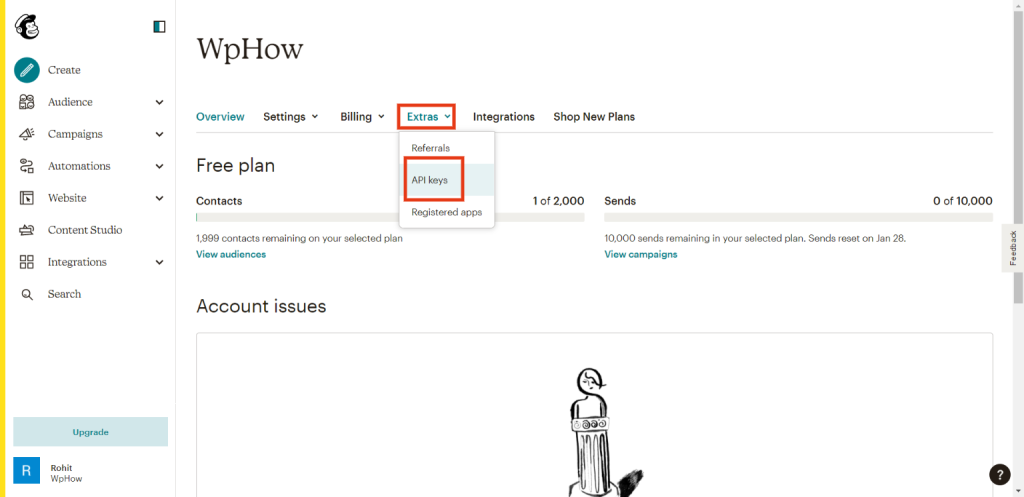
3. Go to the extras section and select API keys as shown in the image.
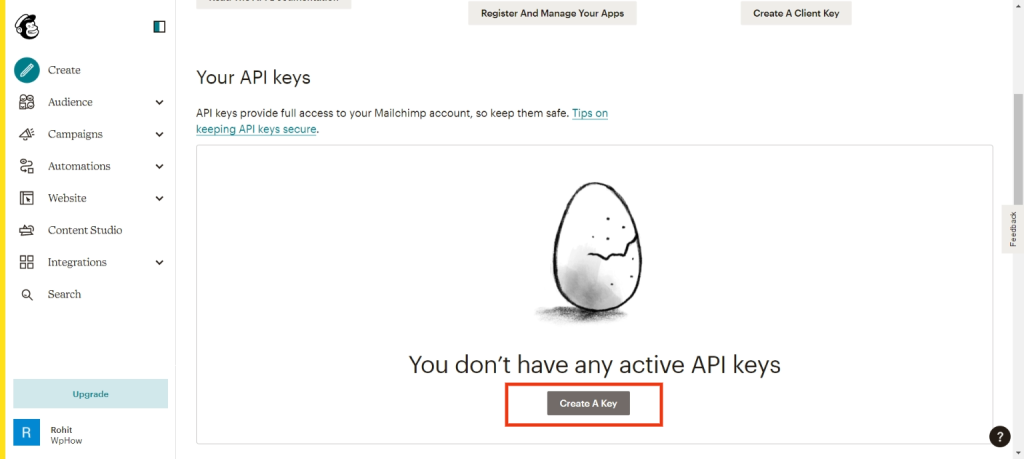
4. Scroll Down in the section and select Create A Key in your Mailchimp Dashboard.
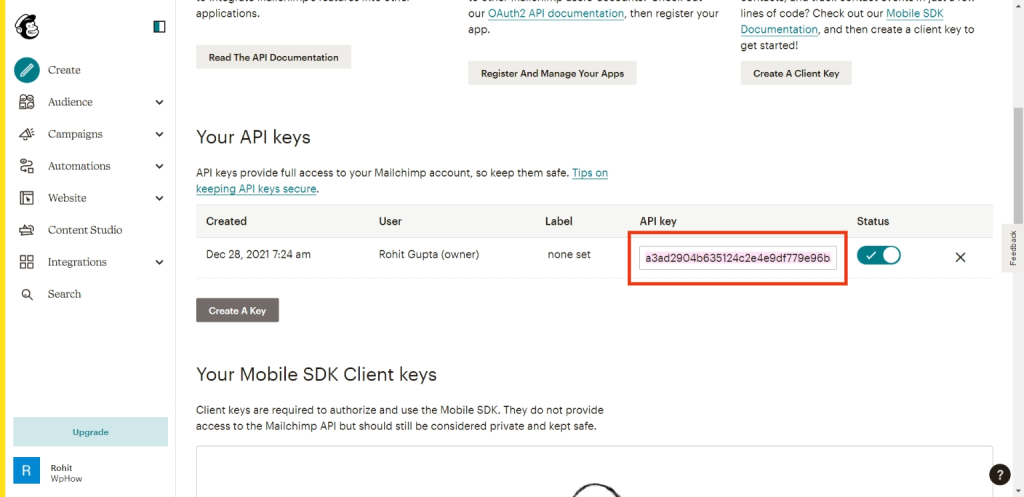
5. This step will generate your API key, make sure to copy it from the dashboard.
6. Paste the API key in your WordPress dashboard. This step is very important as it’ll integrate your Mailchimp with your WordPress website.
MC4WP>Mailchimp
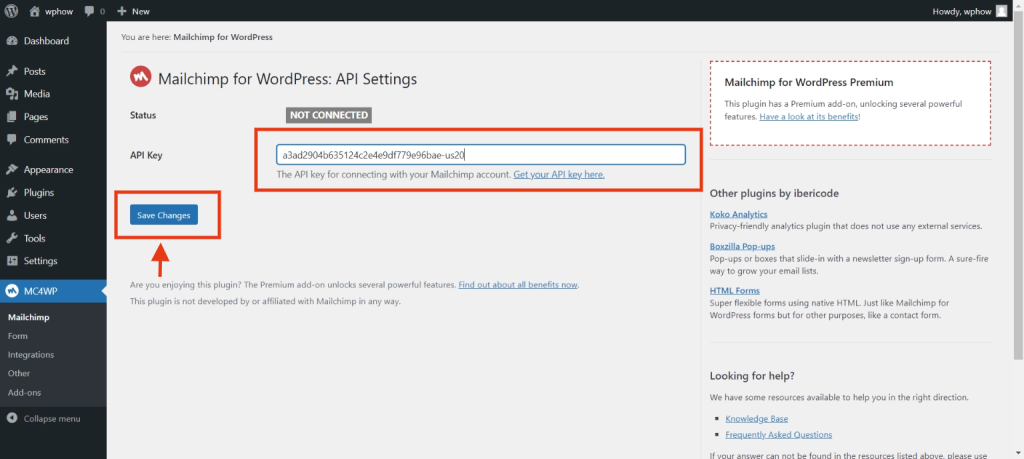
Click on Save Changes, it’ll successfully integrate your Mailchimp into your WordPress.
Step 3: How to add the form on your WordPress.
Once we are done with integrating Mailchimp with WordPress, now we’ll learn how to add forms to your website.
- Go to Your WordPress dashboard, click on MC4WP and select Forms. Name your form as I’ve named it WpHow and select Add new form
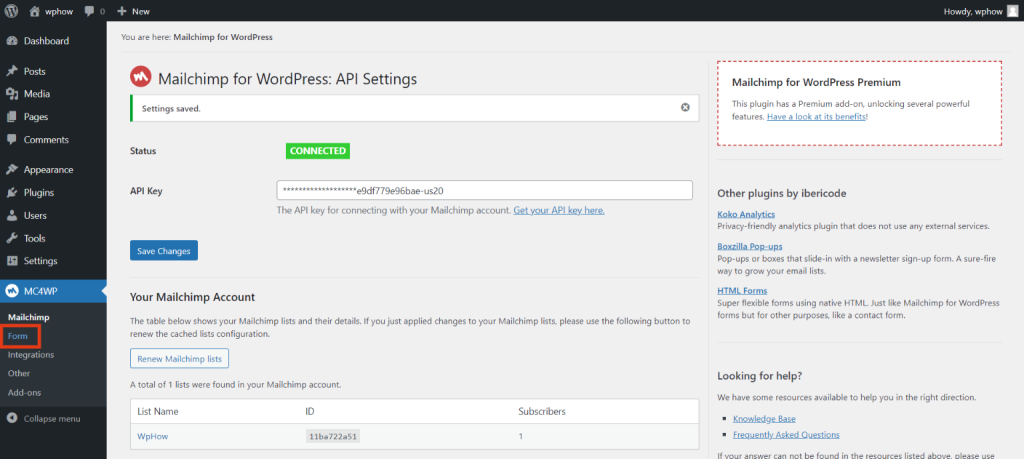
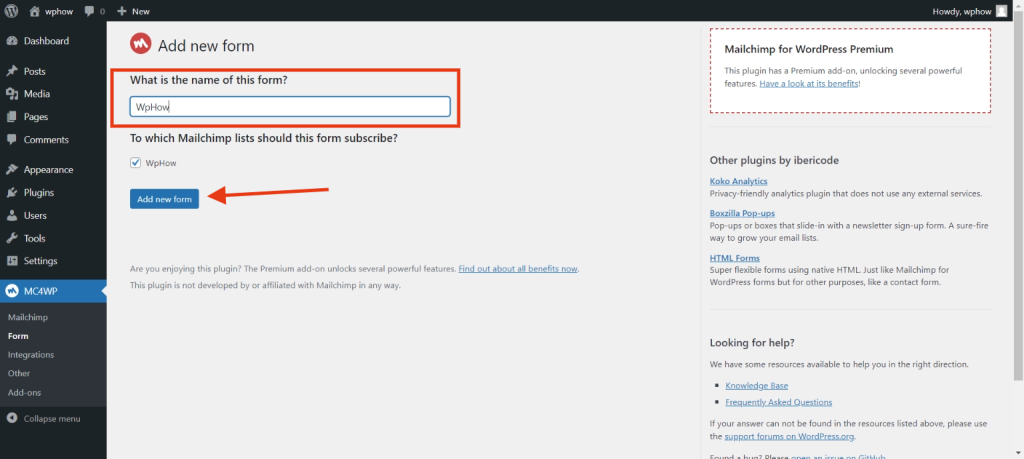
2. Select the structure of your form. MC4WP allows you to add so many sections to your form.
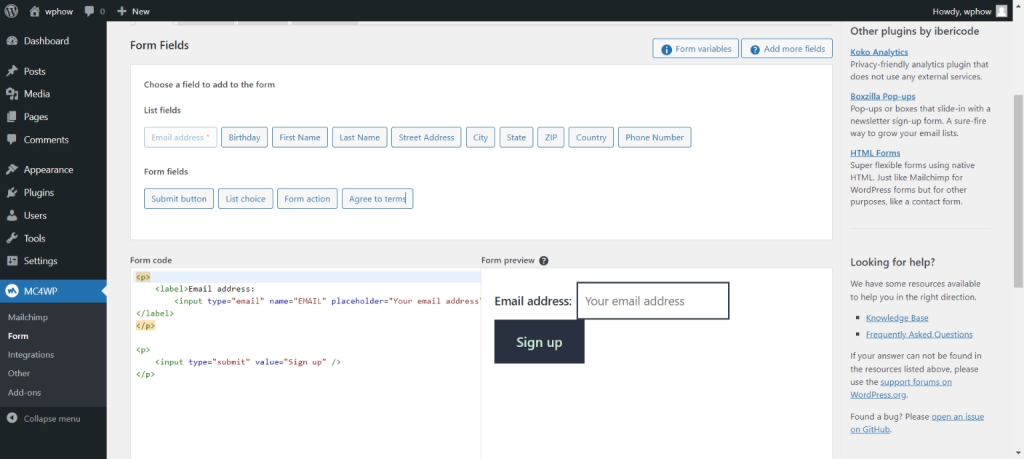
3. E.g. I want to add the first name in the form, I’ve selected First Name from the list fields.
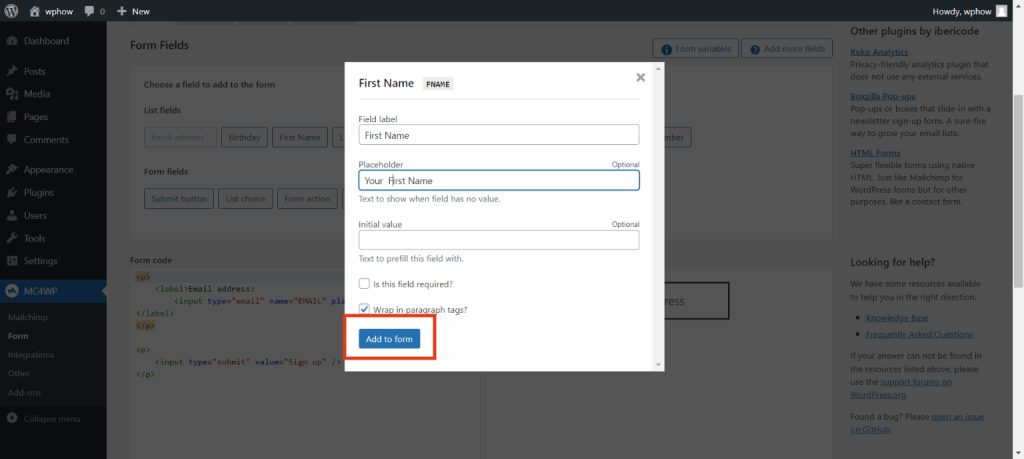
4. Once you click Add to Form, the section which you’ve selected will be added to your form.
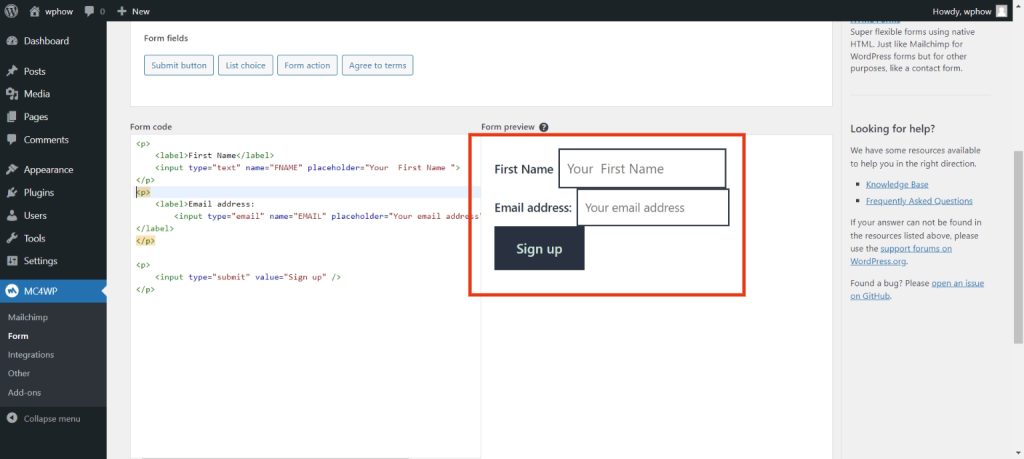
As you can see in the Image, the First Name section has been added to my form.
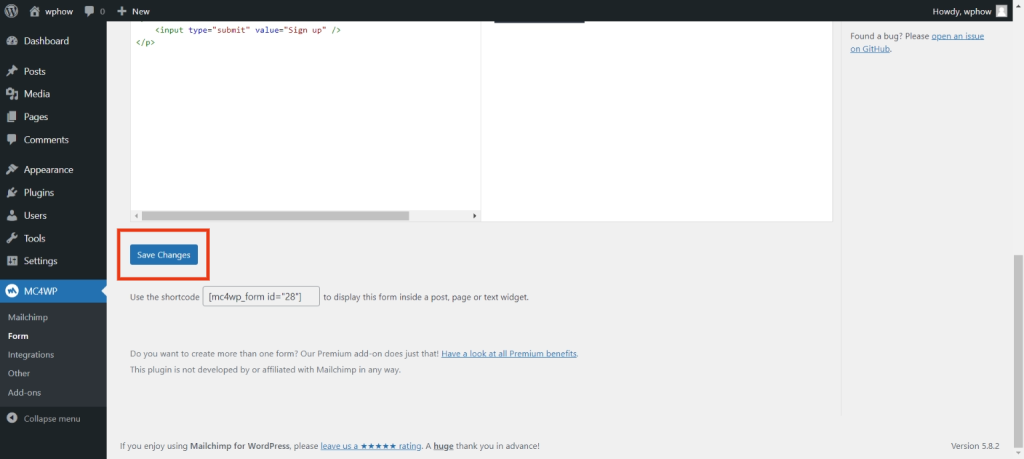
5. Once you’re done editing your form, scroll down the page and click on Save Changes.
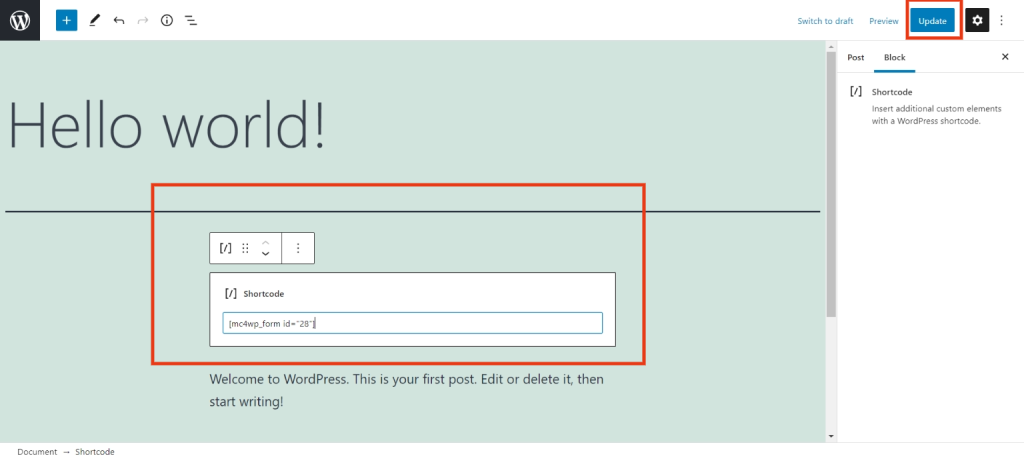
6. After saving changes, a unique code will appear on top of the page. Make sure to copy the code.
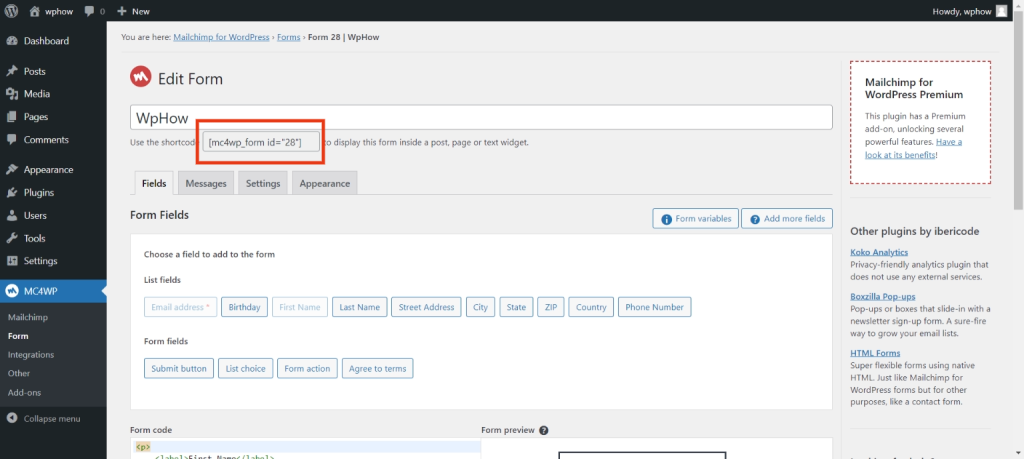
7. Now in the final step, we need to paste the code on our website page. You can paste it on whichever page you want to. Click on the Update button, your form will be visible to every visitor.
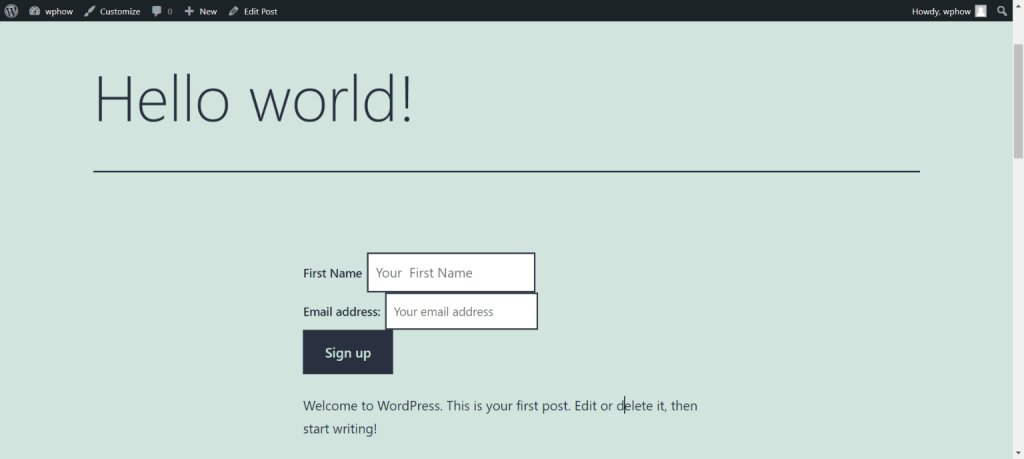
You’ve successfully connected Mailchimp to WordPress.
Conclusion
In this article, we learned the importance of email marketing. We also looked at how we can add Mailchimp to WordPress. I explained two ways in which you can add 2 different forms to your WordPress. Collecting forms from your audience can be a great way to connect with your audience and it’ll help you to send them personalized offers and discounts from your websites.
I hope this article was helpful to you.
Stuck Somewhere?
Connect With JustHyre
Hire WordPress Engineers for custom jobs like Website Customization, SEO Optimization, Clearing a Hacked Website, Installation & Configuration & more.
Connnect with JustHyre


0 Comments