How to Easily Fix “Post-Processing of Image Failed Error” in WordPress?
Are you facing annoying errors like “Post-Processing of Image Failed”? It is a very common error one gets while uploading an image to your WordPress. The most common solution that we see everywhere is refreshing the browser. But if that doesn’t work, in this blog we have shown you other 9 solutions to fix the error.
Read this blog to know 10 different ways by which you can fix the “Post-Processing of Image Failed” error. But before that, let’s have a look at what exactly is the “Post-Processing of Image Failed” error.
What Is the “Post-processing of Image Failed” Error?
The “Post-Processing of Image Failed” error is an error you get while uploading an image in WordPress. There can be several reasons why this error occurs. Fortunately, the WordPress error message provides quite a lot of detail that tells you why this error happened. Sometimes, it also suggests a possible solution.
When you try to add an image to a post on your WordPress website, the image file is uploaded to your WordPress hosting server. Apart from this, an attachment page is also created for the image and a PHP image editing module performs some post-processing. Unfortunately, while uploading an image, some error occurs and your WordPress shows the “Post-Processing of Image Failed” error.
Don’t worry, you can fix this error. Let’s have a look at 10 different ways by which you can fix this error.
10 Ways to Fix Post-processing of Image Failed
1. Re-Scale the Image
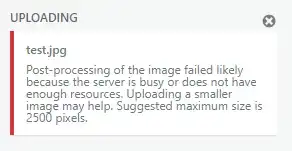
If your image size is more than 2500 pixels, then compress your image, reduce the size, and try uploading it again. Check your image resolution to see if your image size is less than 2500 pixels. Images having more than 2500 pixels are known as big-size images and generally, WordPress has problems uploading big-size images.
We suggest you use an image compression service like tinypng.com to reduce the image size without losing the real quality. Using these compression services will slow and help you load your WordPress page/post much faster which will eventually help you fix the broken image in WordPress.
2. Clear Cache
Caching is one of the most annoying things that can happen to you when you are trying to upload your image. Many times caching restricts the changes to loading on your website. Clearing your browser’s cache can help you see the uploads much faster.
You can use a caching plugin like “WP Fastest Cache” which automatically clears the cache for you and your visitors. Caching can be the reason for the “Post-Processing of image Failed” error and if clearing your browser’s cache can’t fix the error, then you should try the other methods mentioned below.
3. Check the Image Filename
If special characters are present in your filename, you should remove them, save them again, and try re-uploading the image. WordPress doesn’t allow you to rename the uploaded image, so you will have to rename the image in your system and then upload it again to your WordPress.
Even if you don’t have a special character in your filename, remaining the image file never hurts. Dashes are okay but try renaming the image file and re-uploading it.
4. Using the Image Threshold Plugin
The “Disable ‘Big Image’ Threshold” plugin is an amazing plugin on WordPress that lets you upload big images or large images by disabling the threshold on your functions.php file.
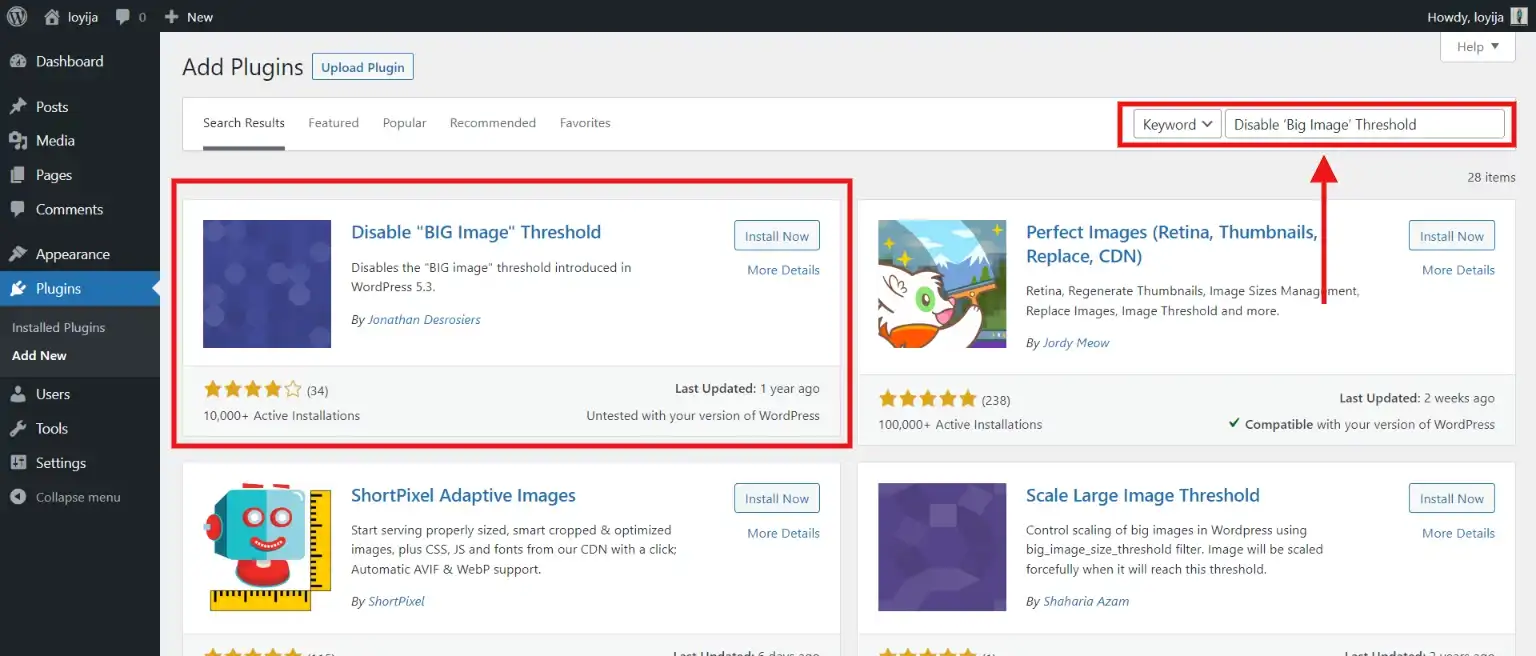
If you are a technical person and know advanced coding, then you can get the same result without using a plugin. You simply have to modify your theme’s function.php code. But you should take note that this is an advanced method and if not done correctly you can end up in a lot of trouble.
5. Try Performing a Hard Refresh
If you are encountering such issues, try refreshing your browser and make sure that it is not a WordPress server error. Sounds too easy right? Refreshing is a quick way to ask your server to send the most updated version. So if your “Post-Processing of Image Failed” is due to some outdated versions, it will quickly get fixed by refreshing.
If your browser has lost connection temporarily, then refreshing the browser can even help you build the connection again.
6. Verify Your Upload Limit
If your image size is more than the maximum upload limit, then the error “Post-Processing of Image Failed” might occur and your server cannot process the image. Make sure that your image file size is smaller than the maximum upload file size.
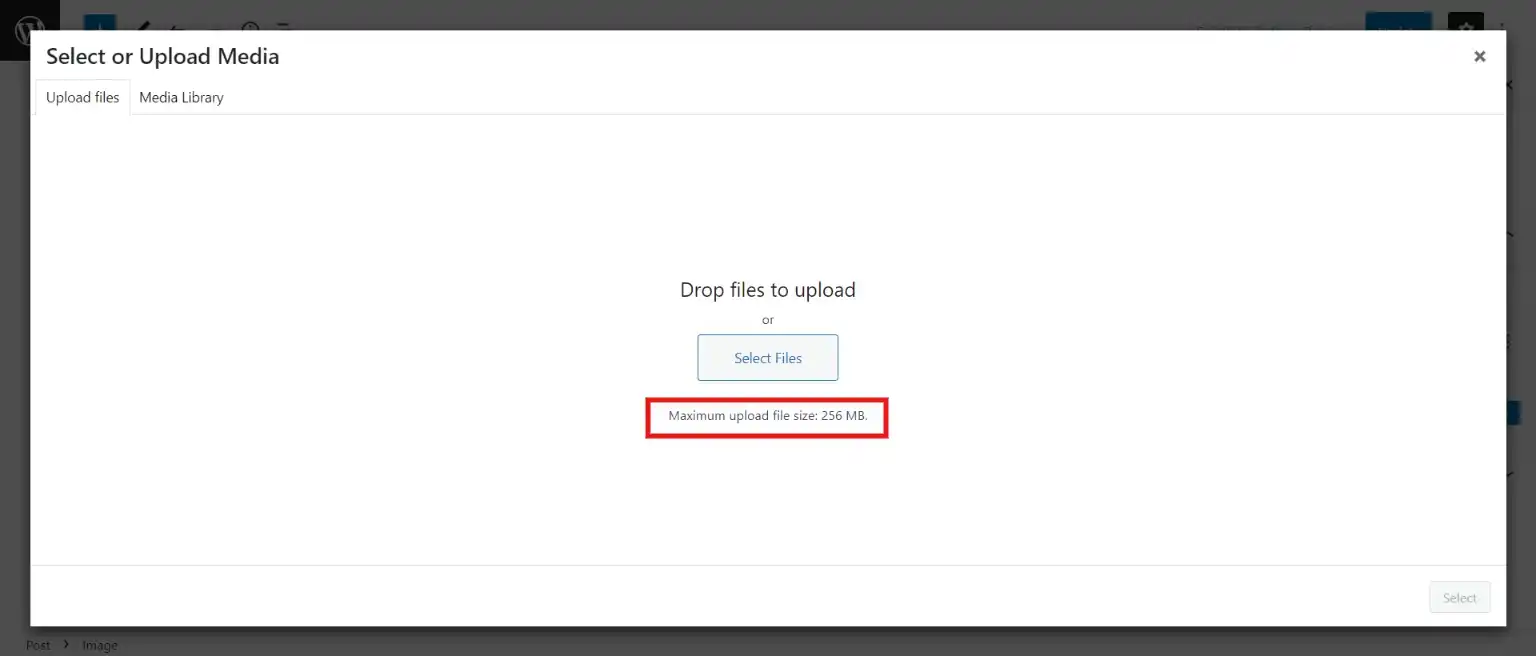
In case you don’t want to reduce the size of your image, then you will have to increase the maximum upload limit.
7. Temporarily Deactivate Plugins and Themes
If you have any HTTP errors, deactivating plugins and switching back to the WordPress default theme is always a good idea. Most of the time, the plugins that are responsible for the “Post-Processing of Image Failed” errors are image optimization plugins and security plugins as these plugins are sometimes too restrictive.
However, deactivating plugins and switching back to the default theme can affect your live website. For that, simply clone your website to the staging environment and quickly deactivate them all. Note that deactivating your plugin will not result in losing data.
8. Change Your Current PHP Version
We suggest you use the latest version of PHP as with every update the functions get improved. Every new update includes bug fixes and offers better security and performance. With this, you can fix the “Post-Processing of Image Failed” error.
9. Increase PHP Memory Limit
WordPress needs memory for the background upload process to be completed successfully. Sometimes, it lacks the available memory which is a very common reason for the “Post-Processing of Image Failed” error.
To fix this, simply increase your memory limit. We suggest you use a 256 MB memory limit. You can increase your memory limit with wp-config.php, cPanel, php.ini, or .htaccess.
10. Check Your Hosting Account’s Memory Usage
If all the above options don’t work, you will have to check your hosting account’s memory usage. If your website is receiving a high amount of traffic or is involved in memory or CPU-intensive activities such as backups, it may be running out of resources.
To fix this, temporarily unpublish your website and then upload the image of the correct size.
Wrapping Things Up
And that’s it for this blog. We hope that the above-mentioned 10 different ways will help you solve the “Post-Processing of Image Failed” error. If you are still stuck and want some help to fix the error, we recommend you send your requirements to JustHyre. It is a platform that offers you WordPress engineers for various WordPress-related tasks.
If you like this blog, also read our expert’s pick How to Fix “File Type Is Not Permitted” WordPress Error with Easy Methods and our step-by-step guide on How To Add Custom CSS WordPress Code easily On WordPress ? (3 methods)


Stuck Somewhere?
Connect With JustHyre
Hire WordPress Engineers for custom jobs like Website Customization, SEO Optimization, Clearing a Hacked Website, Installation & Configuration & more.
Connnect with JustHyre
0 Comments