How to Connect Outlook to WordPress? (4 Easy Steps)
Are you looking for a way to connect Outlook to WordPress?
If you own a WordPress website and want to connect with your users with emails, Microsoft Outlook is one of the best options. It lets you send over 1,000 emails in a single minute. Using Outlook to send emails will help you improve your email deliverables.
Here, in this blog, we have shown you an easy way by which you can connect Outlook to WordPress. But before that, let’s have a look at why you should use Microsoft Outlook to send emails.
Key Takeaways
- Microsoft Outlook is a better option to send emails than any other email service provider.
- Its API is a free and safe solution to send emails.
- A detailed guide on how you can easily connect Outlook to WordPress.
Why Use Microsoft Outlook to Send WordPress Emails?
In addition to email inbox service, Microsoft Outlook also helps you to improve the deliverability of your emails. They use API to do this, where you don’t need to enter sensitive information into your WordPress admin area. The biggest advantage of using Microsoft Outlook is that it can send up to 1,000 emails per minute, which is higher than any other email service provider.
You might have noticed that many WordPress hosting services don’t have properly configured PHP mail. But Microsoft Outlook just doesn’t need to access the PHP mail function to send emails. The bottom line is that Microsoft’s API is a free, secure solution for email delivery. Also, if you send emails via WordPress hosting service, the Gmail service provider won’t detect where the mail came from and there are high chance that your emails might go to the spam folder.
Method 1: Using WP Mail SMTP
Step 1: Install WP Mail SMTP
The very first step to connect Outlook to WordPress is to install and activate the plugin. From the WordPress admin dashboard, go to the “plugins” from the sidebar and click on “Add New” to add a new plugin. Next, in the search field, search for WP Mail SMTP, and install it.
Step 2: Getting Started With Wp Mail Smtp
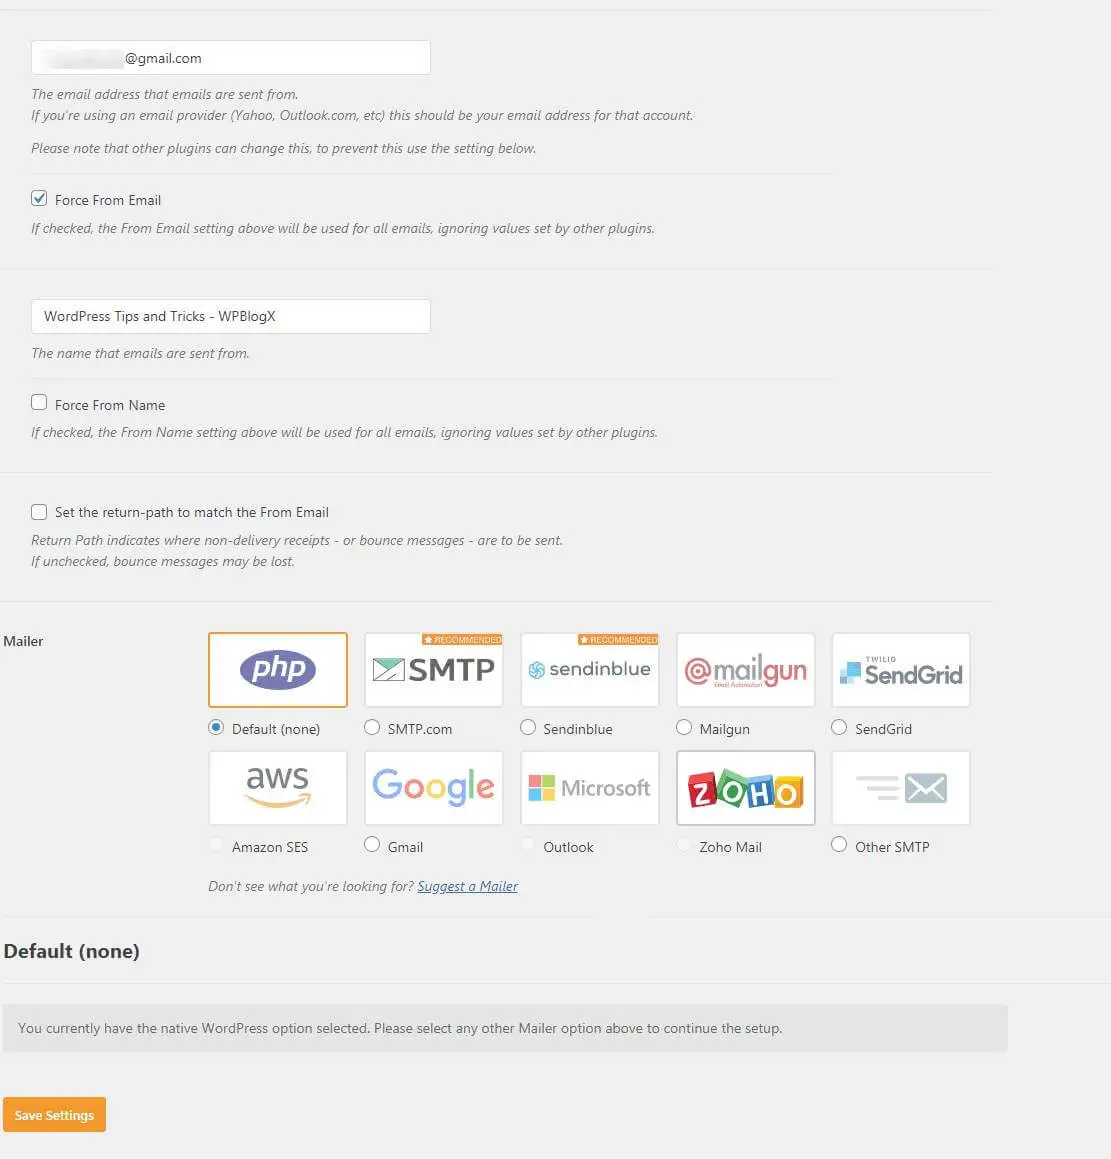
Go to “Settings” and enter your email address and name that is sent from. The next step is to choose the SMTP mailer through which you would like to send your emails. Since we want to connect Outlook to WordPress, select the “Microsoft Outlook” option in the “Recommended Mailers” list.

Once you select the recommended mailer, a new screen will appear. Fill in the information in the given section and to connect Outlook to WordPress, you also need to configure the Microsoft Azure account.
Step 3: Configure the Microsoft Azure Account
The next step to connect Outlook to WordPress is configuring an Azure account. Before going further, make sure that you have one of the Microsoft email accounts like Live, Hotmail, Office 365, or any other Microsoft account. Now, log into your Microsoft Azure account with your existing account credentials. Also, if you don’t have a Microsoft account, then you can go to Microsoft Azure and sign up.
Now, you will need your application ID, password, and redirect URL. You can find these credentials on the Azure portal.

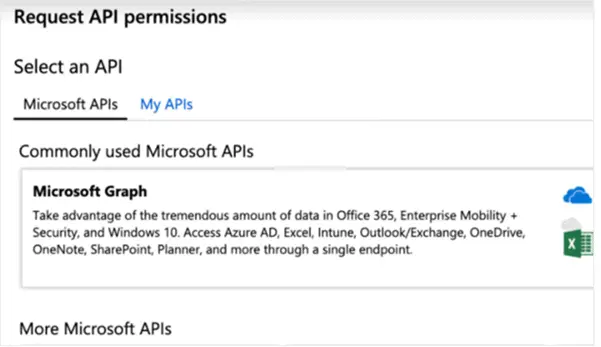
To create an application ID, search for “App registration” in the search bar. From the new registration window, select option (+) for new registration. Next, you will need to request API permission. Here, select the “Microsoft Graph” option.
Now, you will have to fill out two important pieces of information,
- Choose ‘Delegated Permission’ in what type of permission your API requires.
- Select the type “Send” and select the “Mail.Send.Shared’ option below under permission.

Next, click on “Add Permission” to add permission. Again, you will have to repeat the same process ‘Request API Permssion’, and select ‘Application Permissions’. Then again search the term ‘Send’ and select the term ‘ Mail Send’.
Step 4: Authorizing WP Mail SMTP
Once done with API permissions, go back to the WP Mail SMTP settings and then hit the “Save Settings” button. At last, confirm the authorization by hitting the “Allow Plugins to send emails using your Microsoft account” button.

Once done with authorization, a new window will pop up for the Microsoft Permission form. Click on the “Yes” button as this will allow you to connect with your Microsoft account. And finally, you will get the Settings page, which shows that you have to connect Outlook to WordPress.
Method 2: Using Zapier
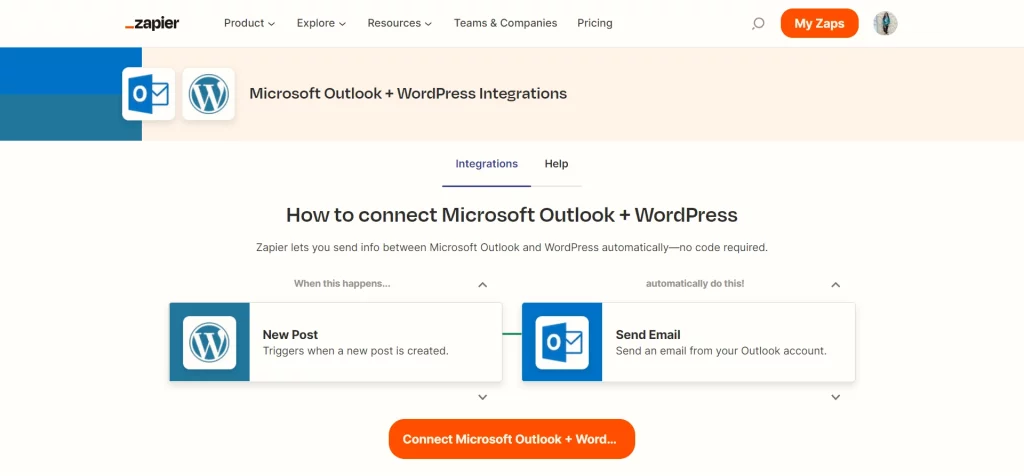
Zapier is a service that lets you seamlessly integrate your Microsoft Outlook into WordPress. It will help you to automate your emails. For example, you can set up a system where whenever you update a new post on your website, an email will be sent to your users. Whenever a new user is created, it will update your contact details.

Here, you will have to select an app that triggers. For example, Calendar Event Start, which will kick off your resulting start. Then you will need to choose a resulting app from the other apps. For a detailed guide read this documentation by Zapier on the integration of Microsoft Outlook with WordPress.
FAQs
1. Can WordPress send emails?
Yes. By default, WordPress sends emails using the wp_mail function which is based on PHP mail. But WordPress mail setup is not reliable as most of these emails end up in the spam folder.
2. Is WP Mail SMTP safe to use?
Yes. It is safe to use but you might find vulnerabilities in the lower versions. So try using the most updated version.
Wrapping Things Up
That’s it for this blog. We hope this blog has helped you connect Outlook to WordPress. This will help you improve your customer management and build your business’s credibility. This was a detailed guide on how you can connect Outlook to your WordPress, but if you need more guidance, you can hire expert WordPress engineers from JustHyre.
If you like reading this blog, also read A Simple Guide for Resizing Images in WordPress (3 Minutes Read) and How to Create a Members-Only Store In WooCommerce. (5 Different Ways).
Stuck Somewhere?
Connect With JustHyre
Hire WordPress Engineers for custom jobs like Website Customization, SEO Optimization, Clearing a Hacked Website, Installation & Configuration & more.
Connnect with JustHyre


0 Comments