4 Easy Ways To Add An Admin User in WordPress
Want to add an admin user in WordPress?
In the initial setup for the WordPress site as a user, we would have not had a concern about having the user as a prime user or an Admin user. But later, necessities may lead to the need to change the regular user settings to an admin user for authorization, security accessing specific options, and controlling access to all files.
So, if you are facing this difficulty in changing a regular user to an ‘Admin user’ or a ‘Super Admin user’ then here are different methods through which you can make this same query committed to your website.
Add An Admin User Programmatically in WordPress
Add this code to the themes functions.php file and enter the username, password, and email address along with your credentials set for the admin login and eventually add user admin capabilities.
 /*
 * Create an admin user add programmatically
 */
 add_action('init', 'xyz1234_my_custom_add_user');
 function xyz1234_my_custom_add_user() {
     $username = 'username123';
     //set usename as per preference
     $password = 'pasword123';
     //set password as per preference
     $email = 'drew@example.com';
     //set email as per preference
     if (username_exists($username) == null && email_exists($email) == false) {
         // Create the new user
         $user_id = wp_create_user($username, $password, $email);
         // Get current user object
         $user = get_user_by('id', $user_id);
         // Remove role
         $user->remove_role('subscriber');
         // Add role
         $user->add_role('administrator');
     }
 }
Pasting this code snippet in the functions.php file will eventually add the user with the $username, $password, and $email as the admin programmatically.
Change User to Admin WordPress (Phpmyadmin)
A stepwise guide to adding an admin user includes the following:
- Access the tool phpMyAdmin and access the MySQL database. In phpMyAdmin, edit your database as preferred.
- wp_users table: Select the WordPress database for your site from the list of databases sorted, and click on the wp_users table. Once done,
- Insert a new WordPress admin user in the user’s table and name it accordingly.
- The details that are mandatory for creating an admin on the WordPress site include:
- user_login: or username for the admin access
- user_pass: or password for the admin access
- user_email: or prime email address
- user_registered: or date and time of registration.
- user_status: zero is the value to be set.
- Once filled click on “Go” to head over to the success acknowledgment page.
- Now returning to the wp_users table, you can find the new user added to the users existing. Note the ID provided.
- Now head over to the wp_usermeta table to fill away the meta details of the admin user.
- Click on Insert >> search for x_usermeta. Inside fill out these:
- user_id: ID of the admin user that you noted in the wp_users table.
- meta_key: add wp_capabilities as value.
- meta key value: add a:1:{ s:13:”administrator”; s:1:’1’;} as value.
- Click “Go” to complete the user creation. By this, you add an admin user settings to your preferred user and thus it is an admin user now.
Struggling to log into WordPress admin? Read How to Log Into WordPress Admin? 2 Easy Approaches.

Add An Admin User WordPress Functions (PHP) Using FTP
The first and foremost necessity to add an admin user is being an FTP client. If you are a new user of FTP, refer to some basic concepts for a better understanding of the upcoming process.
<?php
 function wpb_admin_account(){
 $user = 'Username';
 $pass = 'Password';
 $email = 'email@domain.com';
 if ( !username_exists( $user ) && !email_exists($email ) ) {
 $user_id = wp_create_user( $user, $pass, $email
 $user = new WP_User( $user_id );
 $user->set_role( 'administrator' );
 }
 }
 add_action('init', 'wpb_admin_account');
 ?>
- Search for the theme’s functions.php file and download the file.
- Open the downloaded file in a code editor or text editor and replace the username, password, and email ID with your admin account’s values (the values set for the admin account are created).
- Save the changes and upload the file again in the same location. Once done, try signing in with the credentials just entered in the file with the WordPress login page. If logged in the process is complete. Once entered via the credentials, delete the changed code piece that you added right now to the file. By this, you add an admin user settings to your preferred user and thus it is an admin user now.
WordPress Admin Account
Adding a common account is fairly easy to adopt. Always adopting a temporary or expiring user admin account is best preferred for security reasons.
- Log in to the WordPress site and reach the dashboard
- Click on the user’s option in the menu bar located on the left side of your dashboard.
- Click “Add User” click on the “Add New” button fill out the details required and finally set the role of the user as “Administrator”. When done, click on “Add New User”.
- Now, use the User ID and Password to log in and you will log in to the site as an administrator. By this, you add an admin user settings to your preferred user and thus it is an admin user now.
WordPress Create Super Admin in Database – Additional Addon.
Adding a Super Admin user is possible by adding a script to your functions.php, phpMyAdmin, or via the network to add an admin user.
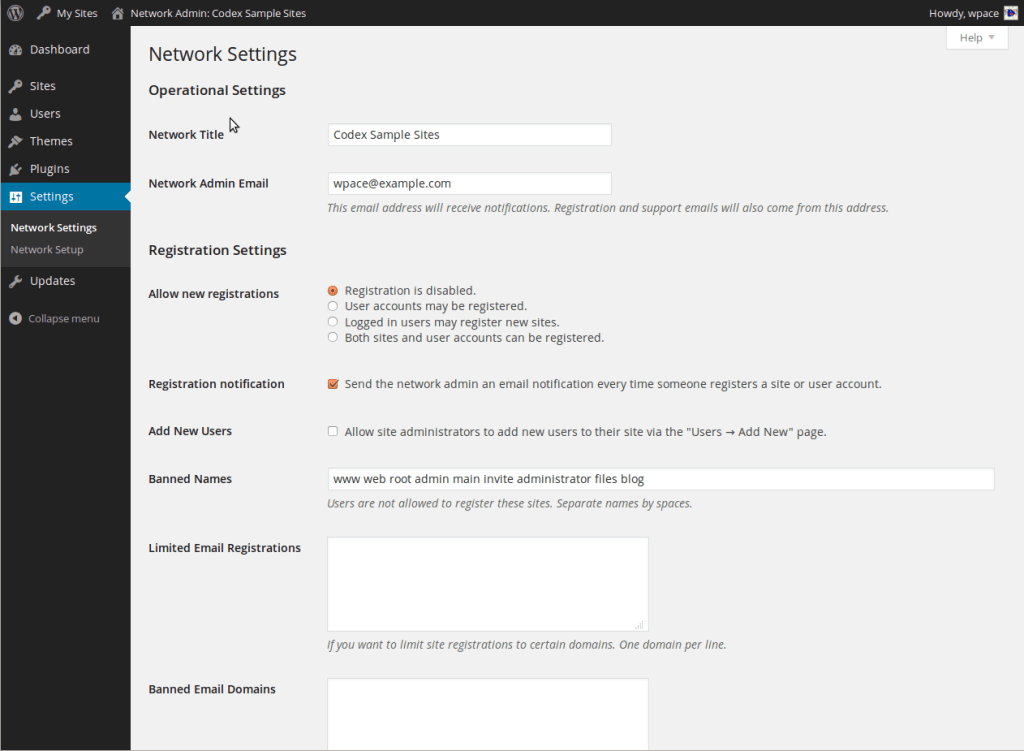
Using Network Admin for Creating Super Admin:
In the settings, below the username option, you can find the super admin option where it will ask for “Grant this user super admin privileges for the network”. Tick the checkbox and refresh the page. Now your user is a Super Admin User.
Using phpMyAdmin for creating Super Admin:
"a:2:{i:1;s:5:"admin";i:2;s:4:"Andy";}"
Add this code snippet and refresh to see the changes.
Here,
- a:2 refers to the number of entries entered admin user. You will change this no. once an admin is entered as a new entry.
- i:1 and s:5 are simply the copied code from the previous entries and refer to the number of characters.
- Andy refers to the sample username entered. You should enter your username which should be changed to Super Admin(Or)
- Open the portal select ‘the environment name and click through phpMyAdmin which is located at the top of the site.
- Select your database by clicking on any of the databases. wp_environment is the primary database for the environment. Then is this snapshot_environment which is the legacy staging database for the environment. Choose the right database that suits you.
- Select wp_users and customize the database prefix or your youprefix_users.
- Insert a user and add the login details as given in the previous sections.
- Additionally, you will be requested to add the display_name, user_status, and user_nicename apart from user_email, user_name, and user_pass.
- Now click on “Go” and Go again in the query page display, Once done a green tick mark will appear to confirm your user’s activation as Super Admin. By this, you add user super admin settings to your preferred user and thus it is a super admin user now.
Common Errors and Their Solution
While adding an admin user in WordPress, you might come across a few common errors. Below is the list of the most common WordPress errors while adding an admin user and their solution.
1. Unable to Add User Programmatically
- Problem: The custom code to add an admin user via functions.php might not execute properly, resulting in failure to add the user.
- Solution: Ensure that the code syntax is correct and that there are no syntax errors. Verify that the function is hooked to an appropriate action like
init. Check for any conflicts with other plugins or themes.
2. Missing Permissions in phpMyAdmin
- Problem: Users may encounter permission errors while trying to add an admin user through phpMyAdmin, restricting access to the wp_users table.
- Solution: Verify that you have sufficient privileges to perform database operations in phpMyAdmin. Contact your hosting provider if you’re unable to access or modify the database.
3. Missing User Meta Data
- Problem: Users may forget to include essential user metadata while creating an admin user, resulting in incomplete user profiles.
- Solution: When adding a new user, make sure to include required metadata such as
user_nicename,display_name, anduser_statusto ensure a complete user profile.
4. Plugin Conflict
- Problem: Users might face conflicts with existing plugins when trying to add an admin users programmatically or via plugins, causing unexpected behavior.
- Solution: Temporarily deactivate all plugins except the essential ones like WP Safe Mode or security plugins. Then try adding the admin user again. If successful, reactivate the plugins one by one to identify the conflicting plugins.
5. Super Admin Privileges Not Granted
- Problem: Users attempting to create a super admin user for multisite networks may encounter issues with granting super admin privileges.
- Solution: Ensure that the user metadata includes the appropriate capability for super admin privileges (
a:1:{s:13:"administrator";s:1:"1";}). Confirm that the user is correctly added to thewp_usermetatable with thewp_capabilitiesmeta key.
Wrapping Up
We hope you liked this blog. After reading this blog you might be able to add an admin user to your WordPress website. Sometimes your website or WordPress might get hacked and you may lose your admin account. To avoid such vulnerabilities, adding an admin user can be a savior as it can help you restore the site quickly.
If you like reading this blog on how you can easily add an admin user in WordPress, you may also read our expert’s detailed guide on How to create a Gravatar for WordPress – A Simplified Guide. and How to Find the Hosting Company of a Website? (3 Easy Ways).
[wbcr_html_snippet id=”4204″]
FAQs
1. Why add an admin user in WordPress?
Adding an admin user allows for better control over the website, access to important settings, and enhanced security measures, especially in case of emergencies like website hacks.
2. Can I add an admin user programmatically in WordPress?
Yes, you can add an admin user programmatically by adding custom code to the theme’s functions.php file, specifying the username, password, and email address for the new admin user.
3. How can I create a super admin user in WordPress?
You can create a super admin user by modifying user metadata in the wp_usermeta table via phpMyAdmin, assigning the user role as “administrator,” and granting super admin privileges for multisite networks.
4. What precautions should I take when adding an admin user to WordPress?
When adding an admin user, ensure to use strong and secure credentials, delete any temporary code added for the process, and consider limiting admin access to trusted individuals for enhanced security.


Stuck Somewhere?
Connect With JustHyre
Hire WordPress Engineers for custom jobs like Website Customization, SEO Optimization, Clearing a Hacked Website, Installation & Configuration & more.
Connnect with JustHyre
0 Comments