How to Create a WordPress Link Directory (Step-by-Step Guide)
Many websites maintain pages that collect useful tools, partner websites, or trusted resources. When these links grow beyond a short list, they start to feel messy and hard to browse. A structured directory solves that problem.
When you create a WordPress link directory, you organize links into clear categories so visitors can find what they need without scrolling through a long list. Some directories act as curated resource pages, while others function as full-listing platforms where users submit their own links.
WordPress allows both approaches. You can create a WordPress link directory using a normal page and a bit of structure, or you can use a WordPress link directory plugin to add search, submissions, moderation, and listing management.
This guide explains both methods step by step. By the end, you will know how to create a WordPress link directory that fits your site, whether you want a small curated page or a larger searchable directory.
What Is a WordPress Link Directory?
A WordPress link directory is a structured page or system that organizes external links or resources into categories. Instead of listing links at random, the directory groups them by topic, purpose, or industry.
For example, a marketing website might maintain categories such as SEO tools, analytics platforms, and content writing resources. A local website might list businesses such as restaurants, gyms, and service providers.
When you create a WordPress link directory, the goal is to make navigation easy and maintainable. Visitors should be able to browse categories, view listings, and access each external resource without confusion.
There are two common ways to build a directory:
- A manual directory created using normal WordPress pages
- A dynamic directory created using a WordPress plugin link directory system
The first option works well for curated resource lists. The second option supports submissions, search filters, and structured listings.
Choose Your Directory Type Before You Start
Before you create a WordPress link directory, it helps to decide how complex the directory should be. Not every site needs a full listing system.
Most directories fall into one of three formats.
- Simple Resource Page
A simple directory is a curated list of links organized by category. The website owner selects the resources and adds them manually. This format works well for:
- Tool collections
- Recommended services
- Partner websites
- Educational resources
Because it uses normal WordPress pages, it does not require a WordPress link directory plugin.
- Searchable Directory
A searchable directory behaves more like a database. Each listing includes structured information such as name, description, category, website URL, and sometimes location or contact details. Visitors can browse categories or search for listings.
This format requires a WordPress plugin that implements a link directory system to manage submissions, categories, and listing pages.
- Paid Listing Directory (Optional)
Some directories allow businesses to pay for placement. This model is common for local business directories, professional listings, and niche marketplaces. When you create a WordPress link directory with paid listings, the plugin usually handles:
- Submission forms
- Payment gateways
- Listing approval
- Featured placements
This setup typically requires a link directory plugin WordPress solution.
Method 1: Create a Simple Link Directory (No Plugin)
You can create a WordPress link directory using a regular page if you want to curate a list of useful resources yourself. This method works well for blogs or websites that recommend tools, services, or partner platforms without allowing user submissions.
Start by creating a page with a clear title such as Resources, Recommended Tools, or Useful Links. Then organize the links into categories so visitors can easily scan the page. For example, sections like SEO Tools, Writing Platforms, Design Software, or Marketing Resources help group related links together.
Add each category as a heading and list the relevant links underneath with a short description explaining what the resource does. Keep the formatting consistent and leave enough spacing between sections so the page remains easy to read.
If the directory grows over time, you can split it into separate resource pages based on topics. This approach allows you to create a WordPress link directory that stays organized without using a plugin.
Method 2: Create a Dynamic WordPress Link Directory (Using a Plugin)
A plugin-based directory adds features that a manual page cannot provide. Listings become structured entries stored in a database instead of a simple list of links.
In this method, we will use the Business Directory Plugin to create a dynamic directory that allows listings to include titles, links, descriptions, and categories. This setup also allows user submissions, listing moderation, and optional paid listings.
Step 1: Install and Activate the Business Directory Plugin
Start by adding the plugin on your WordPress site.
Go to: Plugins → Add New
Search for Business Directory Plugin, then click Install Now and Activate.
After activation, the plugin will automatically prompt you to create the required directory pages. Select the option “Create required pages for me.”
This setup generates the essential directory pages needed for your WordPress link directory. The main directory page contains the shortcode:
[businessdirectory]

This shortcode displays the directory archive, including categories and listings. You can rename the page to something more descriptive, such as “Link Directory” or “Resources Directory”.
Step 2: Create and Configure the Core Directory Pages
A functioning directory requires a few core pages. The most important ones are:
- The directory archive page, where all listings appear
- A listing submission page where users can submit new links
The archive page is usually created automatically when the plugin is activated. It shows the search bar, listing categories, and directory items.
To create the submission page manually:
- Go to Pages → Add New
- Add the shortcode
[businessdirectory-submit-listing]
- Publish the page
This page allows visitors to submit their own link listings through a front-end form. You can place links to this submission page anywhere on your site.
Step 3: Customize Directory Form Fields
Every listing in your directory collects structured information through form fields. Business Directory Plugin includes several default fields, but you can modify them to match your directory.
Go to: Directory → Form Fields.
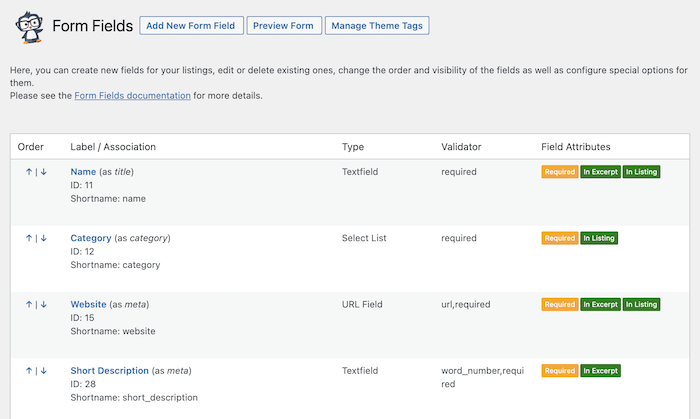
From here,e you can edit existing fields, change their order, or add new ones.
For a link directory, useful fields typically include:
- Listing name
- Website link
- Short description
- Full description
- Email address
The Website link field should be set as a URL field so that the link appears as a clickable button on the listing page. You can also control where each field appears. For example:
- Show name, link, and short description in the listing archive
- Show the full description on the individual listing page
This setup keeps the directory easy to scan while still providing detailed information when users open a listing.
Step 4: Configure Listings, Moderation, and Payments
Business Directory Plugin provides several settings that control how listings behave.
Open: Directory → Settings
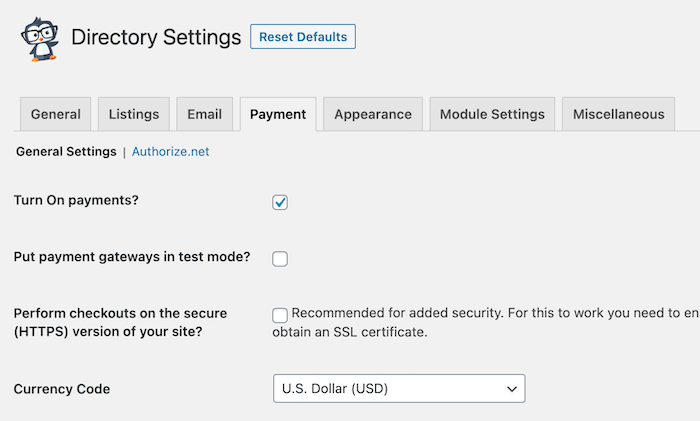
Key areas to configure include:
- Listing moderation: If you want to review submissions before they appear on the site, set the default listing status to Pending. This means every new listing must be approved before publishing.
- Submission rules: You can choose whether users must register before submitting a listing and enable tools such as reCAPTCHA to reduce spam submissions.
- Listing limits: The plugin allows you to define how many listings appear per page and whether listings expire after a certain period.
- Payments and pricing plans: If you plan to charge for listings, you can create pricing plans.
Go to: Directory → Fee Plans.
Here you can create both free and paid listing plans. Each plan can include settings such as:
- Listing duration
- Number of images allowed
- Pricing structure
To accept payments, configure a payment gateway under:
Directory → Settings → Payment
Business Directory Plugin supports gateways such as Authorize.net, PayPal, and Stripe, depending on the version you are using.
Step 5: Style, Organize, and Add Listings
Once the directory system is configured, you can begin adding listings and organizing categories. First, create categories to group related links.
Go to:
Directory → Directory Categories
Examples might include:
- Marketing Tools
- Design Resources
- Developer Platforms
Categories and subcategories make the directory easier to browse. Next, add listings either from the front end or from the WordPress dashboard.
You can add listings in two ways:
- Front-end submission form: Use the submission page you created earlier.
- Admin dashboard: Go to Directory → Listings → Add New Listing.
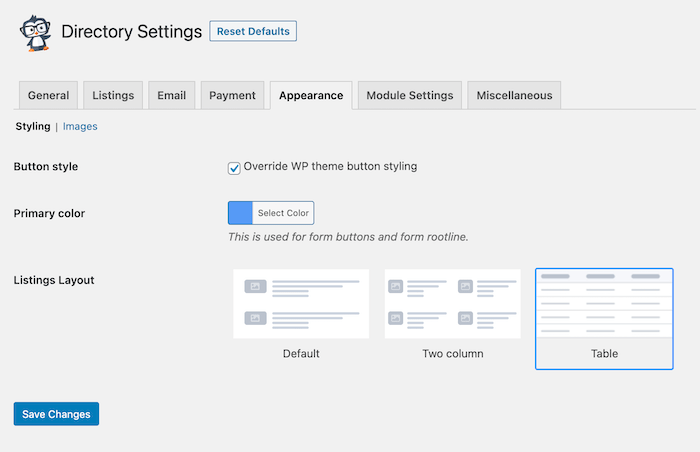
When adding a listing, include the title, website URL, description, and category. Business Directory Plugin also includes layout options that control how listings appear. You can adjust these settings under:
Directory → Settings → Appearance
For example, the table layout displays listings in a structured format with columns for name, website link, and description.
Once listings are added and categories are defined, your WordPress link directory becomes a searchable and organized resource for visitors.
At this stage, you have successfully created a dynamic WordPress link directory using the Business Directory Plugin.
SEO Tips for Your WordPress Link Directory
Search visibility depends heavily on structure and content quality. A directory page filled only with links rarely performs well in search results. When you create a WordPress link directory, consider the following SEO practices.
- Use category pages with proper URLs: Each category should have its own page and a clean URL structure.
- Write unique descriptions for each listing: Short descriptions help search engines understand the content of each listing.
- Avoid duplicate content: Do not copy descriptions from the linked website.
- Add schema markup (Local Business or Organization if relevant): Do not copy descriptions from the linked website.
- Enable clean permalink structure: Use readable URLs rather than numeric page IDs.
- Optimize for internal linking: Link relevant blog articles to directory categories.
- Add nofollow to external links if needed: This prevents passing unnecessary ranking signals.
- Create landing pages for each niche category: Detailed category pages help the directory rank for targeted searches.
These practices help ensure the directory provides real value rather than appearing as a simple link collection.
Pro-Tip: JustHyre
Sometimes a standard plugin setup is not enough. You might need custom fields, unique listing layouts, advanced search filters, or integrations with other tools on your site.
This is where JustHyre can help.
JustHyre provides custom WordPress development for websites that need functionality beyond what standard plugins offer. If your directory needs specific behavior, a custom workflow, or deeper integration with the rest of your site, working with a development team can help you implement those requirements without forcing your setup into plugin limitations.
Launch Your WordPress Link Directory the Right Way
A directory works best when it stays organized and actively maintained. Broken links, outdated listings, and unclear categories quickly reduce its usefulness.
The process to create a WordPress link directory is straightforward once the structure is clear. A simple page works well for curated resources, while a plugin-based system supports submissions, search, and large collections of listings.
Choose the method that matches your site’s goals. If the directory contains a small set of recommended resources, a manual page will be enough. If you plan to build a searchable listing platform or accept submissions, a WordPress link directory plugin provides the necessary tools.
With clear categories, helpful descriptions, and good SEO structure, a directory can become one of the most useful sections of your website.


Stuck Somewhere?
Connect With JustHyre
Hire WordPress Engineers for custom jobs like Website Customization, SEO Optimization, Clearing a Hacked Website, Installation & Configuration & more.
Connnect with JustHyre