How to Add a Content Locker in WordPress? (2 Different Methods)
If you publish guides, templates, downloads, or premium lessons on your WordPress site, you need a way to control access without breaking the user experience. This is where content lockers for WordPress become useful. A content locker allows you to hide specific parts of a post or page until the visitor completes an action, such as entering an email, logging in, or sharing the content.
Many site owners want to add a content locker to grow their email list, protect paid resources, or increase engagement on high-value pages. The goal is not to block everything, but to create a fair exchange. Visitors get access to something useful, and you gain a lead, subscriber, or member.
Here, we will walk you through a detailed guide to adding a content locker in WordPress using two practical methods. Both approaches work without custom code and fit different business goals, from lead generation to gated downloads.
What Is a Content Locker in WordPress?
A content locker is a tool that restricts access to part of your content until the user completes a required action. The locked section remains hidden, blurred, or replaced with a message and form.
The required action can include:
- Submitting an email address
- Logging into an account
- Sharing on social media
- Completing a survey
- Making a payment
Once the action is completed, the content unlocks and becomes visible.
Most opt-in content lockers for WordPress setups focus on email capture. Others rely on login access or membership rules. Many of the best content locker plugins for WordPress allow you to choose between these options depending on your goal. Instead of placing all value in the open, you decide where to add a content locker so that the most valuable section sits behind a controlled access point.
Why Use a Content Locker on Your WordPress Site?
Adding a content locker changes how users interact with your site. It turns passive readers into active participants. When placed carefully, it supports your marketing strategy without harming readability.
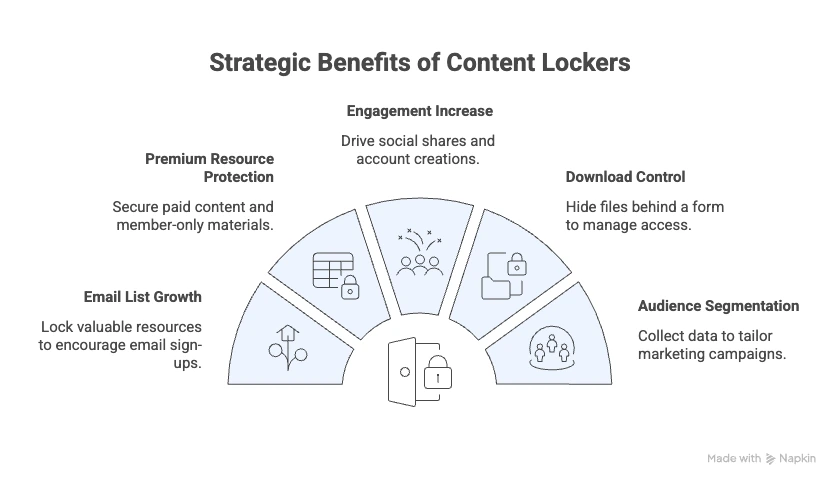
You might choose to add a content locker for several practical reasons:
- Grow your email list: Lock a template, checklist, or bonus section and require email submission before access.
- Protect premium resources: Restrict paid lessons, member-only guides, or advanced training materials.
- Increase engagement: Encourage social shares or account creation before revealing extra content.
- Control access to downloads: Hide PDF files, spreadsheets, or design assets behind a form.
- Segment your audience: Collect data and tailor follow-up campaigns based on user actions.
Many site owners compare tools before choosing the best plugins to gatekeep content. The right solution depends on whether you need advanced targeting, analytics, or a simple login-based restriction.
When implemented well, a content locker supports both conversion goals and content quality. The key is balance. You want users to see enough value before you ask for something in return.
How to Add a Content Locker in WordPress? (2 Different Methods)
There are two reliable ways to add a content locker in WordPress without writing code. The first uses a dedicated plugin and offers more flexibility. The second uses a page builder and works well for simpler setups.
Method 1: Add a Content Locker Using OptinMonster
If your goal is to grow your email list, build a newsletter, and control access to premium sections, OptinMonster is a reliable option. Content locking is available on the Plus plan and above.
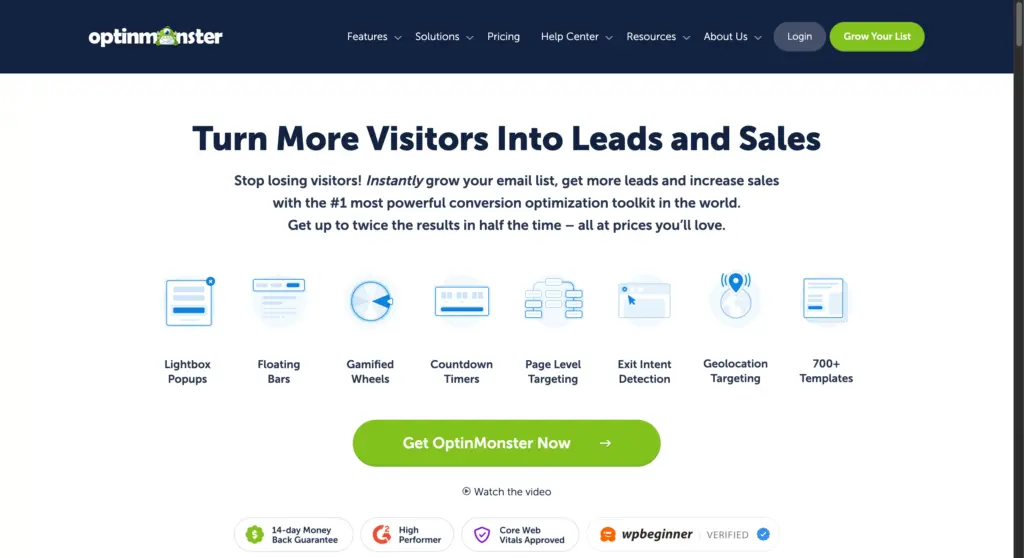
Here is how to set it up:
- Sign up for OptinMonster and connect it to your WordPress site.
- Create an inline campaign and choose a template.
- Edit the headline, description, and form fields using the drag-and-drop builder.
- Enable content locking and choose a style: blur or remove.
- Decide how the content locker should appear in WordPress: automatic or manual placement.
- Test the content locker to make sure it works correctly.
Method 2: Add a Content Locker Using a Page Builder
If you already use a page builder like Elementor Pro, you can add a content locker without installing another plugin. This method works well when you want to control access through a pop-up interaction instead of email capture.
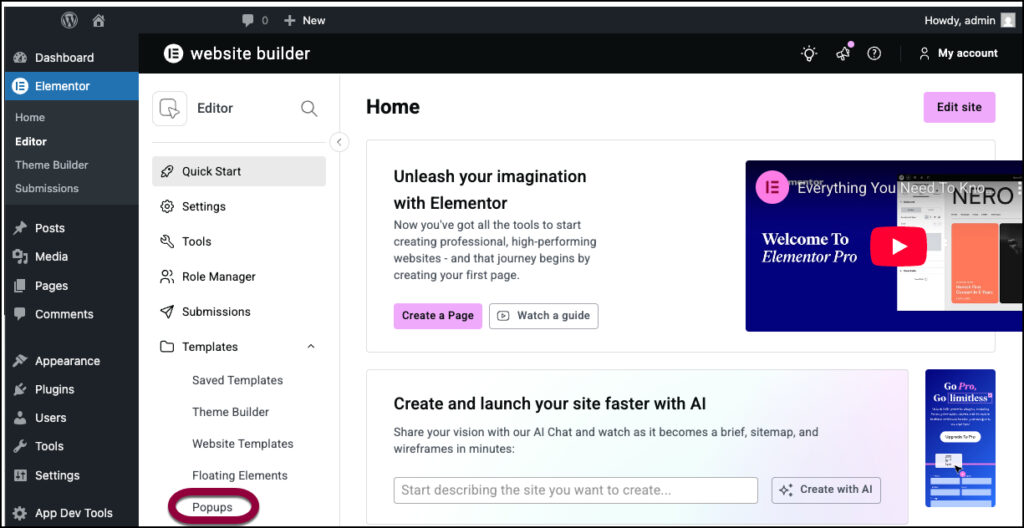
- Test the flow to confirm the pop-up appears, the Yes button reveals the page content, and the No button redirects users away.
- Create a pop-up from Elementor → Templates → Popups and design it with a clear Yes or No question and two buttons.
- Set the Yes button to close the popup using Dynamic → Actions → Popup → Close Popup. Set the No button to redirect users to another URL.
- Disable the default close options so users must choose Yes or No to proceed.
- Attach the content lock pop-up to a button on your page using Dynamic → Actions → Popup → Open Popup.
Bonus: Best Practices and Common Mistakes to Avoid
Adding a content locker requires careful placement and clear messaging. Poor implementation can reduce trust and increase bounce rates. Focus on user experience while protecting your content.
Best Practices
- Lock only high-value sections, such as downloadable files or advanced tutorials.
- Provide enough free content before the locked section so users understand the value.
- Use clear, benefit-focused copy that explains what users gain after unlocking.
- Keep forms short and request only necessary information.
- Test the content locker setup on mobile devices and different browsers.
- Connect lockers to your email service to automate lead capture and follow-up.
Common Mistakes
- Locking the entire article without preview content, which discourages engagement.
- Using vague messages that do not explain what is behind the lock.
- Adding too many required fields in the form, which reduces conversions.
- Forgetting to test the page in logged-out mode.
- Exposing sensitive content in the page source due to weak visibility settings.
- Overusing popups that interrupt reading flow.
Closing Notes on Using a Content Locker in WordPress
Learning about content lockers in WordPress gives you control over how value is exchanged on your site. Whether you use a dedicated plugin or a page builder, the goal remains the same. You want to protect key resources while encouraging meaningful actions from your audience.
Choose the plugin method if you need advanced targeting, analytics, and email integrations. Choose the page builder method if your main requirement is login-based access for members or students.
If you prefer expert help setting up gated content, integrations, or optimizing conversions, you can also work with services such as JustHyre for technical and marketing support.


Stuck Somewhere?
Connect With JustHyre
Hire WordPress Engineers for custom jobs like Website Customization, SEO Optimization, Clearing a Hacked Website, Installation & Configuration & more.
Connnect with JustHyre