How to Integrate ChatGPT Into the WordPress Website? (4 Easy Steps)
Are you looking for an easy way to integrate ChatGPT into the WordPress website?
ChatGPT has significantly impacted the way we approach the content on our website. With AI unleashing its power to craft outlines, headlines, full blog posts, chatbots, edit images, and many more powerful features, everyone is warming up to the idea of creating content with it.
Here in this blog, we will show you an easy way to integrate ChatGPT into the WordPress website.
What Is ChatGPT?
ChatGPT is an open AI language model. A generative pre-trained transformer (GPT) is an artificially intelligent model that can understand and produce text as if it is a human. ChatGPT can be customized for conversational communication between its users and the machine which responds to questions, generates text based on provided inputs, provides answers, and so forth.
ChatGPT can be used for chatbots, virtual assistants, content generation, etc. The model is trained with data drawn from the web that allows it to generate text conversationally, and contextually. It has been used for several language processing tasks, including the generation of coherently appropriate text as a response to textual interaction.
Why Use ChatGPT in WordPress?
Integrating ChatGPT into a WordPress website can elevate your site performance and increase usability. Here are some reasons why you might want to integrate ChatGPT into the WordPress website:
1. Interactive Customer Support
Your company’s website could have a chatbot in the form of ChatGPT that answers typical questions posed by customers immediately. It can help with basic customer support including answering FAQs and providing information to users after closing time.
2. Engagement and Interaction
One way you can incorporate ChatGPT with the WordPress website is by using it to chat with your visitors and get them to stay for a long time on your site. Interactive options and query answering will enable users to interact with it.
3. Content Generation
With ChatGPT, it is possible to generate content for your WordPress site. This can help in preparing articles or blogs among other things that may necessitate content creation thus eliminating the time constraints required for those processes.
4. Personalization
Users will find chat GPT helpful as it will use their behaviors as well as preferences to suggest or respond to any particular service or product.
5. Lead Generation
ChatGPT can provide means of lead or contact acquisition from website visitors using fill-in forms, questioners, or particular steps to get things done.
6. Multilingual Support
Another way to integrate ChatGPT into the WordPress website is a chatbot for multilingual support. You could use a chatbot to give multi-language support to your website therefore increasing its reach globally.
7. Data Collection and Analysis
With the help of ChatGPT, it is also possible to get information concerning user actions and preferences. This may then be useful in enhancing your website or any other aspects like goods or services.
8. Automation
You may also integrate ChatGPT into the WordPress website to automate monotonous functions such as booking an appointment, tracking orders, and learning more regarding products.
How to Integrate ChatGPT Into the WordPress Website?
Here, in this blog, we are using the AI Engine plugin to integrate ChatGPT into the WordPress website. This ChatGPT WordPress plugin helps you create chatbots, generate blog post ideas, and create images.
Step 1: Setting up the plugin
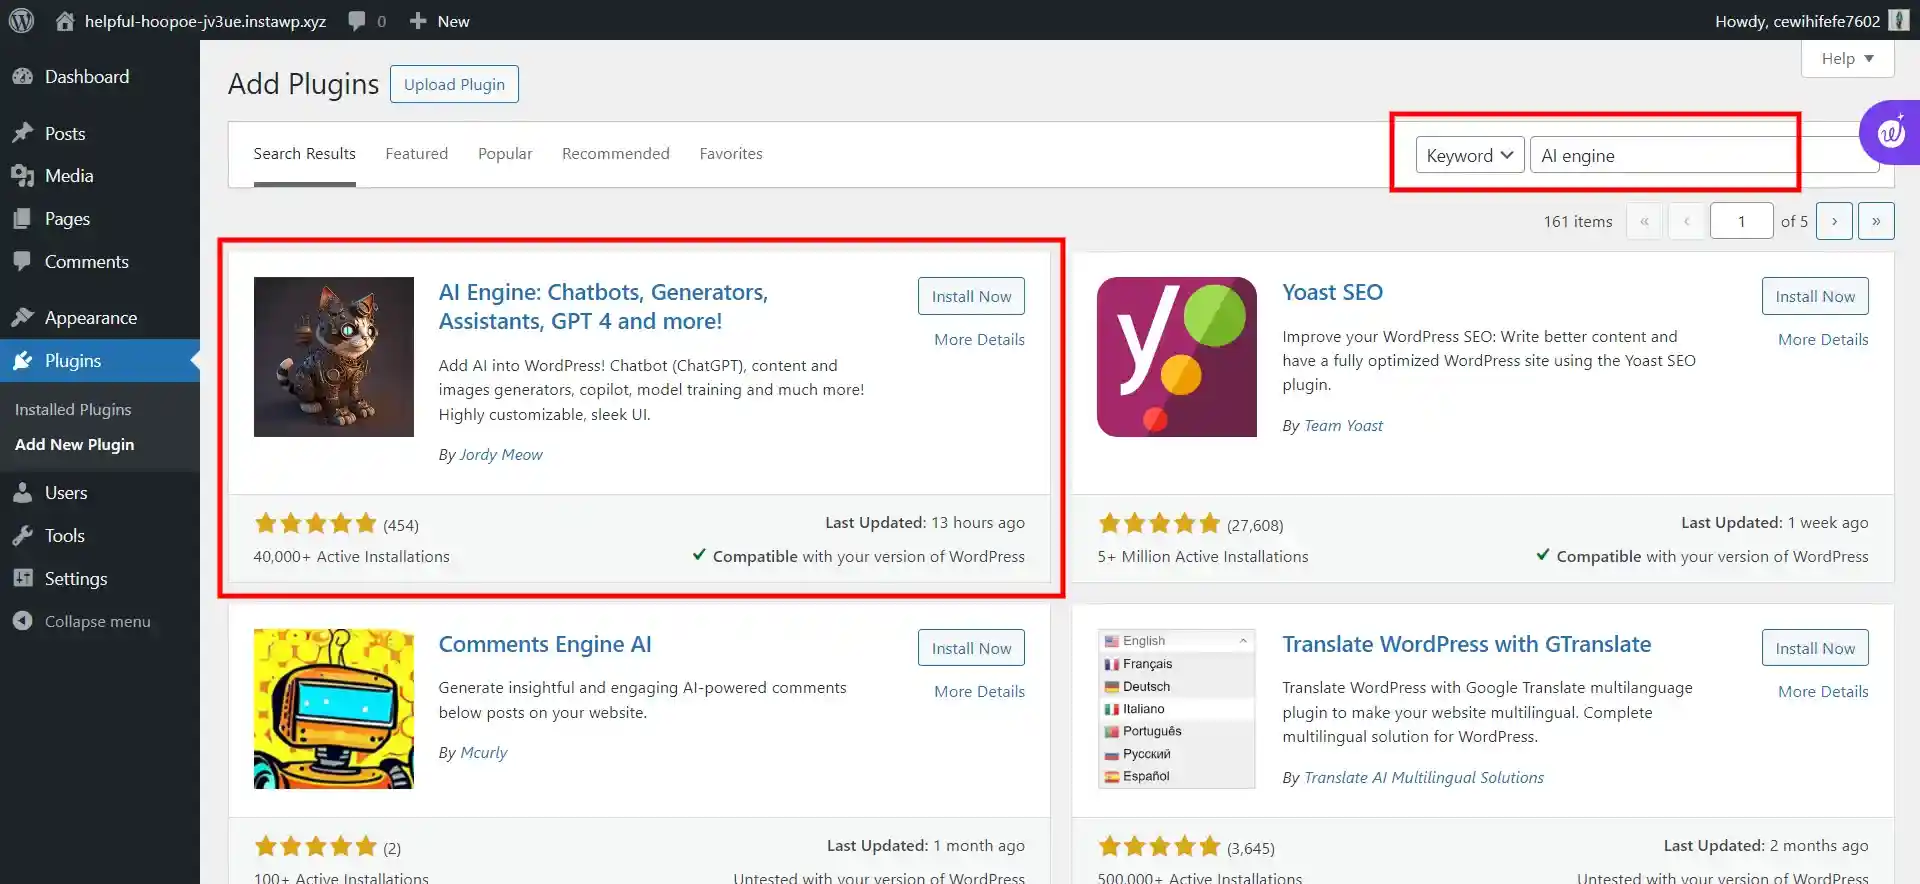
- Acquiring Your API Key:
To kick start the setup process, you will first have to acquire a free API key from the OpenAI website. Begin by logging in with your active OpenAI member. You, however, need to register on the open AI site and use the “sign up” button that is located at the top right corner. Make sure you’ve bought enough Credits to continue.
Want to know how you can easily add a Bitcoin payment gateway to WordPress, read How to Add a Bitcoin Payment Gateway to a WordPress Website? (4 Easy Steps)
2. Add Credits to Your Account:
To add credits, click the “add to credit balance” next to the billing overview.
3. Create a New Secret Key:
After you have your credits, go to the user option then click “API keys”. From there choose “+ Create New Secret Key.”
4. Naming Your API Key:
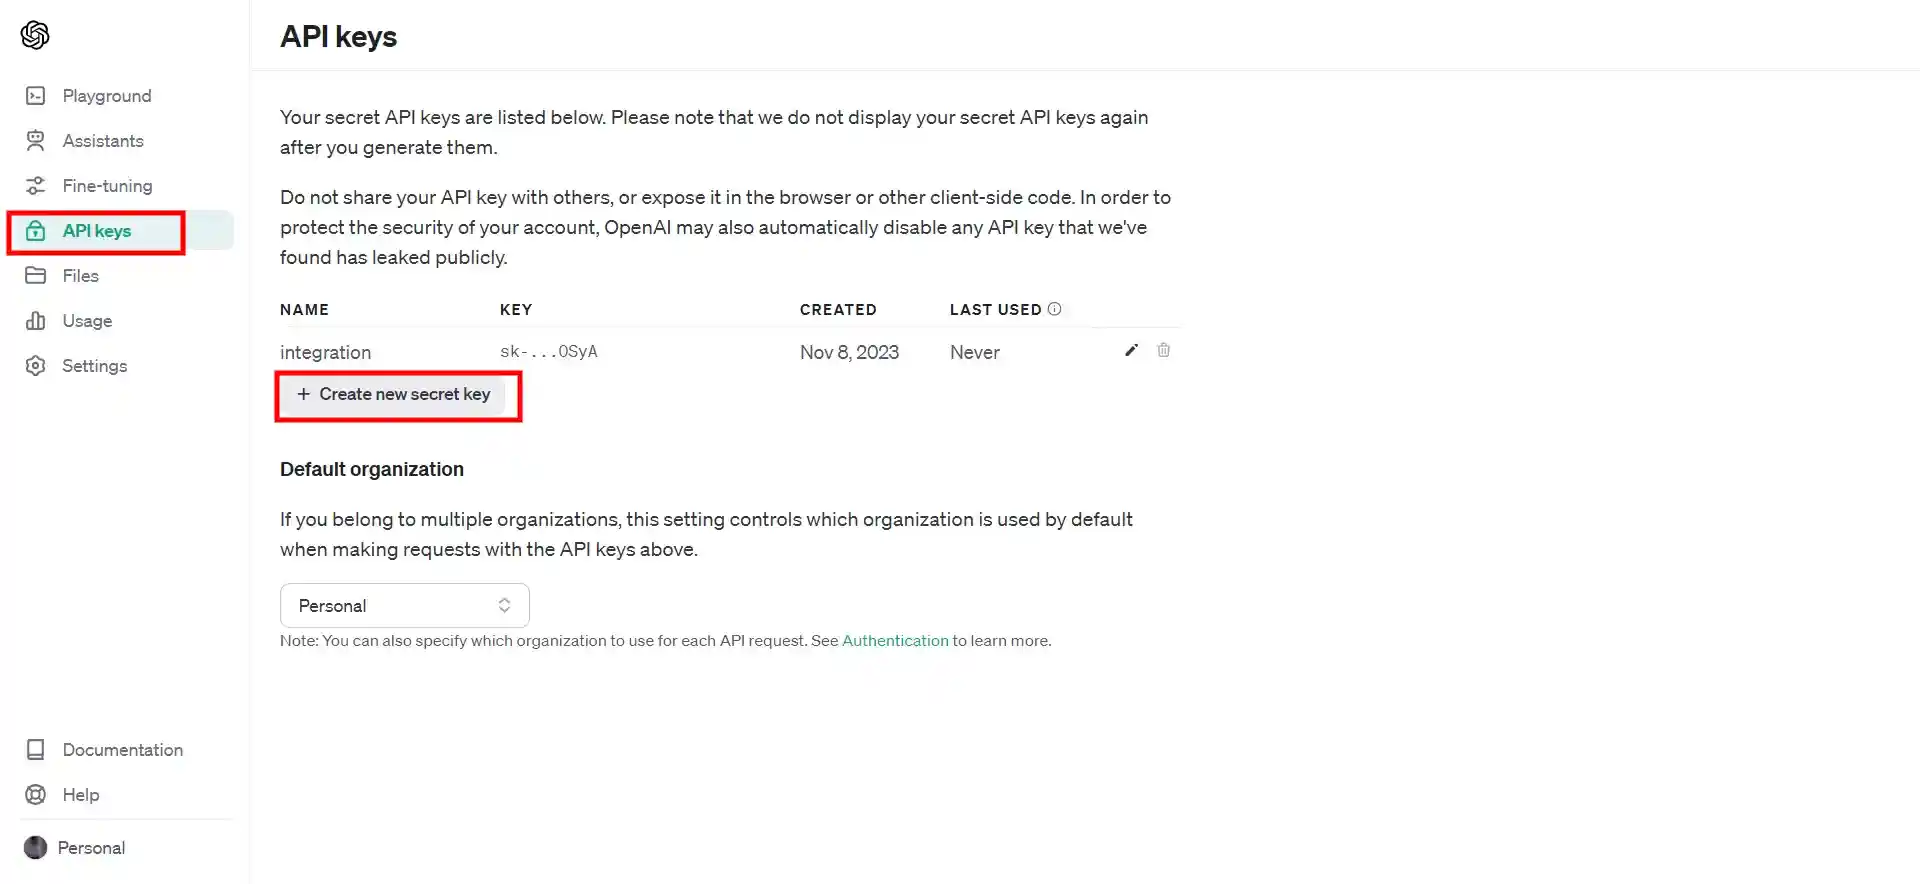
Give a name to the new API key and press the Create secret key.
5. Copy and Paste Your API Key:
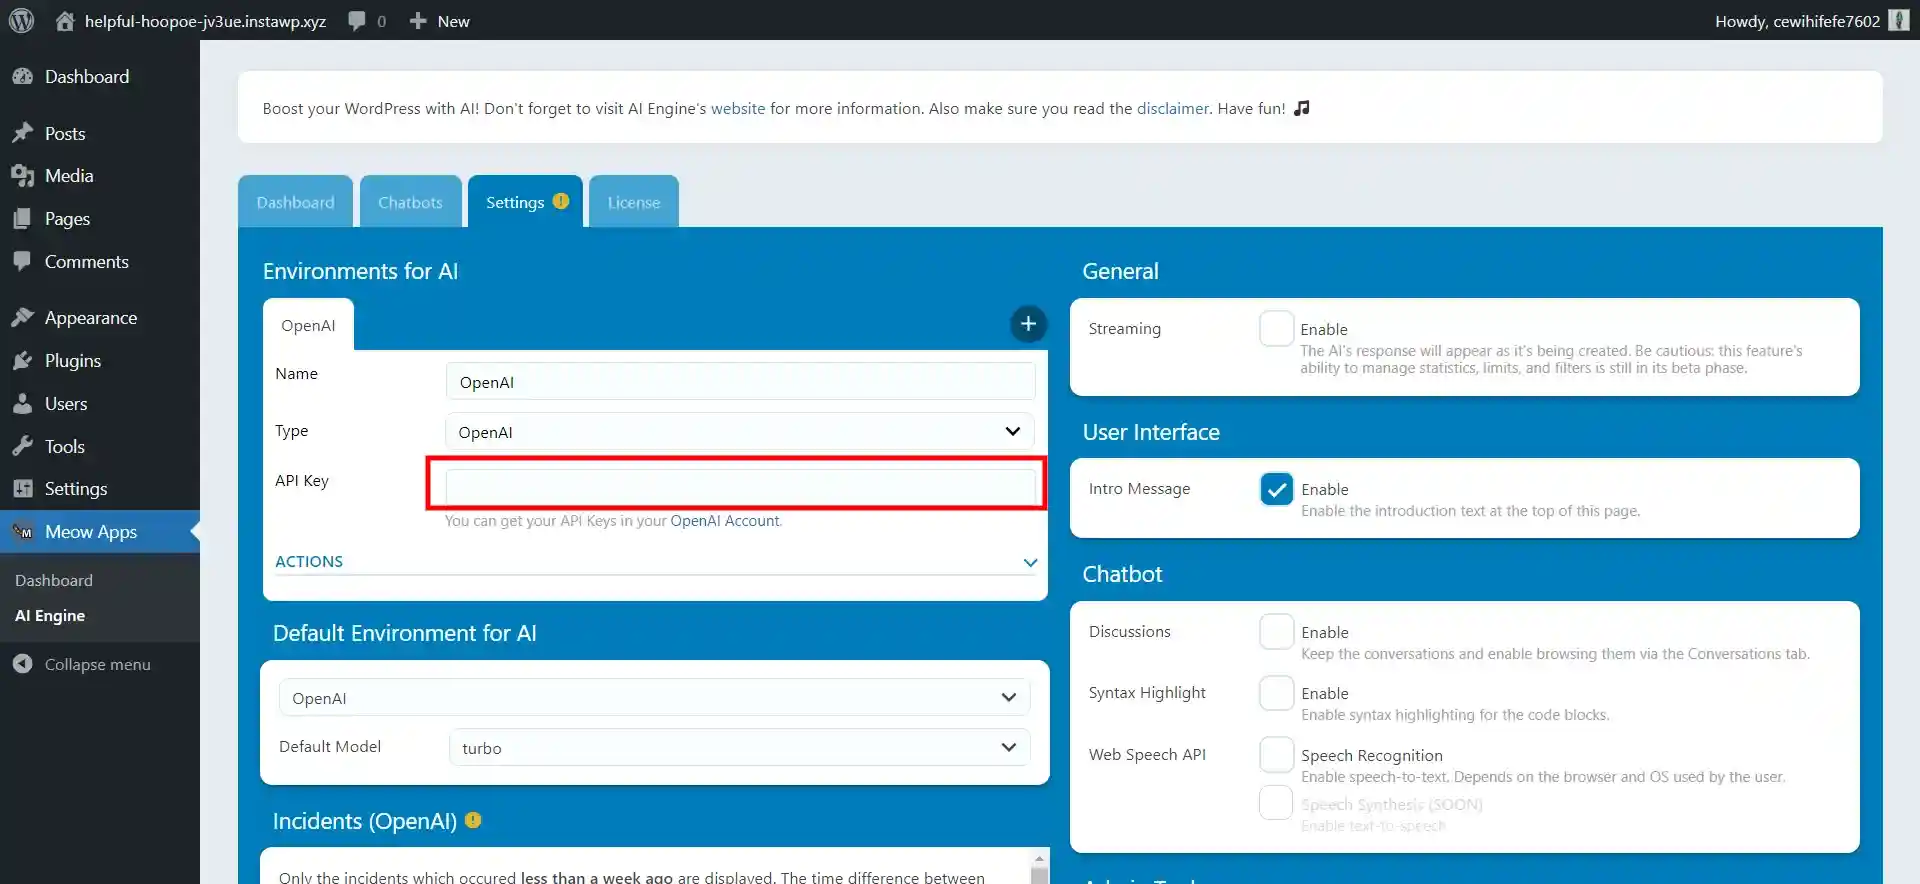
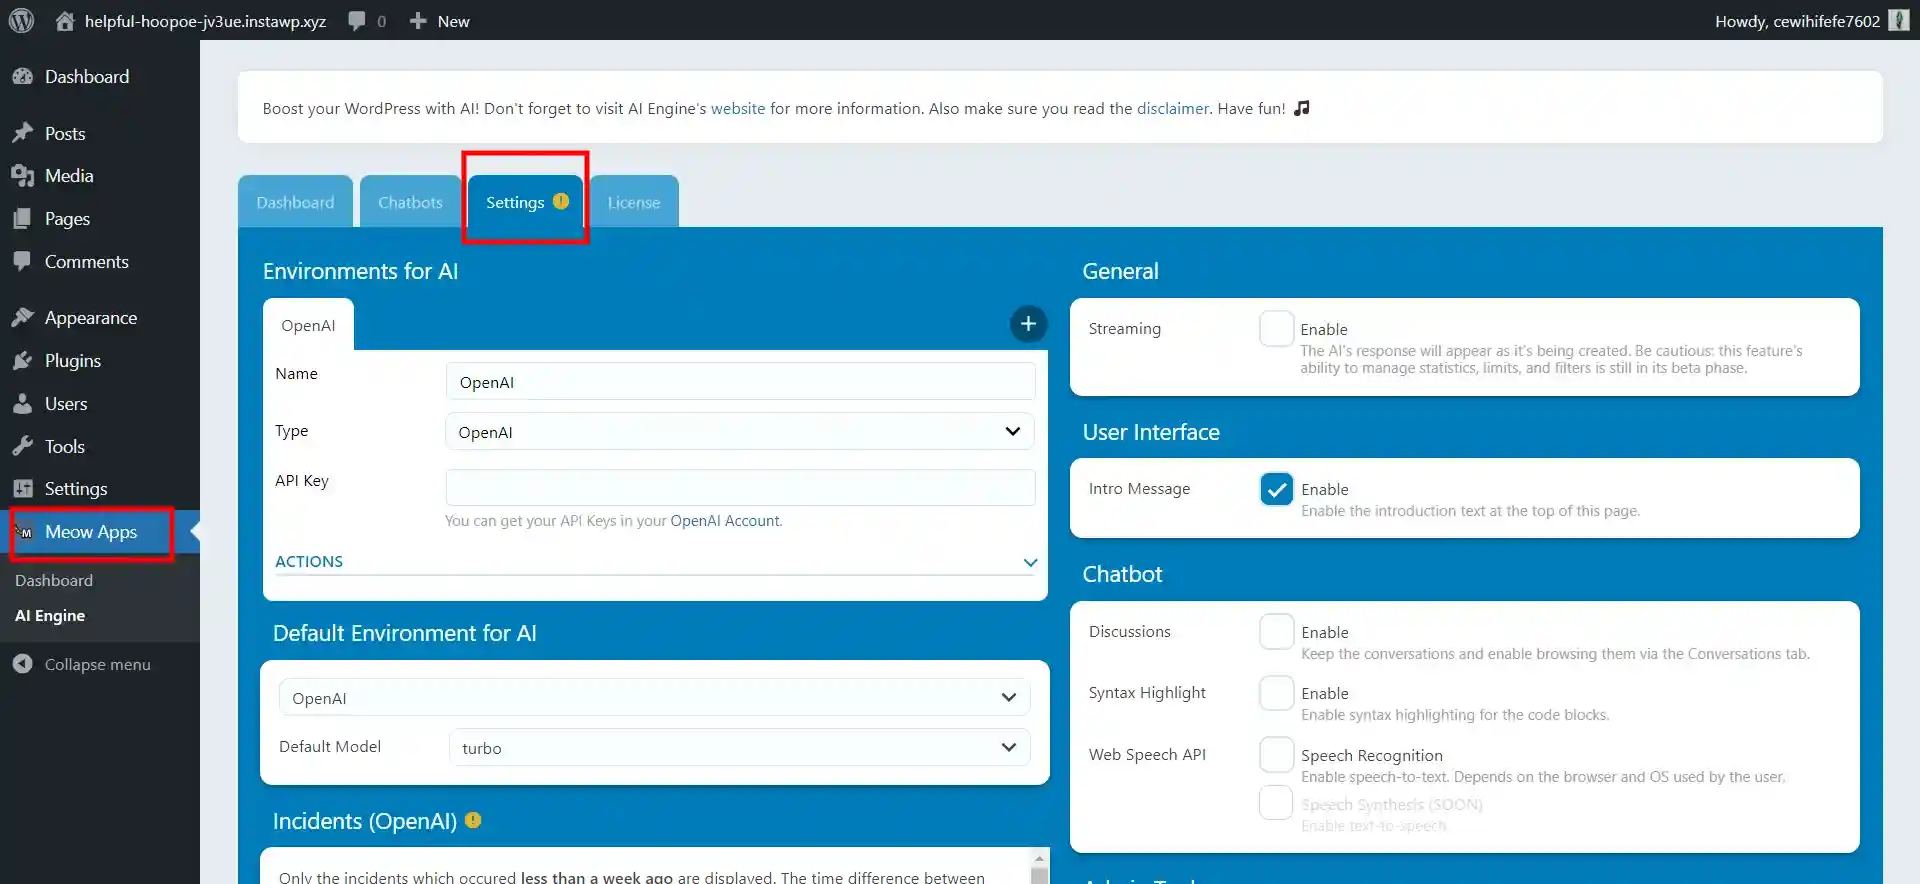
Once you generate your key, just click “copy” for it to be copied on your clipboard. Go back to the settings screen of the AI engine plugin interface and insert your new API key in the blank space provided.
Want to add a PDF download button using Elementor? Read, How To Add PDF Download Button Using Elementor? (6 Easy Steps)
Step 2: Configure AI Engine Content Generator Settings
- Accessing the Content Generator:
With your AI Engine in place, you are set to create content. Ensure that you click on the “content” tab which is in the upper part of your screen.
2. Configure the AI engine content generator:
After a few seconds when the screen refreshes, it will take you into the AI engine content generator. This is where you can conveniently create files that you can use for your site, emails, or even codes.
3. Define Your Content:
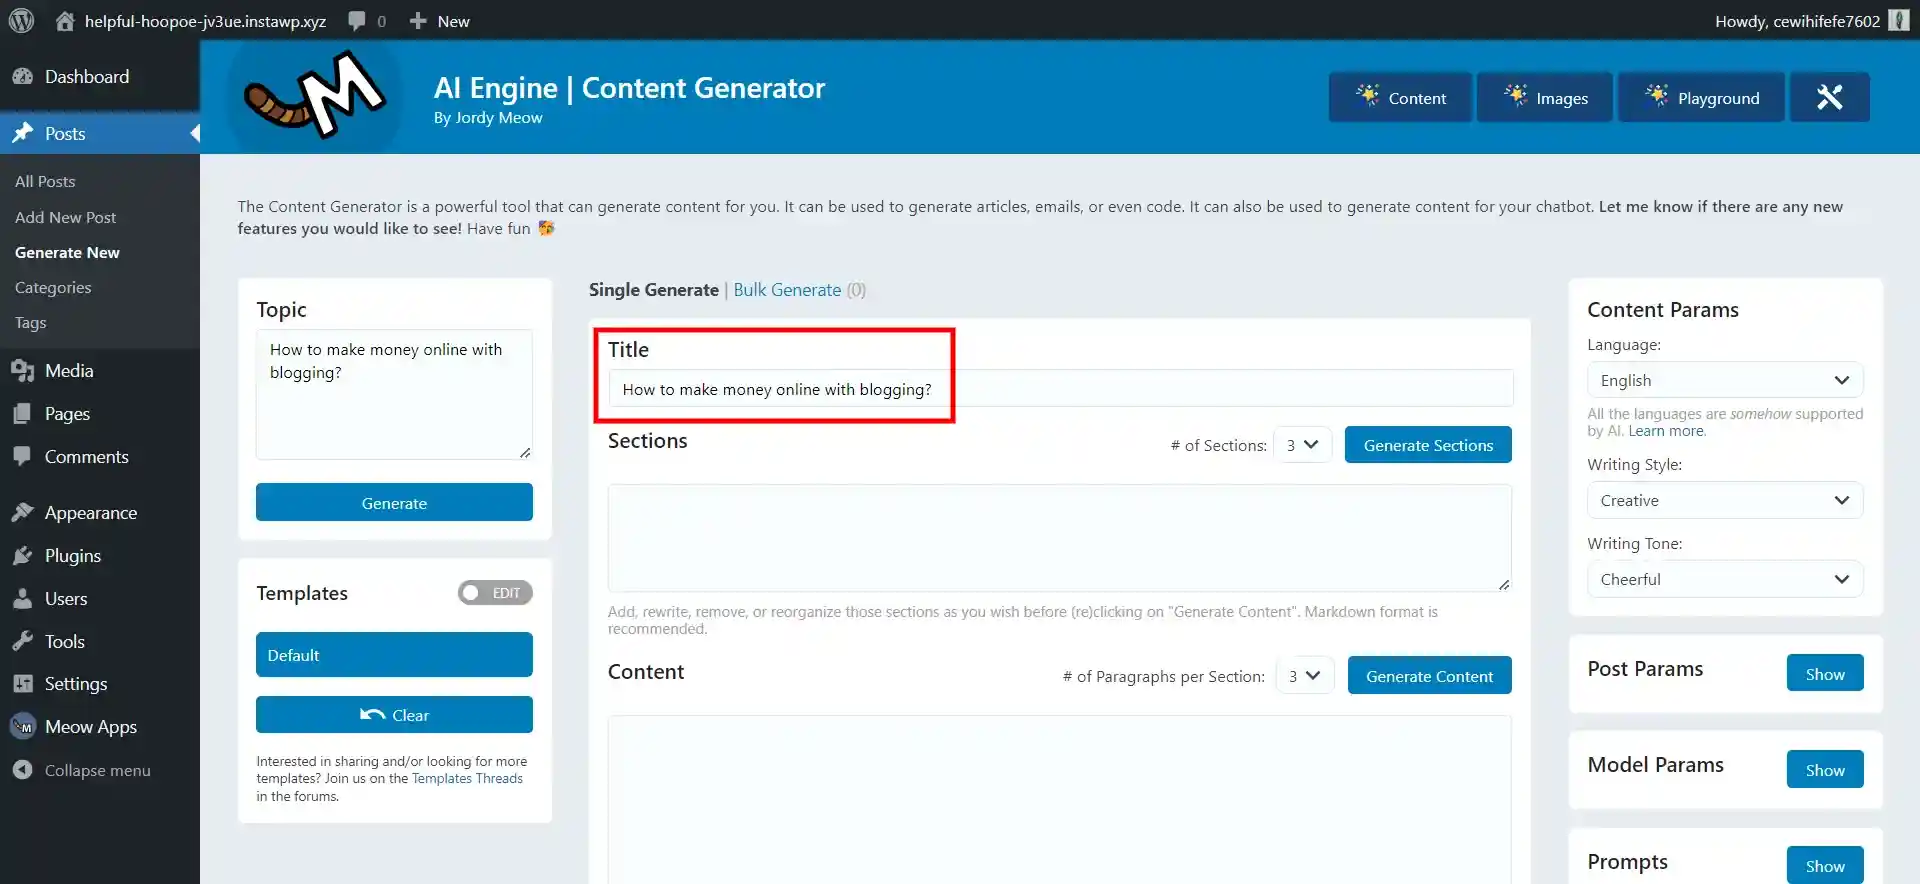
- Topic: First of all, you should outline the subject matter which you would like to write about.
- Templates: Create new templates using the information obtained in the new setup.
- Title: Type in a heading for the content, or allow the topic box to do it instead.
- Sections: Rewrite input text with ChatGPT or let the AI write it on your behalf.
- Content: That’s when the whole body of your content springs into action.
- Excerpt: This will serve as your post’s excerpt.
- Select Between Posts and Pages: Choose your desired content type.
- Create Post Button: This is your go when you are ready to generate content.
- Content Parameters: Change the vocabulary, writing fashion, and tone of your content.
- Post Parameters: Do you intend to write for posts or pages?
- Model Parameters: Customize your content generation by adjusting parameters like temperature, max tokens, and a chosen model.
- Prompts: Save prompts and variables for template review, easy reusability.
- Usage Cost: Monitor your expenditure in creating current content.
Step 3: Generating Content With AI Engine
- Define Your Topic
First, introduce your topic of interest. Let’s say we have “How to Make Money with ChatGPT” as our demo topic and after that, you hit “Generate.”
2. Let the magic do its work – AI Engine
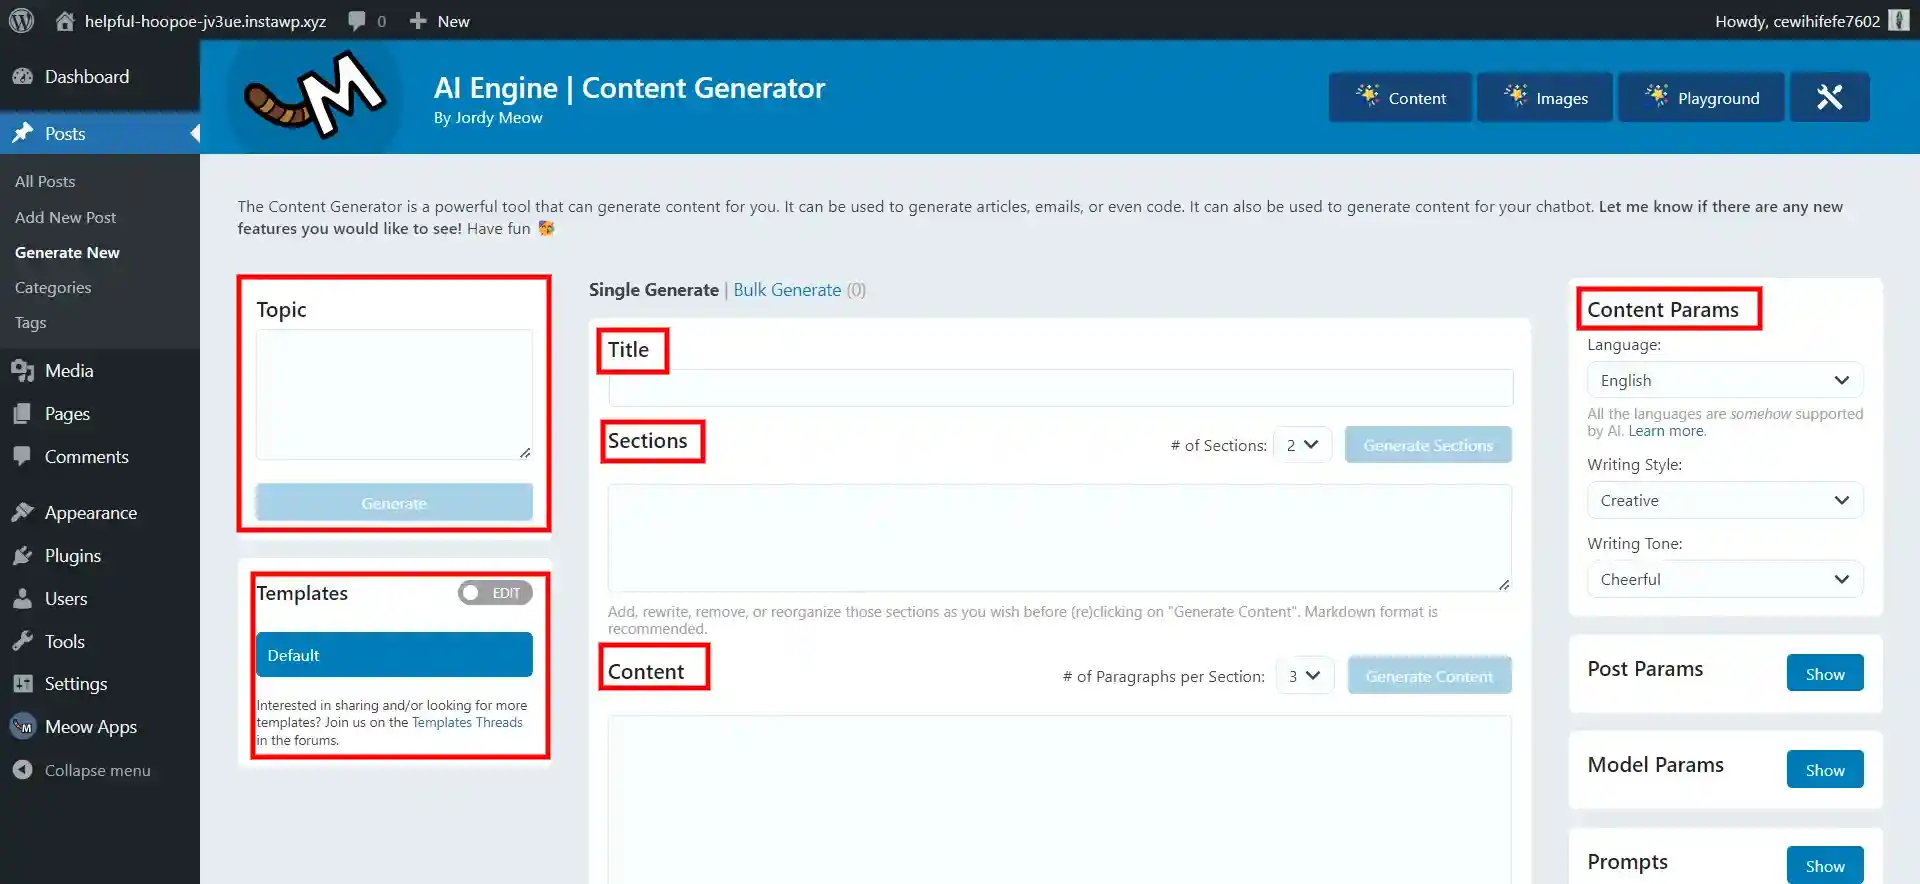
Upon clicking “Generate”, the AI engine produces a title for your topic. Now comes sectioning. Determine how many parts will be there. However, for this tutorial, we shall choose 3. By clicking on “Generate Sections,” Chat GPT will come up with them and effortlessly embed them into the page.
3. Craft the Content
Finally, you have to choose how many paragraphs each section requires. Two paragraphs per section is a good option for our example. It depends on the portion that you buy and it will take about one to two minutes. Start it by clicking on “Generate Content”.
4. Craft an Excerpt
Depending on your wishes, create a summary of your post by picking it up in the adjacent text. That can be accomplished by clicking on generate excerpt.
5. Choose Your Content Type
Finally, determine if you would like your new content to be added as a post or a page. Then we’ll click “Posts”, and finally, “Create post”. You will also create a draft post for yourself which you can subsequently amend or include photos in before going online.
Step 4: Adding a Chatbot to WordPress
Using this tool only takes a few seconds and gives your site an intelligent chat assistant. You can use this chatbot to lead your customers, answering their queries and directing them towards relevant goods and services.
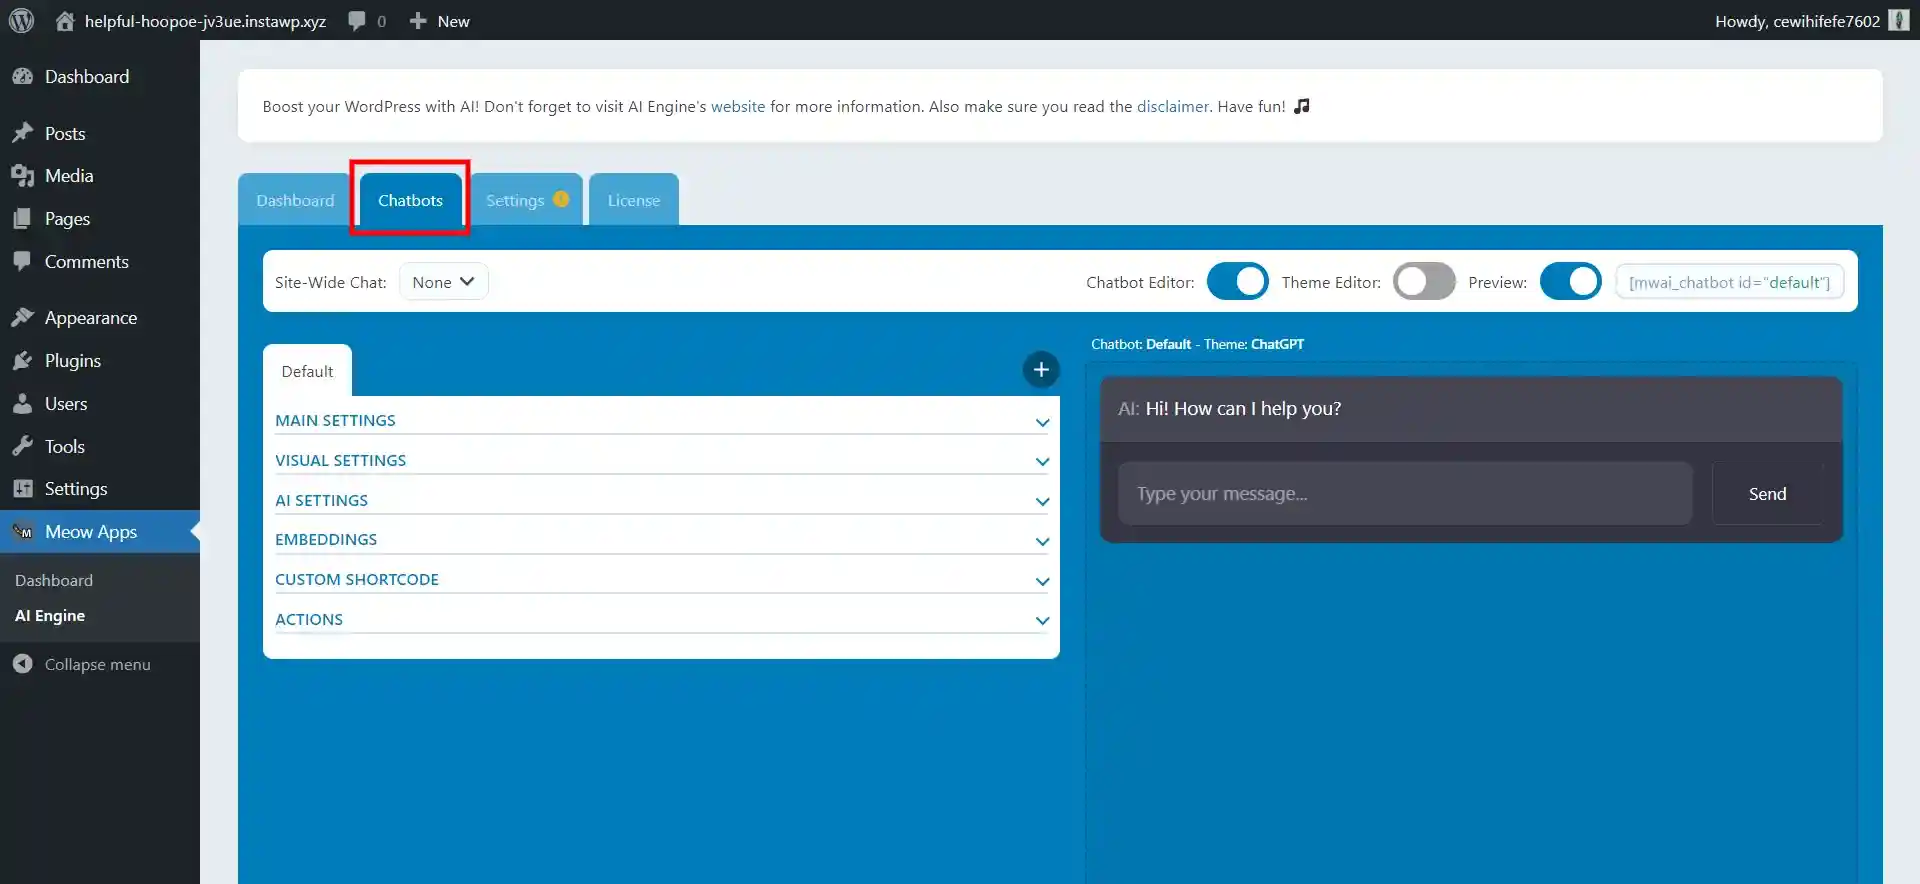
AI Engine offers a prebuilt chatbot that you can implement onto your site by just pasting a snippet of code. You can also personalize it more to make it appear, go into full-screen mode, and match your website style. However, it is a very effective and straightforward technique for improving interactions on your site and offering great customer care.
Want to create a Gravatar for WordPress? Read, How to create a Gravatar for WordPress?( A Simplified Guide)
Top ChatGPT Plugins for WordPress
Here is the list of ChatGPT plugins to integrate ChatGPT into the WordPress website.
1. AISEO
Have you ever faced an experience where you thought that SEO was confusing as part of a puzzle? AISEO is a tool that has been described as its star player to enhance your website’s SEO with other features like content recommendation, ranking, and tracking amongst others.
Think about all those moments in time when you were forced to type a catchy title and an engaging meta-description which later did not produce any tangible results in terms of conversion rate. If you get AIOSE0, it’s as if a superhero flies into your head creating great brain-born ideas for you.
With the AISEO plugin to integrate ChatGPT into the WordPress website, there will be no more struggling with writer’s block and wasting too much of your time on these matters.
Looking for an easy way to add a testimonial block using Elementor? Check out, How to Create an Attractive Testimonial Block In Elementor? ( 2 Easy Methods)
2. Elementor AI
Elementor AI is a great feature within the Elementor webpage editor that has the potential to turbocharge your webpage’s content and appearance. Using this AI writing assistant, you will easily write fresh and good-quality content that will keep your site styled in one line, matching your corporate identity.
In addition, Elementor AI has a useful Code Assistant that enables the generation of custom code using CSS and HTML snippets for anyone with zero programming skills. Integrating with Elementor will improve the productivity level of your web development as well as enhance the content creativity, reading easiness, and styling such that the content generated is almost undiscoverable in human writing.
Considering Everything
ChatGPT can handle many tasks from generating post ideas to final execution. When you integrate ChatGPT into the WordPress website, you are unlocking a whole new world of possibilities to grow your business. It significantly saves your valuable time and costs and simplifies your routine workflows.
We hope this blog has helped you integrate ChaGPT into the WordPress website, also read our detailed guide on How to Display “This Site Uses Cookies” Cookie Notice in WordPress?, Setting Up FrontPage And Post Page – Best Explained in 5 mins and How to Properly Move Your Blog From WordPress.com to WordPress.org? (4 Easy Steps)
Stuck Somewhere?
Connect With JustHyre
Hire WordPress Engineers for custom jobs like Website Customization, SEO Optimization, Clearing a Hacked Website, Installation & Configuration & more.
Connnect with JustHyre


0 Comments