How to Add A Ticketing System In WordPress? (4 Easy Steps)
Want to create a ticketing system in WordPress?
A good ticketing system helps you manage your user’s questions, issues, and inquiries. No matter if you run an eCommerce shop or maintain a monthly blog, you need a good ticketing system to answer all your questions.
In this blog, we have shown an easy way by which you can create a ticketing system in WordPress. But before that let’s have a look at what exactly is a ticketing system and why you need that.
What Is the Ticketing System in WordPress and Why Use It?
A WordPress ticketing system helps to handle users’ multiple inquiries, for direct support requests, and to keep support inquiries organized and in one convenient location. Most ticketing systems let you create tickets from an admin side and let customers create their tickets from a form. Sometimes, you can even turn your comment section into a ticket. The best out of all the ways is how other channels like social media become your ticketing system.
A good ticketing system in WordPress acts as a good support system that can help you notice and gather important information about what your customers need and want from you and your business. This can also help you make many data-driven decisions for your business which will help your business grow.
There are many advantages to the ticketing system in WordPress. A few of them are listed below.
1. Offer Better Communication
A ticketing system helps you keep your eye on who registered, bought, and canceled tickets to your email. This way, you can send follow-up emails to them and can also send reminder emails to users to leave the process incomplete at registration. This type of information will help them guide about the event and its registration and users can find most of the information about the events.
2. Automate the Entire Process
With the ticketing system in WordPress, you can send personalized and automatic email confirmations to your attendees. A good event ticketing system through a ticket-selling plugin can help you attach e-tickets in PDF forms with the necessary details. This way, users can download them based on their convenience and you don’t have to send them tickets again and again.
3. Better Support System
As mentioned above, you convert your comment box to a ticketing system in WordPress with just one click. This will help you communicate better with your audience and understand their point of perspective. Using the collected data, you can improve your marketing strategies and see if your customers are happy or not.
How to Create a Ticketing System in WordPress?
Many different ticketing plugins help you set up a good ticketing system in WordPress. Here, in this tutorial, we have used the Awesome support plugin, a WordPress support ticket plugin as it is very user-friendly and feature-rich.
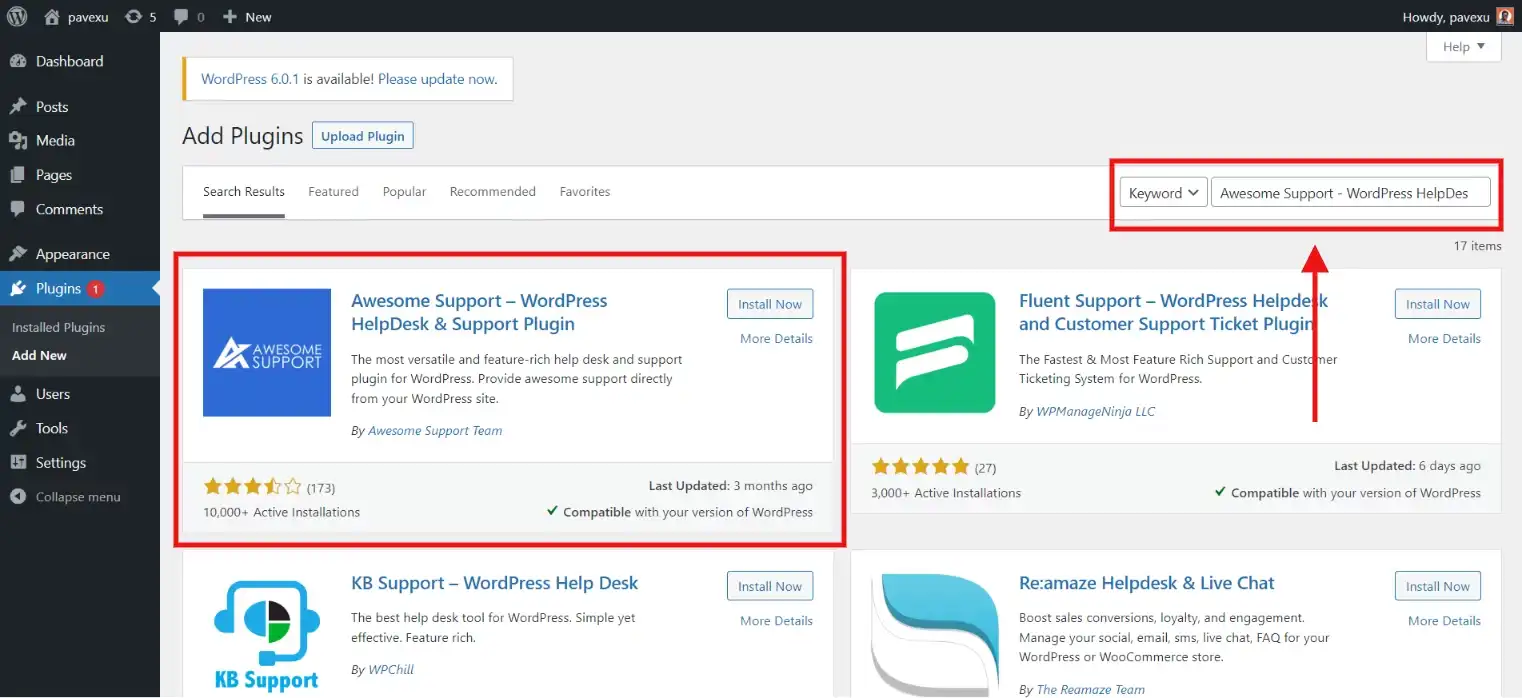
Step 1: Install the Plugin
Go to the “Plugins > Add New” on the WordPress dashboard and search for “Awesome Support – WordPress HelpDesk & Support Plugin”. Download the one published by the Awesome Support Team and click on “Activate to activate the plugin.
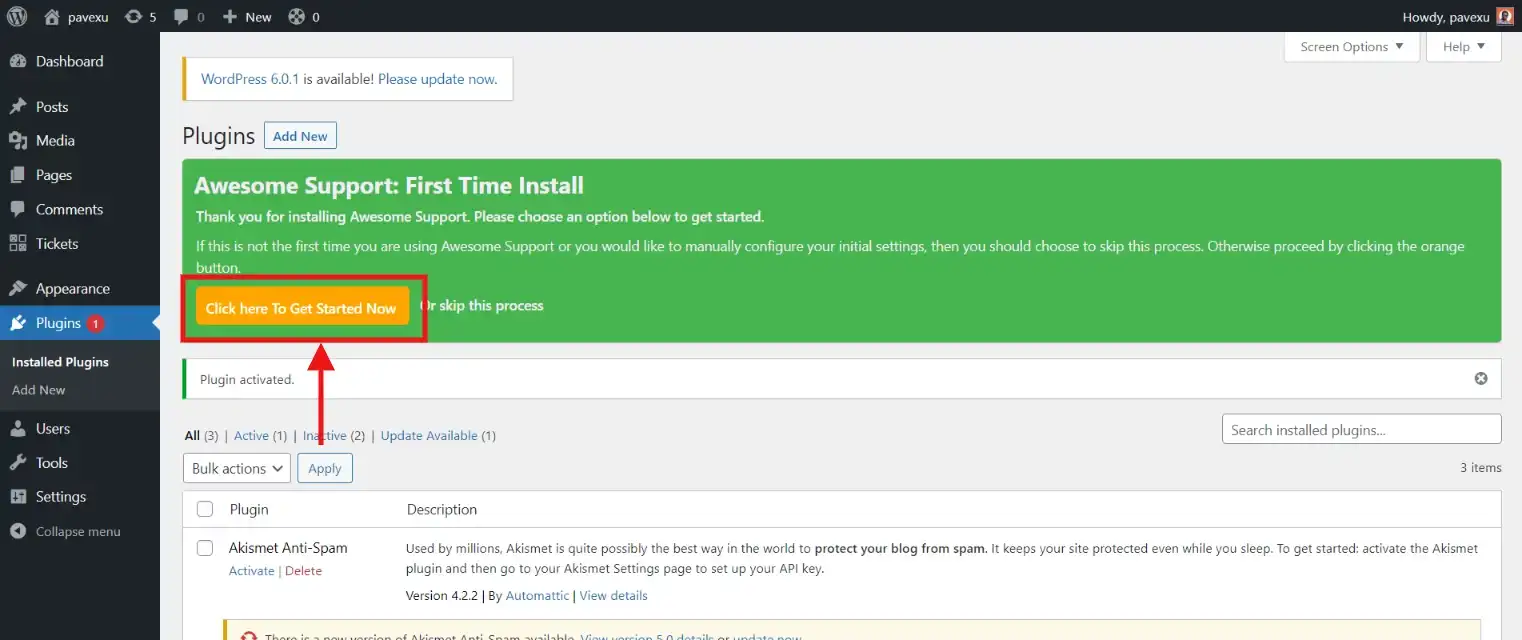
Step 2: Configure the Plugin
Once done with the download and activation, click on the “Get Started” button. This will guide you through the setup process.
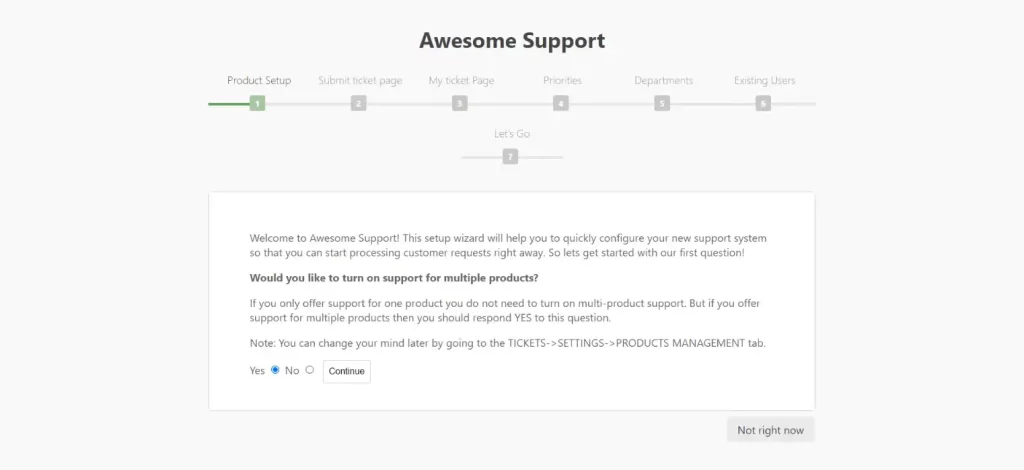
Next, you will see a window named “Product Setup”. Here, you can select whether you want to activate the support for multiple products. If you have an eCommerce shop, you might want to activate this option. You can control which product the support should be shown. And if you don’t want to show it on multiple products then check “No” and select “Continue”.
Next, you will be taken to your next page where you can select when can a customer access when they want to submit a support ticket. We suggest you add these to one of your menus as it would be easily accessible to your users.
From the drop-down, select the menu where you would like to add your WordPress support ticket system and continue.
This page will help you locate the support tickets your users have submitted. Select the menu from the drop-down and go ahead. If you want to change the settings sometime later, you can easily do that from Appearance > Menus.
If you wish to assign priorities to your ticket, then you can do that from the “Priorities” tab. This can be helpful if your company has multiple departments and you want to connect your users to different departments based on their submissions. Next, click on Continue and you will take to the “Departments” tab.
If you have existing users then you can handle them with that option. But if you don’t have any existing users on your site then you can skip this step and move ahead.
After all the steps you will see a pop-up screen with a success message.
Step 3: Test a Support Ticket
Once done with the configuration, you are almost ready to publish your ticket. But before publishing, we suggest you test it once and check if everything is according to your requirements.
To test the support ticket on the front end, click on “Submit Ticket” and log in. if a new user, then register yourself. Next, fill in the necessary details and click on “Submit Ticket”.
Step 4: Reply to Support Ticket Submissions
Now, you might need to reply to the tickets your users have submitted. For that, click on the ticket you want to respond to and then enter your reply into the editor.
Here, you can also change the status of the ticket to New, In Progress, or On Hold. Once you close the ticket, it will be removed from the All Tickets section.
And there your ticketing system in WordPress will be all set.
Wrapping Things Up
And that’s it for this blog. We hope this has helped you create a ticketing system for your WordPress website. Just like the Awesome Support, there are a few other amazing WordPress helpdesk plugins like,
- Heroic Solution: Amazing sales, customer support, partnership, and other inboxes. Easy to connect with Gmail and GSuite.
- WordPress Advanced Ticket System: Unlimited custom fields, ticket visibility customization, basic reporting, and easy-to-export tickets.
- SupportCandy: easy to create tickets without creating an account, unlimited tickets, agents, private notes, and service level agreements.
This was a detailed guide, but if you still find it difficult to create a ticketing system, then you can hire WordPress engineers from JustHyre.
If you like reading this blog, also read our other blogs on topics like How to Add Text on Images in WordPress? (3 Easy Methods) and How to Add a Bitcoin Payment Gateway to a WordPress Website? (4 Easy Steps)
Stuck Somewhere?
Connect With JustHyre
Hire WordPress Engineers for custom jobs like Website Customization, SEO Optimization, Clearing a Hacked Website, Installation & Configuration & more.
Connnect with JustHyre
0 Comments